
Guía Práctica para la Fabricación Manual de Ladrillos de Cemento: Desde la Mezcla hasta la Obra Maestra
En el mundo de la construcción, los ladrillos de cemento son los héroes anónimos: duraderos, asequibles y sumamente versátiles. Para proyectos comerciales a gran escala, el rugido de la maquinaria automatizada es la banda sonora estándar. Pero existe otro camino de producción, más silencioso: la máquina manual para fabricar ladrillos de cemento. Esta herramienta atemporal es la columna vertebral de pequeños negocios, iniciativas comunitarias y proyectos de bricolaje en todo el mundo, ofreciendo una independencia inigualable y un funcionamiento de bajo costo.
Esta guía integral sirve como tu manual definitivo. Iremos más allá de la teoría básica hacia conocimientos prácticos y paso a paso, cubriendo operación, beneficios y las mejores prácticas de la industria. Ya sea que estés lanzando una microempresa o construyendo el muro de tu propio jardín, dominar esta máquina es una habilidad fundamental. Construyamos tu conocimiento desde los cimientos.
Comprensión de las Máquinas Manuales para Hacer Ladrillos de Cemento
¿Qué es una Máquina Manual para Hacer Ladrillos de Cemento?
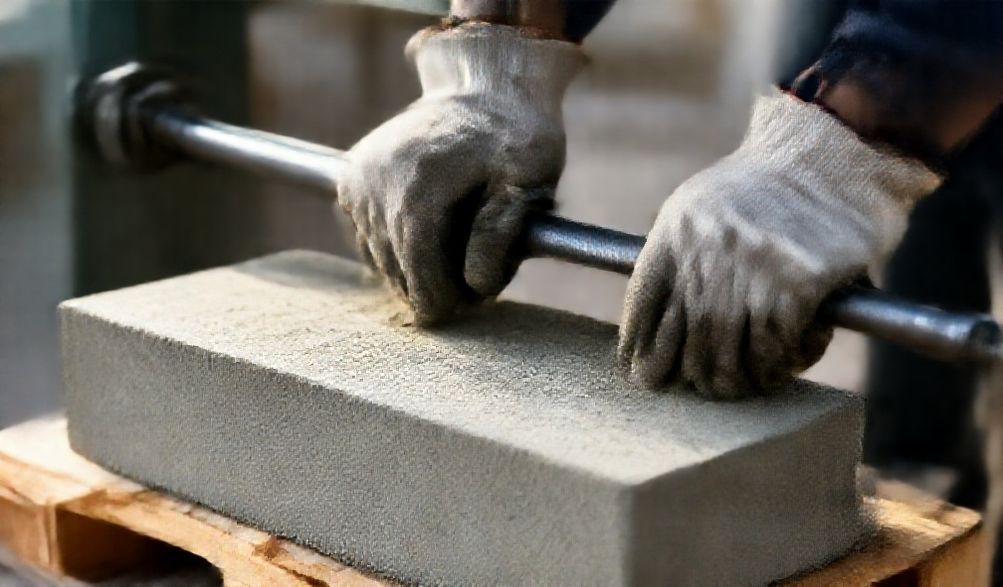
Una máquina manual para fabricar ladrillos de cemento es un dispositivo accionado por humanos diseñado para comprimir una mezcla específica de cemento, arena y agregados en un ladrillo sólido y con forma, utilizando palanca mecánica. No requiere electricidad, diésel ni sistemas hidráulicos. La fuerza física del operador, amplificada a través de un sistema de palancas, proporciona toda la compresión necesaria. Esto hace que la máquina sea inherentemente portátil, económica e ideal para ubicaciones fuera de la red.
Componentes Clave y Sus Funciones
Comprender la anatomía de tu máquina es el primer paso hacia la destreza. Cada parte desempeña un papel fundamental.
- Marco:El robusto esqueleto de acero que proporciona estabilidad y alberga todos los demás componentes. Debe soportar una fuerza repetitiva significativa.
- Molde/Cámara:El corazón de la máquina. Esta cavidad define la forma, tamaño y diseño final del ladrillo (macizo, hueco, de enclavamiento). Normalmente está hecha de acero endurecido para mayor durabilidad.
- Palanca de Compresión/Manija:El brazo largo que te da ventaja mecánica. Al presionar hacia abajo esta palanca, multiplicas tu fuerza para compactar la mezcla cruda a fondo.
- Cabeza de Alteración:La placa unida al mecanismo de compresión que presiona directamente sobre la mezcla de concreto dentro del molde.
- Mecanismo de Eyección:Una palanca o placa separada que empuja cuidadosamente el "ladrillo verde" recién formado fuera de la cavidad del molde sin dañarlo.
- Placa Base:La superficie plana y estable donde ocurren los procesos de moldeo y expulsión. Asegura que el ladrillo se forme en un plano nivelado.
Tipos de Ladrillos que Puedes Producir
La versatilidad de una máquina manual radica en los moldes intercambiables. Puedes producir varios tipos de ladrillos para diferentes aplicaciones.
- Bloques de Concreto Sólidos:El estándar, el caballo de batalla denso para muros generales portantes y no portantes.
- Bloques Huecos:Cavidades características que reducen el peso y el uso de material, mejorando al mismo tiempo el aislamiento térmico y acústico. Común en muros divisorios.
- Ladrillos de Interconexión:Diseñados con ranuras y protuberancias para que encajen entre sí sin necesidad de mortero. Perfectos para pavimentación, muros de contención y algunos sistemas de paredes, acelerando la construcción.
- Adoquines:Ladrillos más pequeños, gruesos y a menudo decorativos, diseñados para alta resistencia a la compresión. Se utilizan para entradas de vehículos, caminos, patios y paisajismo.
Manual de Operación Paso a Paso
El éxito depende de un proceso meticuloso y repetible. Sigue estas fases en orden.
Fase 1: Preparación y Configuración
Seleccionar la Ubicación Adecuada
Elige un sitio que sea:
* Plano y Nivelado:Crítico para producir ladrillos uniformes y para la estabilidad de la máquina.
* Terreno Firme:El suelo suave o irregular se moverá, afectando la compactación.
* Amplio: You need dedicated zones for material storage, concrete mixing, brick formation, and curing. Plan for efficient workflow.
Preparing the Raw Materials
Quality in equals quality out. Never compromise on materials.
- Cemento: Use fresh, high-quality Ordinary Portland Cement (OPC) or Portland Pozzolana Cement (PPC). Check the manufacturing date and store bags off the ground in a completely dry place.
- Arena Use clean, sharp, well-graded river sand or machine-made crushed stone sand. It must be free of silt, clay, and organic matter. Dirty sand drastically reduces brick strength.
- Aggregate: For higher-strength bricks, incorporate a small, clean aggregate (like 6-10mm stone chips). This adds density and compressive strength.
- Agua: Always use clean, potable water. Impurities can interfere with the cement hydration process.
Determining the Mix Ratio
The ratio is the recipe for your brick’s strength. A standard, reliable mix for general-purpose bricks is:
1 part cement : 6 parts combined sand/aggregate blend (by volume).
- For higher strength (e.g., for pavers or load-bearing walls), use a richer mix like 1:4 or 1:5.
- Crucial Tip: Always conduct a small test batch first. Local material characteristics can vary, so adjust slightly if needed.
Mixing the Concrete
Proper mixing ensures uniform strength throughout every brick.
- Dry Mixing: On a clean, hard surface or in a mixing tray, thoroughly combine all dry materials (cement, sand, aggregate) until the color is completely uniform. No streaks of pure cement should be visible.
- Adding Water: Create a crater in the center of your dry pile. Gradually add clean water while turning the mix over. The goal is a “moist” consistency—the mixture should hold its shape firmly when squeezed in your hand without water dripping out. Too wet weakens the brick; too dry prevents proper bonding.
Phase 2: The Brick Making Process
Loading the Mold
- Prepare the Mold: After the last brick, always clean the mold cavity. Before loading, lightly coat all interior surfaces with a release agent (used motor oil diluted with diesel, or a commercial mold oil). This prevents sticking.
- Fill in Stages: Do not dump the entire mix in at once. Fill the mold cavity in two or three layers. Slightly overfill each layer.
Compacting the Mix
This is the most critical step for strength.
- Precompactación: For each layer, use the tamper head or a hand trowel to initially press the material down, ensuring it spreads into all corners of the mold.
- Final Compression: Engage the main compression lever. Apply firm, steady, and full pressure. You should feel significant resistance. Consistent, high compaction is non-negotiable for producing dense, durable bricks. Ensure the lever is fully engaged to its end point.
Ejecting the Green Brick
- Gentle Ejection: Carefully operate the ejection mechanism. The freshly formed brick, now called a “green brick,” should slide out smoothly onto a prepared, level pallet or plywood sheet.
- Handle with Care: Green bricks have only “green strength.” They are incredibly fragile. Move the pallet, not the individual brick, to the curing area.
Phase 3: Curing and Drying
Curing is not merely drying; it’s the chemical process that gives the brick its strength. Neglecting this ruins good work.
Initial Setting
Allow the green bricks to remain untouched on their pallets in a shaded, protected area for 24-48 hours. This lets them gain enough strength to be handled.
The Curing Process
For optimal strength development, bricks require moisture for an extended period. The target is 21-28 days of controlled curing.
- Método: Stack the bricks and cover them completely with damp burlap sacks, tarps, or plastic sheeting. The goal is to trap moisture.
- Maintenance: Check the covers at least twice daily. They must remain damp. Sprinkle water as needed. This slow, moist environment allows cement to fully hydrate, maximizing final strength and weather resistance.
Final Drying
After the curing period, remove the covers and allow the bricks to air-dry completely in a shaded, well-ventilated space. Only then are they ready for construction use.
Advantages of Using a Manual Machine
Why choose a manual machine in an automated world? The benefits are compelling for the right user:
Rentabilidad y Baja Inversión
The upfront cost is a fraction of that for electric or hydraulic machines. With no fuel or power bills, the operational overhead is virtually zero, offering an exceptionally low barrier to entry for entrepreneurs.
Portability and Independence from Power
Carry it in a pickup truck or trailer. Operate it in a remote village, a backyard, or a site without grid connection. This independence is its superpower.
Ideal for Small-Scale Production and DIY Projects
It’s the perfect tool for on-demand production. Whether you’re building a home extension, a garden shed, a community toilet block, or a landscape wall, it puts control directly in your hands.
Essential Maintenance & Troubleshooting Guide
A well-maintained machine lasts for years and produces consistent results.
Daily and Weekly Maintenance Checklist
- After Each Use: Clean the mold, tamper head, and base plate with water and a stiff brush to remove concrete residue.
- Weekly Inspection: Check for wear on the mold edges, lever pivot points, and the tamper head. Look for cracks or bends in the frame.
- Lubrication: Apply a few drops of light oil to all moving joints, pivots, and the ejection mechanism. Lightly oil the mold surface before storage to prevent rust.
Common Problems and Solutions
-
Problem: Bricks break when ejected.
- Solución: The concrete mix is too dry, or compaction was insufficient. Increase water slightly to the “moist” consistency and ensure you apply full lever pressure every time.
-
Problem: Bricks stick to the mold.
- Solución: The mold was not properly oiled, or the mix is too wet. Clean the mold thoroughly, apply fresh release agent, and reduce the water in your mix.
-
Problem: Bricks are weak or crumbly.
- Solución: Likely causes are an incorrect mix ratio (too little cement), poor curing (drying out too fast), or contaminated sand. Re-check your measurements, and be religious about the 21-day moist curing process.
-
Problem: Brick dimensions are inconsistent.
- Solución: This points to a worn mold or inconsistent filling/compaction technique. Inspect the mold for damage. Follow a strict, repeatable process for loading and compacting each layer.
Maximizing the Lifespan of Your Machine
Store it under cover, protected from rain and direct sun. Never use excessive, jarring force or try to modify the levers. Respect the machine’s design limits.
Safety Protocols for Operators
Safety is paramount when working with heavy materials and mechanical force.
Personal Protective Equipment (PPE)
Always wear:
* Sturdy Gloves: To protect hands from abrasion and cement.
* Safety Glasses: To shield eyes from flying debris or cement dust.
* Dust Mask/Respirator: Essential when handling and dry-mixing cement to prevent inhalation of fine particles.
* Steel-Toe Boots: To protect feet from dropped materials or the machine itself.
Safe Operating Procedures
- Ensure the machine is on stable, level ground before starting.
- Keep hands and fingers clear of the mold cavity, tamper head, and compression lever’s path during operation.
- Use proper lifting techniques—bend your knees, keep your back straight—when handling bags of cement or stacks of cured bricks.
Handling Cement and Raw Materials
- Avoid prolonged skin contact with dry cement mix, as it can cause irritation, dryness, or dermatitis.
- Work in a well-ventilated area, especially during the dry-mixing phase.
FAQ: Your Questions Answered
Q1: What is the typical production output of a manual machine?
A: Output depends heavily on operator skill, brick size, and workflow efficiency. A skilled, organized operator can typically produce between 80 and 120 standard bricks in an 8-hour workday.
Q2: How long must the bricks cure before they can be used?
A: For structural applications, a minimum moist curing period of 21 to 28 days is essential. Bricks can be carefully moved after 48 hours of initial setting but will only reach a fraction of their design strength. Full strength develops over the full curing timeline.
Q3: Can I use a manual machine to make interlocking bricks for walls?
A: Yes, absolutely. Many manual machines offer specialized interlocking block molds. These are excellent for constructing mortar-less garden walls, sheds, boundary walls, and other structures where a rustic or efficient design is desired.
Q4: What is the main difference in strength between manual and hydraulic machine bricks?
A: Hydraulic machines apply immense, calibrated pressure (measured in tons), producing bricks with very high density and uniform compressive strength. Manually made bricks, when produced with perfect technique and curing, are entirely suitable for low-rise residential, agricultural, and landscaping applications. The difference is in the consistency and upper limit of strength achievable.
Q5: Where can I buy a reliable manual brick making machine?
A: Seek out reputable local construction equipment dealers or established online marketplaces and manufacturers. Prioritize suppliers with positive customer reviews, clear warranty terms, and ready availability of spare parts (especially molds). Always ask for detailed specifications and, if possible, request a live demonstration or video of the machine in operation.
Conclusión
Mastering the manual cement brick making machine is more than learning a process; it’s embracing a philosophy of self-reliance and practical craftsmanship. By meticulously following the steps outlined in this guide—respecting the science of mix ratios, the art of compaction, and the discipline of curing—you transform raw materials into building blocks of lasting value.
This machine represents a gateway to sustainable, small-scale enterprise and empowered DIY construction. Remember, your success is built on the details: the consistency of your mix, the patience of your curing, and the care of your maintenance. Start with small test batches, apply these expert principles diligently, and you will lay a solid foundation for your projects, one perfectly formed brick at a time.
Authoritative Note: This guide synthesizes standard construction material practices and small-scale manufacturing principles. For critical structural projects, always consult a civil engineer and adhere to local building codes and material standards.
<