
Cómo Hacer Bloques de Cemento: Una Guía Paso a Paso para Aficionados al Bricolaje y Constructores
Observa cualquier sitio de construcción, patio trasero suburbano o complejo industrial, y los verás. Los bloques de hormigón, más precisamente denominados Unidades de Mampostería de Concreto (CMU, por sus siglas en inglés), son los héroes anónimos del entorno construido. Desde muros de cimentación y soportes estructurales hasta camas elevadas de jardín y chimeneas exteriores, su versatilidad y durabilidad no tienen igual.
¿Pero alguna vez te has preguntado cómo se fabrican estos omnipresentes bloques de construcción? Ya seas un entusiasta del bricolaje que contempla un pequeño proyecto de jardín, un granjero que busca ser más autosuficiente o simplemente alguien a quien le encanta entender cómo funcionan las cosas, esta guía es para ti.
Elaborado a partir de principios establecidos de ciencia de materiales y metodología de construcción, esta guía integral te guiará a través de todo el proceso de fabricación de bloques de hormigón. Desmitificaremos la terminología, contrastaremos los métodos de bricolaje con la fabricación industrial, y proporcionaremos un procedimiento detallado centrado en la seguridad. Aprenderás no solo el "cómo", sino el "por qué" detrás de cada paso, capacitándote para emprender un proyecto con conocimiento y confianza.
Pongamos los cimientos.
Entendiendo los Bloques de Ceniza: Más que Solo Concreto
Antes de mezclar una sola libra de cemento, es crucial entender lo que estás fabricando. El término "bloque de ceniza" es una reliquia histórica, mientras que las prácticas y normas modernas han evolucionado significativamente.
¿Qué son los bloques de hormigón (CMU)? Composición y usos comunes
Primero, aclaremos el lenguaje. Hoy en día, el término genérico correcto esUnidad de Mampostería de Concreto (CMU).
- Bloque de Cemento:Este nombre se origina a principios y mediados del siglo XX, cuando productos de desecho industrial comoCenizas de carbónocenizas volantesSe utilizaban como agregado principal. Estos bloques eran más ligeros y proporcionaban un buen aislamiento, pero generalmente eran más débiles que los bloques de hormigón modernos.
- Bloque de Concreto / Unidad de Mampostería de Concreto (CMU):Los bloques modernos se fabrican a partir de una mezcla deCemento Portland, agua y áridoscomo arena, grava o piedra triturada. Esto crea una unidad más densa y resistente, adecuada para una amplia gama de aplicaciones estructurales y no estructurales.
Los usos comunes de las unidades de mampostería de concreto (CMU) modernas incluyen:
* Cimientos y muros de sótano
- Muros de carga en edificios
* Muros de contención y bordes de jardín
* Muros de privacidad, fogatas y cocinas al aire libre
* Sound barrier walls
DIY vs. Industrial Manufacturing: What You Need to Know
The blocks you buy at a lumberyard and the ones you can make at home are worlds apart in scale, consistency, and strength.
Industrial Manufacturing is a high-tech process:
* Scale & Precision: Computer-controlled batching systems mix thousands of pounds of materials to exact, consistent ratios.
* Compactación: Steel molds are filled and subjected to intense hydraulic pressure and high-frequency vibration, forcing out air pockets and creating an incredibly dense product.
* Curado: Fresh blocks are moved to steam curing chambers, where controlled heat and humidity allow them to reach over 70% of their full strength within 24 hours.
* Control de Calidad: Every batch is tested for compressive strength (measured in PSI), dimensional tolerance, and absorption.
DIY Manufacturing is a manual, artisanal process:
* Realistic Expectations: Your homemade blocks will not match the 1,500-3,000+ PSI rating of commercial blocks. This is critical.
* Best Applications: They are perfectly suitable for non-structural, non-load-bearing projects where building codes are not a factor. Think garden edging, planter boxes, or a simple backyard bench base.
* Key Differentiators: Your strength will depend on manual mixing, hand compaction, and ambient air curing, leading to more variability between blocks.
Essential Materials and Tools for Making Cinder Blocks
Success hinges on having the right ingredients and equipment. Don’t cut corners here.
The Concrete Mix: Getting the Proportions Right
The “recipe” is simple, but the proportions are sacred. A standard mix for DIY blocks is:
- 1 part Portland Cement: The binding agent. Use fresh, Type I/II general-purpose cement.
- 3 to 5 parts Aggregate: This provides bulk and strength. A well-graded mix is best.
- Use a “concrete sand” (a coarse, gritty sand) mixed with small pea gravel (3/8″ or smaller).
- Avoid using only fine “play sand,” as it creates a weaker, more brittle mix.
- Agua: The activator. Use clean, potable water.
The Golden Rule: Add water gradually. You are aiming for a “low-slump” concrete—it should be moist and hold its shape when squeezed in a gloved hand (like damp soil), not soupy or runny. Excess water creates voids as it evaporates, drastically reducing final strength.
Must-Have Equipment: From Molds to Mixers
For the DIY Workshop:
- Block Molds: You can purchase plastic or steel CMU molds online, or build sturdy wooden forms. A standard “8x8x16″ block is actually 7 5/8″ x 7 5/8″ x 15 5/8” to account for mortar joints.
- Mixing Vessel: A large, sturdy wheelbarrow or a concrete mixing tub.
- Mixing Tools: A masonry hoe or a shovel. For larger batches, a portable electric concrete mixer is a back-saving investment.
- Compaction Tools: A sturdy tamping rod (a piece of rebar or a 2×2 wood dowel) and a rubber mallet.
- Finishing Tools: A metal trowel or a straight piece of wood for striking off excess mix.
- Mold Release: Non-stick cooking spray, used motor oil (for wooden molds), or a commercial form-release agent.
- Safety Gear: Non-negotiable. Safety glasses, N95 respirator (for dry cement dust), heavy-duty rubber gloves, long sleeves, and sturdy boots.
- Curing Space: A flat, shaded area where blocks can sit undisturbed for weeks. Plastic sheeting or burlap sacks are needed for moisture retention.
A Glimpse at Industrial Tools: To appreciate commercial quality, know that factories use automated batching plants, conveyor belts, steel pallets, massive vibration tables, hydraulic rams, and computer-controlled steam kilns.
The Step-by-Step Process of Making Cinder Blocks
This is where theory meets practice. Patience and attention to detail are your most important tools.
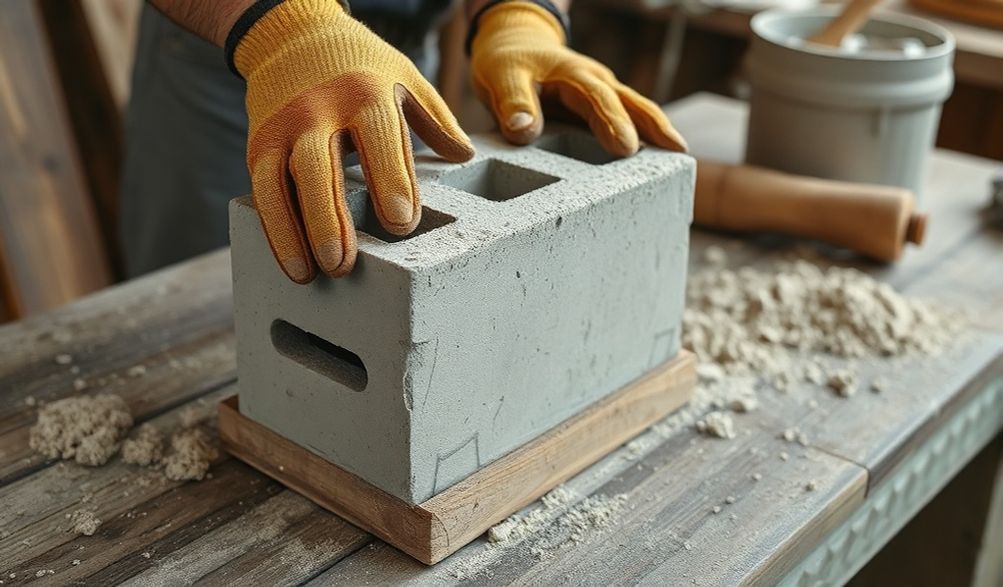
Step 1: Preparing Your Workspace and Mold
Set up on a flat, level surface like a concrete slab or packed dirt. Work in the shade if possible, as direct sun will cause the concrete to dry too quickly.
Prepare your mold:
1. Clean it thoroughly, removing any old concrete debris.
2. Apply a thin, even coat of your chosen release agent to every interior surface. This is critical for a clean demolding.
Step 2: Mixing the Concrete Thoroughly
Always start with dry ingredients.
1. In your mixing tub, combine the measured cement and aggregate. Use your hoe or shovel to mix them until the color is uniform—no streaks of gray cement or brown sand.
2. Form a crater in the center of your dry pile.
3. Slowly add about 3/4 of your estimated water. Mix thoroughly, pulling dry material from the edges into the center.
4. Continue adding small amounts of water until you achieve the proper, stiff consistency. It’s better to be slightly too dry than too wet.
Step 3: Filling, Compacting, and Striking Off
This step is the heart of making a strong block.
1. Fill in Layers: Shovel mix into the mold in two or three equal layers. Do not simply dump it all in at once.
2. Compact Each Layer: After each layer, use your tamping rod to vigorously “rod” the concrete—poke it repeatedly, especially around the edges and corners, to eliminate air pockets. For molds with a hollow core, ensure the form is centered. Tap the sides of the mold firmly with a rubber mallet to help settlement.
3. Strike Off: Once the final layer is overfilled and compacted, use a trowel or a straight piece of wood in a sawing motion to scrape off the excess concrete, leaving a smooth, flat top flush with the mold.
Step 4: Demolding and Initial Curing
Timing is key.
1. Let the filled mold sit undisturbed for 30 minutes to 2 hours, depending on temperature and humidity. The concrete should be firm enough to hold its shape but not fully hardened.
2. Carefully disassemble or lift the mold straight up and off the block. If it resists, wait longer. Do not force it.
3. Immediately move the fresh, “green” block to your curing area. It is incredibly fragile at this stage.
Step 5: The Critical Curing Process
Curing is not drying. It is a chemical reaction called hydration that requires moisture.
* La Ciencia: Cement particles react with water to form crystals that interlock and create strength. If water evaporates too quickly, the reaction stops, and the block will be permanently weak and dusty.
* The Method: Within an hour of demolding, cover the blocks with plastic sheeting or damp burlap sacks. Keep them continuously moist for a minimum of 7 days.
* The Routine: Gently mist them with water 2-3 times a day, especially in hot weather, and re-cover them. For the best results, a full 28-day curing period is ideal.
Crucial Safety and Quality Control Tips
Non-Negotiable Safety Practices
Concrete work is physically demanding and presents specific hazards.
* Respiratory Protection: Cement dust is alkaline and can irritate lungs. Always wear an N95 respirator when handling dry cement.
* Skin Protection: Wet cement is highly caustic and can cause severe chemical burns (cement dermatitis). Always wear waterproof gloves, long pants, and long sleeves. Wash skin immediately if contact occurs.
* Eye Protection: Flying debris or dust requires safety glasses.
* Lifting Technique: A single 8″x8″x16″ block can weigh over 35 lbs. Lift with your legs, not your back. Ask for help.
Ensuring Block Quality and Durability
Even with care, issues can arise. Here’s how to identify and prevent them:
- Honeycombing (Rock Pockets): Visible voids or aggregates on the surface.
- Cause: Insufficient compaction or a concrete mix that was too stiff.
- Fix: Ensure better compaction on each layer and check mix consistency.
- Cracking: Hairline or structural cracks appearing during or after curing.
- Cause: Rapid moisture loss (improper curing), improper mix (too much water), or movement during the green stage.
- Fix: Maintain constant moisture, avoid over-watering the mix, and handle blocks with extreme care for the first 48 hours.
- Surface Scaling: The surface flakes or peels away.
- Cause: Often due to freezing while saturated (if cured outdoors in cold climates) or finishing with excess water on the surface.
- Fix: Cure in above-freezing temperatures and avoid “watering in” the surface when striking off.
Simple DIY Test: After 7 days of curing, try the “tap test.” A well-cured block should produce a clear, ringing sound when struck with a hammer. A dull thud suggests internal weakness or cracking.
Frequently Asked Questions (FAQ) About Making Cinder Blocks
Q: Can I make cinder blocks at home that are as strong as store-bought ones?
A: For critical structural purposes, likely not. Commercial blocks benefit from controlled, high-pressure compaction and accelerated steam curing that are impossible to replicate at home. DIY blocks are excellent for non-load-bearing projects where extreme, code-specified PSI ratings are not required.
Q: How long does it take for a homemade cinder block to fully cure?
A: Concrete cures progressively. It will be hard to the touch in a day, achieve most of its usable strength in 7 days, and continue to strengthen for up to 28 days. The first week of moist curing is absolutely critical for achieving maximum potential strength.
Q: What is the best aggregate mix for DIY cinder blocks?
A: A combination of coarse, sharp “concrete sand” and small, smooth pea gravel (up to 3/8″) is ideal. This blend, known as a “well-graded aggregate,” packs together densely, reducing the amount of cement paste needed and creating a stronger final product.
Q: Do I need to reinforce my homemade cinder blocks?
A: Individual CMUs are not typically reinforced. In wall construction, reinforcement is added vertically through the hollow cores (with rebar and grout) and horizontally in the mortar joints (with ladder or truss wire). Solid, homemade blocks are not designed for internal reinforcement.
Q: Is it cost-effective to make my own cinder blocks?
A: For a small, personal project like a garden planter, it can be comparable, especially if you value the DIY experience. For any project requiring more than 20 blocks, the economics shift. Factor in the cost of materials, molds, your time, labor, and the risk of inconsistent quality. Purchasing commercial blocks is almost always more economical and reliable for larger-scale work.
Conclusión
Making your own cinder blocks is a profound and educational dive into one of construction’s most fundamental materials. You’ve learned that it involves far more than just pouring concrete into a form—it’s a deliberate process of understanding materials, mastering precise mixing, executing diligent compaction, and committing to the slow, essential science of curing.
While this guide provides a robust, safety-focused framework for creating blocks for non-structural projects, it’s vital to respect the engineering behind commercial CMUs. For foundations, load-bearing walls, or any project governed by building codes, professionally manufactured blocks are the indispensable standard for ensuring safety, durability, and compliance.
Ready to put this knowledge to the test? Start small. Mix a batch and create a few blocks for a garden edge or a simple base. Feel the material, learn its behavior, and experience the satisfaction of building something from the very ground up. And remember, for any project beyond decorative use, always consult your local building codes and regulations. The world is built block by block—now you know how to make your own.
<