
The Ultimate Guide to Cinder Block Molds: DIY, Types, and Pro Tips
परिचय
You’re standing in your backyard, envisioning a sturdy garden wall, a rustic fire pit, or perhaps the foundation for a new shed. You head to the hardware store and see the pallets of uniform, gray cinder blocks. They’ll do the job, but something holds you back. Maybe you want a unique color, a specific texture, or the profound satisfaction of building something from the ground up—literally. What if you could create the building blocks themselves?
यह वह जगह है जहांcinder block mold becomes your most powerful tool. While purchasing pre-made blocks is convenient, mastering the use of molds unlocks a world of customization, significant cost savings on large projects, and an unmatched sense of accomplishment. This guide is not just a collection of tips; it’s a comprehensive manual forged from industry masonry standards, material science, and hard-won DIY experience. Whether you’re a seasoned hobbyist or a curious first-timer, we’ll provide the reliable, safe, and effective knowledge you need to succeed.
We’ll walk you through everything: from understanding what a cinder block mold really is and choosing the right type, to a detailed, step-by-step DIY process and expert troubleshooting. Let’s build your knowledge, so you can build anything.
What is a Cinder Block Mold? Understanding the Basics
Before you mix a single bag of concrete, it’s crucial to understand the tool at the heart of this craft.
Definition and Core Function
A cinder block mold is a rigid, hollow container designed to form wet concrete or mortar into a specific shape—the iconic rectangular block with one or two hollow cores. Its core function is to impart shape, dimension, and surface texture to the liquid material until it cures into a solid, structural unit.
It’s important to clarify some common terminology:
* Concrete Block Mold: This is the more accurate modern term. Today, most “cinder blocks” are actually made from Portland cement and aggregates, not cinders.
* Cinder Block: This is a historical name that persists in common language. True cinder blocks, made with coal cinders, are rarely produced today.
Think of the mold as the negative space that defines your final product. The quality of the mold directly influences the quality of your block.
A Brief History: From Cinder Ash to Modern Concrete
The story of the cinder block is a lesson in industrial ingenuity. In the late 19th and early 20th centuries, as coal powered homes and industry, a byproduct piled up: coal cinders. Inventors realized these lightweight cinders could be mixed with cement and pressed into blocks, providing an affordable, insulating building material. The first molds were simple wooden boxes.
Post-World War II, the industry shifted towards more durable and readily available aggregates like sand, gravel, and crushed stone. The modern concrete masonry unit (CMU) was born, requiring stronger, more precise, and mass-producible molds made from steel. Today’s DIY and small-scale molds carry on this legacy, allowing for both standardized and custom creation.
Types of Cinder Block Molds: Choosing the Right Tool for Your Project
Selecting the right mold is your first critical decision. The material and design you choose will affect your block’s finish, the mold’s lifespan, and your overall efficiency.
Material Types: Plastic, Steel, and Polyurethane
-
Plastic Concrete Molds (Typically ABS or Polypropylene):
- सर्वोत्तम: Hobbyists, one-off projects, decorative blocks, and beginners.
- फायदे: Lightweight, affordable, often available in decorative styles (rockface, brick patterns). Easy to clean.
- नुकसान: Less durable than metal. Can warp under stress or UV exposure. Surface finish may not be as smooth as with other molds.
- Verdict: A great low-cost entry point for non-structural projects.
-
Steel Block Forms (Sheet or Cast Steel):
- सर्वोत्तम: High-volume production, professional results, and structural blocks.
- फायदे: Extremely durable and long-lasting. Provides a smooth, consistent finish. Handles the abrasion of concrete mix and vigorous vibration. The standard for reusable block molds in serious DIY and small business contexts.
- नुकसान: Heavier, more expensive, and can rust if not properly maintained.
- Verdict: The workhorse choice for anyone planning to make many blocks or who demands professional quality.
-
Polyurethane/Rubber Molds:
- सर्वोत्तम: Intricate decorative blocks, complex textures, and precise casting.
- फायदे: Excellent for capturing fine detail. Flexible, which can aid in demolding complex shapes.
- नुकसान: Less rigid, so may require a supportive “mother mold” (a rigid outer casing). Can be degraded by certain release agents.
- Verdict: The specialist’s tool for ornamental landscaping features.
Design Types: Single vs. Gang Molds
- Single-Cavity Molds: Create one block at a time. Offer maximum flexibility for custom projects where you might be changing designs or mixes frequently. Ideal for low-volume needs.
- Gang Molds: Feature multiple cavities (2, 4, 6, or more) in a single frame. They are the key to efficiency, allowing you to produce a batch of identical blocks in one pour. This ensures uniformity and dramatically speeds up production for larger projects like walls or foundations.
Specialized Mold Designs
Beyond the standard stretcher block, molds come in specialized shapes to solve specific construction challenges:
* Half-Block Molds: For creating closers to complete a course without cutting.
* Corner Block Molds: Produce blocks with one smooth end for clean corner finishes.
* Decorative Block Molds: For landscaping, featuring textures like split-face, limestone, or cobblestone.
How to Use a Cinder Block Mold: A Step-by-Step DIY Guide
This is where theory meets practice. Follow these steps closely for safe and successful results.
Step 1: Safety First and Gathering Materials
Concrete work is serious business. Protect yourself and assemble everything you need before you start.
Personal Protective Equipment (PPE) is Non-Negotiable:
* Safety glasses or goggles
* Heavy-duty rubber gloves
* Dust mask (N95 minimum) when handling dry cement
* Sturdy boots and long pants
Materials & Tools Checklist:
* Cinder block mold (cleaned and prepped)
* Concrete mix (see FAQ for ratios) or pre-mixed bags
* Release agent (form oil, non-stick cooking spray, or commercial mold release)
* Mixing container (wheelbarrow, mortar tub, or large bucket)
* Shovel or hoe for mixing
* Trowelऔरmargin tray
* Vibrating tool (a dedicated concrete vibrator, a vibrating table, or even a robust sander held against the mold)
* Level, flat curing surface (plywood covered in plastic sheeting)
* Water source and spray bottle/mister for curing
Step 2: Preparing Your Mold and Concrete Mix
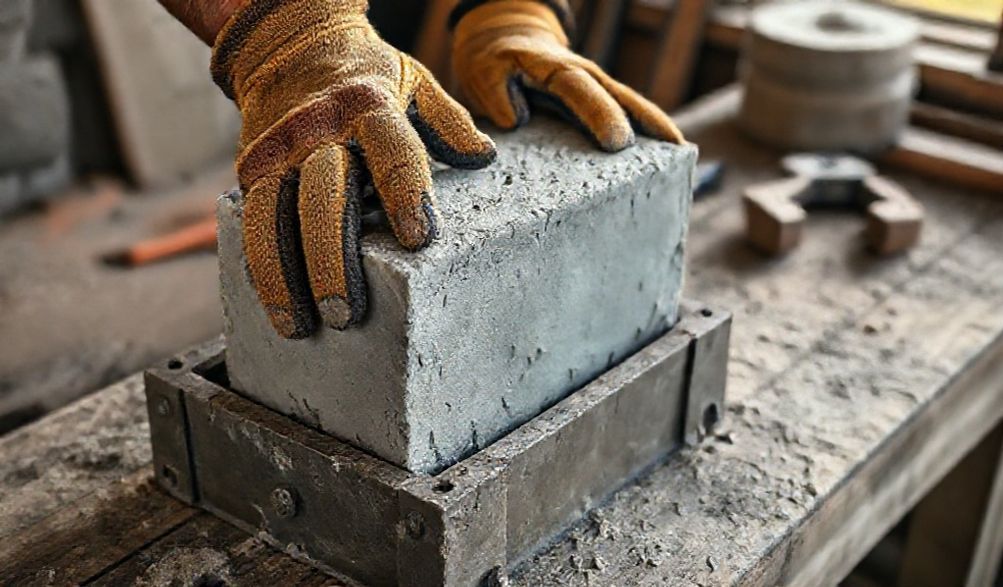
Mold Prep: This step is critical for easy demolding. Apply a thin, even coat of release agent to every interior surface of the mold. Don’t skimp, but avoid puddles. For steel molds, a light vegetable oil or diesel fuel works; for plastic, a commercial spray is often best.
Mixing Concrete: For block-making, you need a stiffer mix than for pouring a slab. It should hold its shape when squeezed but still be workable.
* If using bagged mix, add water slowly, mixing thoroughly.
* A common DIY mix ratio for strong blocks is 1 part Portland cement, 3 parts sharp sand, and 1 part fine gravel (pea gravel). Mix the dry ingredients first, then add water incrementally.
Step 3: The Pouring, Compacting, and Curing Process
- भराई Shovel your mix into the mold cavities. Use your trowel to press it into the corners. For gang molds, ensure each cavity gets an equal amount.
- Compacting (The Most Important Step): This removes air bubbles, which are the enemy of strength. Rod the mix with a stick or rebar, poking vigorously into every corner. Then, vibrate. Place your vibrating tool against the side of the mold for 10-15 seconds per cavity. You’ll see the concrete settle and a slurry (cream) rise to the top. This ensures a dense, strong block.
- Finishing: Scrape off excess concrete flush with the top of the mold using a straight edge (a 2×4 works). Smooth the top with a trowel.
- Initial Cure in Mold: Carefully move the filled mold to your protected, level curing area. Cover it with plastic to retain moisture. Let it sit, undisturbed, for 24-48 hours. Do not attempt to demold too early.
Step 4: Demolding and Post-Curing Care
- डीमोल्डिंग: After the initial set, gently disassemble or invert the mold. The block should release cleanly. If it resists, wait longer. Never force it.
- Post-Curing: The block is now “green.” It has shape but little strength. The curing process is not drying. For the next 7-28 days, blocks must stay moist. Mist them daily, cover them with wet burlap, or seal them in plastic. This allows a chemical reaction (hydration) to complete, reaching full strength. A block dried in the sun in 2 days will be brittle and weak.
Expert Tips for Perfect Blocks Every Time
Here’s the insider knowledge that separates passable blocks from exceptional ones.
Pro Mixing and Pouring Techniques
- Consistency is Key: Aim for a “moundable” mix. Make a ball; it should hold its shape with slight cracking.
- Layer and Rod: Fill the mold in 2-3 layers, rodding/vibrating each layer thoroughly before adding the next.
- Slight Overfill: Overfill the mold slightly before scraping with your straight edge to ensure a perfectly flat, full top.
Ensuring Strength and Durability
- Respect the 28-Day Cure: For any structural project, plan for a full 28-day moist cure before putting load on the blocks.
- Consider Additives: For outdoor projects in freeze-thaw climates, use a concrete mix with air-entraining agents. For faster turnaround, accelerators can reduce initial set time (but don’t shorten the full cure need).
Mold Maintenance for Longevity
- Clean Immediately: After demolding, wash the mold with water and a brush before concrete residue hardens. Never use metal tools on plastic or polyurethane molds.
- Dry and Store Properly: Ensure molds are completely dry before storage to prevent rust (steel) or mildew. Store in a cool, dry place out of direct sunlight.
- Inspect and Repair: Check for dents, rust, or residue buildup before each use. A well-maintained steel mold can last for thousands of blocks.
Common Problems and Troubleshooting Solutions
Even experts encounter issues. Here’s how to diagnose and fix common problems.
Blocks Breaking When Demolding
- Likely Cause: Demolding too soon, insufficient or no release agent, or a concrete mix that is far too weak/watery.
- Solution: Extend initial cure time to at least 48 hours. Always use a release agent. Re-check your water-to-cement ratio.
Poor Surface Finish or Pitting
- Likely Cause: Insufficient compaction/vibration (leaving air bubbles at the surface) or using a mix with overly large aggregate for the mold.
- Solution: Increase vibration time significantly. For smoother finishes, use a sand-heavy mix or a mix designed for countertops with fine sand.
Blocks Lacking Strength
- Likely Cause: Improper curing (blocks dried out instead of staying moist) is the #1 culprit. Second is an incorrect cement-to-aggregate ratio (too little cement).
- Solution: Implement a strict moist-curing regimen for weeks. Measure your dry ingredients accurately by volume, not by guesswork.
Frequently Asked Questions (FAQ) About Cinder Block Molds
Q: Can I make my own cinder block mold at home?
A: Yes, you can construct simple molds from wood or create flexible ones with silicone. However, for structural blocks that require precise dimensions, high strength, and smooth demolding, commercially manufactured steel or polyurethane molds are strongly recommended. Homemade wooden molds are best for occasional, non-critical projects.
Q: What’s the best concrete mix for cinder block molds?
A: A standard bagged concrete mix will work. For a superior finish and strength, opt for a “high-strength” or “countertop” mix with smaller aggregate. A reliable DIY mix is 1 part Portland cement, 3 parts sharp sand, and 1 part fine gravel (pea gravel).
Q: How long do blocks need to cure in the mold?
A: They need 24-48 hours to set sufficiently for careful demolding. However, they require a continuous 28-day moist cure (kept damp) after demolding to reach their full structural strength.
Q: Are homemade blocks as strong as store-bought ones?
A: They can be of comparable strength if you use the correct mix, achieve full compaction, and, most critically, execute a full 28-day moist cure. The primary advantage of commercial blocks is their consistent quality achieved through controlled, high-pressure steam curing.
Q: Where can I buy reliable cinder block molds?
A: Check specialty masonry and concrete supply stores, online marketplaces like Amazon and eBay, and industrial equipment catalogs. Read reviews closely, paying attention to comments about durability, ease of use, and the quality of the demolded block finish.
Conclusion
Embarking on the journey of making your own cinder blocks is more than a cost-saving measure; it’s a step toward true self-reliance and creative freedom in your building projects. You gain the power to customize size, texture, and color, turning a utilitarian object into an expression of your craftsmanship.
Success hinges on three pillars: choosing the right cinder block mold for your goals, following the meticulous processes of mixing, compacting, and—above all—curing, and learning from the inevitable small setbacks. This guide has armed you with the expertise, authoritative best practices, and trustworthy troubleshooting to build those pillars strong.
Now, it’s your turn. Start with a small project—a planter box, a garden edging. Feel the weight of a block you created yourself. Share your results, ask questions, and join the community of builders who start from the very beginning. The satisfaction of building with your own custom cinder blocks is a reward no store-bought bag can ever provide.
<