
The Complete Guide to Making Concrete Blocks: DIY Methods & Professional Tips
For the DIY enthusiast, the self-reliant homesteader, or the curious mind, the idea of creating your own building materials is deeply appealing. There’s a profound satisfaction in constructing something from the very ground up—literally. This comprehensive guide is written for those who want to understand the craft and science of making concrete blocks. Whether you’re planning a garden retaining wall, a small shed, or a decorative backyard feature, this article draws on proven construction principles and material science.
We’ll cover everything from material selection and mix design to molding, curing, and quality control. You’ll gain the knowledge to create strong, durable blocks safely and effectively. Important Note: While making blocks for small, non-structural projects is an achievable and educational DIY task, always consult local building codes and a structural engineer for any load-bearing applications like house foundations or critical support walls. Safety and compliance are paramount.
Understanding Concrete Blocks: Types and Applications
Before you start mixing, it’s crucial to understand what you’re making. Concrete blocks, often called Concrete Masonry Units (CMUs), are more than just gray rectangles. They are engineered building components with specific properties.
What Are Concrete Blocks (CMUs)?
At its core, a concrete block is a precast building material made from a mixture of Portland cement, fine and coarse aggregates (like sand and gravel), and water. This mixture is molded under pressure and then cured to achieve strength.
- Brief History: The widespread use of concrete blocks took off in the early 20th century, revolutionizing construction by offering a faster, more uniform, and fire-resistant alternative to traditional brick and stone.
- Why They Are Preferred: Their popularity stems from their high compressive strength, excellent fire resistance, sound dampening qualities, and potential for thermal mass (helping to regulate indoor temperatures).
Common Types of Concrete Blocks
Not all blocks are created equal. Understanding the types helps you choose the right one for your project or decide what to make.
- Solid vs. Hollow Core Blocks: This is the primary distinction.
- Hollow Core Blocks: The most common type. They have one or more large cavities (cores). These reduce weight, improve insulation, and allow for the running of reinforcing steel and grout in structural walls.
- ບລັອກແຂງ: Denser and heavier, used where maximum strength or mass is needed, such as in paving or certain load-bearing applications.
- Standard Sizes and Dimensions: The classic “8x8x16 inch” block is a nominal size. Its actual dimensions are typically 7 5/8″ x 7 5/8″ x 15 5/8″ to account for a 3/8″ mortar joint. Many other sizes exist.
- Specialized Blocks:
- Lightweight Blocks: Made with expanded clay, shale, or slate aggregates. Easier to handle and cut, with better insulation value.
- Aerated Autoclaved Concrete (AAC): A factory-made product containing air bubbles, making it very light, easy to cut, and highly insulating. Not typically a DIY block.
- Decorative Split-Face Blocks: Manufactured as a double-width block and then mechanically split to reveal a rough, natural stone-like texture.
Essential Materials and Tools for Making Concrete Blocks
Success in block-making hinges on using the right materials and tools. This isn’t a place for guesswork or shortcuts.
The Core Ingredients: Getting the Mix Right
The quality of your blocks is directly tied to the quality and proportion of your ingredients.
- Cement: This is the binder. Use fresh, general-purpose Portland Cement (Type I/II). Store bags off the ground in a dry place. Once opened, use it quickly, as it absorbs moisture from the air and loses potency.
- Aggregates: These provide the bulk and strength.
- Fine Aggregate: Sharp, clean concrete sand. It should be free of clay, silt, and organic matter.
- Coarse Aggregate: Small, clean gravel or crushed stone (typically 3/8″ or 1/2″ max size for blocks). Well-graded aggregates pack together tightly for a stronger mix.
- ນ້ຳ: Use clean, potable water. The water-cement ratio is critical. More water makes the mix easier to work with but drastically reduces final strength and increases shrinkage cracking. You want just enough to achieve full hydration of the cement.
- Optional Admixtures:
- Plasticizers/Water Reducers: Allow you to use less water while maintaining workability.
- Color Pigments: Integral pigments (iron oxides) can add color.
- Accelerators: Speed up the initial set, useful in cold weather.
Required Tools and Equipment
You don’t need a full factory, but the right tools make the job feasible and the results professional.
- For Mixing:
- Small Batches: A sturdy mortar pan and a hoe.
- Larger Batches: A wheelbarrow or, highly recommended, a portable concrete mixer (electric or gas). Consistent mixing is hard to achieve by hand.
- For Molding:
- DIY Molds: Can be built from smooth, sealed wood (like melamine-coated plywood) to your desired block size.
- Commercial Molds: Plastic or steel block molds are available online and offer better durability and release.
- ເຄື່ອງຈັກກໍ່ສ້າງບລັອກແບບມື Lever-operated machines that apply significant compaction pressure for a denser, stronger block. Ideal for serious DIY production.
- Safety Gear (Non-Negotiable): Heavy-duty rubber gloves, safety glasses, a NIOSH-rated N95 dust mask (for dry cement and sand dust), and sturdy, closed-toe boots.
- Other Essentials: Shovels for batching, a margin trowel, a sturdy tamper (a piece of 2×4 works), a straightedge for striking off excess mix, and materials for curing—plastic sheeting or a misting hose.
Step-by-Step Process: How to Make Concrete Blocks
This is the core of your project. Follow these steps methodically for the best results.
Step 1: Calculating and Batching Your Concrete Mix
First, decide on your mix design and calculate how much you need.
- Standard Mix Ratio: A reliable, strong mix for blocks is 1:3:5 (by volume): 1 part cement, 3 parts concrete sand, 5 parts gravel. For a finer, non-structural block (e.g., for a planter), a 1:4 mix of cement to sand can be used.
- Calculate Volume: Determine the volume of one block (Length x Width x Height in feet). Multiply by the number of blocks and add 10% for waste. This is your total wet concrete volume needed.
- Batching: For consistency, measure your ingredients by volume using the same bucket. For ultimate accuracy, batching by weight is used professionally, but volume is standard for DIY.
Step 2: Mixing the Concrete Thoroughly
Proper mixing is essential for uniform strength.
- Dry Mix First: In your mixer or pan, combine all the sand and gravel. Mix for a minute until uniform.
- Add Cement: Add the full amount of cement to the dry aggregates. Mix until the color is consistent, with no streaks of brown or gray.
- Add Water Gradually: With the mixer running, add about 3/4 of your estimated water slowly. Add the remaining water in small increments until you achieve the ideal consistency: a stiff, “low-slump” mix. It should hold its shape when squeezed in a gloved hand (like damp soil for packing), not soupy or crumbly.
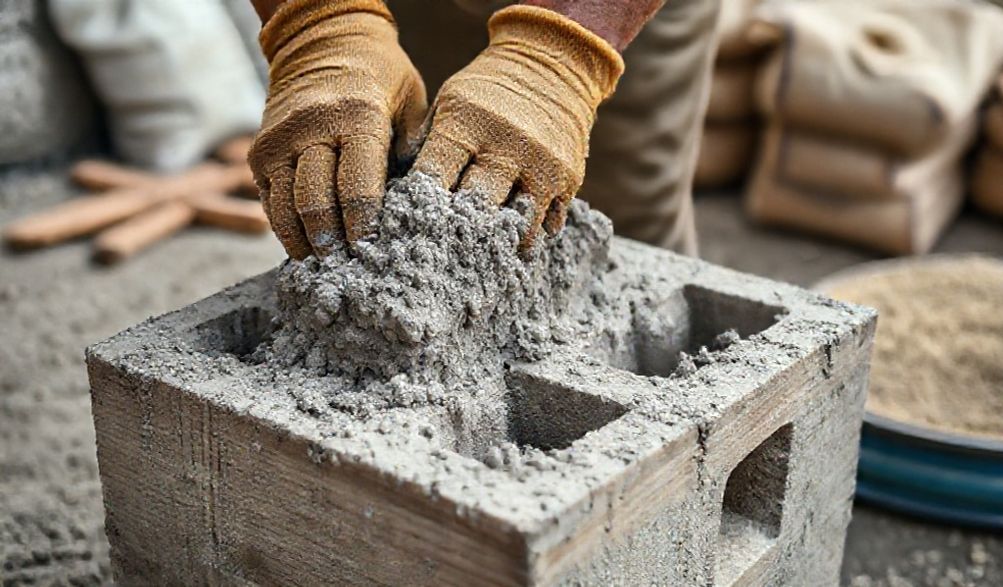
Step 3: Filling and Compacting the Molds
Density is key to strength. This step removes harmful air pockets.
- Prepare Molds: Lightly coat the inside of each mold with a form release agent (used motor oil is a traditional but messy option; commercial release agents or even a light vegetable oil spray are better).
- Fill in Layers: For hollow blocks, place a core in the mold. Shovel the stiff concrete into the mold in 2-3 layers.
- Tamp Vigorously: After each layer, use your tamper to compact the concrete forcefully. Spend significant time on this. The goal is to work out all the air bubbles until you see a slight “cream” of cement paste rise to the surface. This ensures a dense, non-porous block.
Step 4: Demolding and the Initial Set
Patience here prevents damage to your still-fragile blocks.
- Strike Off: After the final tamping, use a straightedge (like a piece of wood) to scrape off any excess concrete, creating a smooth, flat top.
- Wait for Initial Set: Carefully move the filled mold to a flat, protected curing area. Let it sit undisturbed for 18-24 hours. The concrete needs time to gain enough “green strength” to hold its shape.
- Gentle Demolding: After a day, carefully disassemble or lift the mold straight up. Handle the “green” block with extreme care—it is still very weak.
Step 5: The Critical Curing Process
This is the most important and most often neglected step. Curing is not just drying; it’s maintaining moisture to allow the chemical hydration process to continue.
- Why It’s Non-Negotiable: Proper curing increases strength, reduces permeability (making it more weather-resistant), and minimizes shrinkage cracking. A block cured for 28 days can be over 50% stronger than one left to dry out after 3 days.
- Methods:
- Plastic Sheeting: Immediately after demolding, cover the blocks with plastic sheeting to trap moisture. Seal the edges.
- Water Curing: Gently mist the blocks with water several times a day to keep them constantly damp, or build a small ponding dam around them.
- Curing Compounds: Spray-on compounds form a membrane that retains moisture (more common in professional settings).
- Duration: Cure blocks for a minimum of 7 days before handling them for building. For them to reach their full design strength, the standard curing period is 28 days.
Pro Tips for Quality and Efficiency
Learn from common mistakes and elevate your block-making game.
Avoiding Common Mistakes
- Too Much Water: The #1 cause of weak, crumbly blocks. Resist the urge to make it “easier to pour.”
- Inadequate Compaction: Leads to “honeycombing” (visible voids) and drastically reduced strength and durability.
- Improper Curing: Letting blocks dry out in the sun and wind will cripple their potential strength.
- Dirty Aggregates: Clay or silt coating on sand or gravel prevents a proper bond with the cement paste.
Testing Your Blocks for Strength
While you can’t replicate a lab crush test, simple field checks offer confidence.
- Visual Inspection: Look for consistent color, sharp edges, and no major cracks or voids.
- Ring Test: Tap two blocks together lightly. A clear, high-pitched “ring” indicates good density and curing. A dull “thud” suggests porosity or internal cracking.
- Drop Test (For Small Blocks): From waist height, drop a cured block onto a hard, flat surface like a concrete slab. A well-made block should not break or chip severely. (Use this test sparingly!)
Scaling Up: Considerations for Larger Projects
Making 20 blocks for a fire pit is one thing; making 500 for a garage is another.
- Mechanical Help: For projects over 100 blocks, seriously consider renting a manual or even motorized block-making machine. The productivity and quality jump is immense.
- ການຂົນສົ່ງ: Plan for bulk material delivery (sand, gravel, cement pallets), a large, flat curing area, and help for handling.
- The Economic Reality: For most people, when you factor in the cost of materials, equipment rental/purchase, and most importantly, your time and labor, purchasing ready-made, ASTM-certified blocks from a lumberyard is almost always more cost-effective for any significant project. DIY block-making is about the skill, self-sufficiency, and customization, not necessarily saving money.
Safety First: Best Practices When Working with Concrete
Concrete work is physically demanding and presents specific hazards that must be respected.
Personal Protective Equipment (PPE) is Mandatory
- Skin Protection: Wet cement is highly alkaline and can cause severe chemical burns (dermatitis). Always wear waterproof gloves and long sleeves. Wash skin immediately if contact occurs.
- Eye Protection: Cement dust and splashes can cause serious eye injury. Wear safety glasses at all times.
- Respiratory Protection: Dry cement and sand dust contain crystalline silica, a known respiratory hazard. Wear a dust mask when handling dry materials or during dry mixing.
Safe Material Handling and Worksite Setup
- Lift Properly: Bend your knees, not your back, when lifting heavy bags of cement or blocks.
- Organized Workspace: Keep your mixing and molding area tidy to prevent trips and falls. Ensure good ventilation if working in an enclosed space.
- Environmental Care: Do not wash leftover concrete or tools into storm drains. The high pH can harm waterways. Let waste concrete harden and dispose of it as solid waste, or rinse into a contained area where the water can filter through soil.
Frequently Asked Questions (FAQ) About Making Concrete Blocks
Q: What is the best concrete mix ratio for making strong blocks?
A: For maximum strength, a 1:3:5 ratio (cement:sand:gravel by volume) is excellent. If you’re making smaller, non-structural blocks where a smoother finish is desired, a 1:4 ratio of cement to sand (with no gravel) can be used.
Q: How long do homemade concrete blocks need to cure before use?
A: They require a minimum 7-day moist curing period before being handled for stacking. For full structural strength, the standard is 28 days of curing. They can be used carefully after 7 days but will continue to gain strength over the following weeks.
Q: Can I make concrete blocks without a mold?
A: To create consistent, usable building blocks, a rigid mold is essential. While you could form primitive shapes in a hole in the ground or a makeshift box, a proper mold is needed for blocks that will fit together in a wall.
Q: Is it cheaper to make your own concrete blocks or buy them?
A: For a tiny project (under 50 blocks), material costs alone might be slightly lower for DIY. However, once you account for the cost of tools/molds, the immense value of your time and labor, and the superior, guaranteed consistency of commercial blocks, purchasing is almost always more economical for any project of scale.
Q: Why are my homemade blocks cracking or crumbling?
A: This is typically due to one of four core errors: 1) Excess water in the mix (weakens the matrix), 2) Insufficient compaction (leaves a porous, weak structure), 3) Improper curing (causes rapid drying and shrinkage cracks), or 4) An incorrect or weak mix ratio.
ສະຫຼຸບ
Making your own concrete blocks is a profoundly rewarding project that connects you to the very bones of the built environment. It demystifies a fundamental material and empowers you with a practical skill. By following the steps outlined here—focusing on a correct, stiff mix, thorough and deliberate compaction, and, above all, patient and proper curing—you can produce durable, functional blocks for a variety of non-structural applications.
This guide has provided the foundational knowledge based on established material science and construction best practices. Remember to always prioritize safety with proper PPE and honestly evaluate the true scale, cost, and needs of your project. For foundations, load-bearing walls, or any large-scale construction, partnering with professionals and using commercially manufactured, code-approved blocks remains the safest, most reliable, and often most sensible path forward.
<