
How to Make Cinder Blocks: A Step-by-Step DIY Guide
မိတ်ဆက်
Have you ever looked at a construction project and thought, “I could build that myself,” only to be stopped by the cost of materials? Or perhaps you’re a homesteader, a dedicated DIYer, or simply someone fascinated by how the built world around us comes to be. If so, the idea of learning how to make cinder blocks has likely crossed your mind.
Making your own concrete masonry units (CMUs)—commonly called cinder blocks—is more than just a cost-saving venture. It’s a gateway to true self-sufficiency, allowing for complete customization in size and even color. Whether you’re planning a garden wall, a shed base, or a small outdoor workshop, mastering this skill puts the foundation of your project literally in your own hands.
This comprehensive guide is built on a foundation of practical construction knowledge, adherence to material science principles, and a non-negotiable commitment to safety. We’ll demystify the process, breaking it down into clear, actionable steps suitable for a motivated beginner, while providing the technical details that ensure your homemade blocks are durable, strong, and fit for purpose.
By the end of this guide, you will understand the exact materials and “recipe” needed, the meticulous molding process, the critical importance of ကုသခြင်း, and how to troubleshoot common issues. Let’s lay the first brick in your knowledge foundation.
Understanding Cinder Blocks: Materials and Mix Design
Before you mix a single grain of sand, it’s crucial to understand what you’re making. This knowledge is what separates a haphazard pile of concrete from a reliable building block.
What Are Cinder Blocks Really Made Of?
First, a quick terminology lesson. True “cinder” blocks are a historical product that used industrial waste—like coal cinders—as the primary aggregate. Today, what we colloquially call a cinder block is almost always a concrete masonry unit (CMU).
The modern block is a marvel of simplicity and strength, composed of three core components:
- Portland Cement: This is the binder, the “glue” of the mix. When mixed with water, it undergoes a chemical reaction called hydration, forming crystals that lock everything together.
- Aggregates: These provide bulk and strength. A combination of fine aggregate (sand) and coarse aggregate (gravel or crushed stone) fills the volume, reduces cost, and minimizes shrinkage.
- ေရ This isn’t just for making the mix wet. Water is the essential agent that triggers the cement’s hydration. The quality and quantity of water are critical.
The Perfect Concrete Mix Ratio
The strength and workability of your block hinge on your mix ratio. A standard, reliable ratio for DIY blocks is:
1 Part Portland Cement : 3 Parts Sand : 3 Parts Gravel
- By Volume: This is the easiest method for DIY. Use the same bucket to measure all your materials.
- Water Ratio: This is more art than science. You’ll typically need about 0.5 to 0.6 parts water per 1 part cement. The goal is a “crumbly but moldable” consistency—like damp beach sand that clumps together when squeezed but doesn’t ooze water.
Why this ratio works:
* Strength: Enough cement to thoroughly coat all aggregate particles.
* Workability: The sand fills voids between gravel, creating a dense, packable mix.
* Economy: Maximizes aggregate use without sacrificing integrity.
Pro Tip: Consistency is key. Once you find a mix that works, document the exact volumes of water and dry materials used. Replicate it precisely for every batch.
Essential Tools and Equipment You’ll Need
Gathering the right tools before you start is half the battle. Here’s your checklist:
Safety Gear (Non-Negotiable):
* Heavy-duty rubber gloves (cement is caustic)
* Safety glasses or goggles
* N95 dust mask or respirator (for mixing dry cement)
* Sturdy, closed-toe boots
* Long sleeves and pants
Mixing Tools:
* Wheelbarrow or Mortar Mixer: A wheelbarrow is fine for small batches. A rented or purchased mixer saves immense time and effort for larger projects.
* Mixing Hoe or Shovel: A garden hoe dedicated to concrete works well in a wheelbarrow.
* Measuring Buckets: Several identical 5-gallon buckets for consistent volumetric measuring.
Molding Tools:
* Block Molds: You can purchase steel or heavy-duty plastic molds online. For a first attempt, you can build a sturdy wooden mold, but metal offers better durability and finish.
* Release Agent: Used motor oil, vegetable oil, or commercial form-release oil.
* Tamper: A heavy, flat-ended piece of wood or metal to compact the concrete.
* Margin Trowel: For smoothing the top surface after molding.
Curing Space:
* A flat, level area (a concrete slab or very firm ground).
* Plastic sheeting or tarps.
* Access to water (a hose or watering can).
The Step-by-Step Manufacturing Process
Now for the hands-on part. Follow these steps in order for the best results.
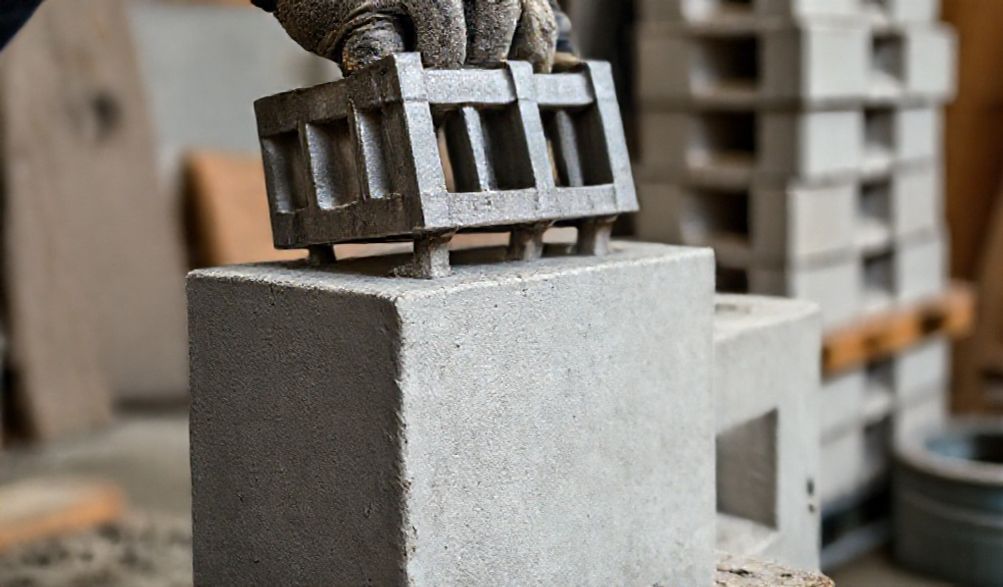
Step 1: Preparing Your Mold
A well-prepared mold is the secret to easy demolding and smooth block faces.
- Clean: Ensure your mold is free of old, hardened concrete debris.
- Coat: Generously apply your release agent to every interior surface of the mold. A paintbrush works well for this. This layer prevents the concrete from bonding to the mold.
- Position: Place your mold on a perfectly flat, solid surface. This base will become the bottom of your block.
Step 2: Mixing the Concrete Thoroughly
Proper mixing is critical for uniform strength. Follow this sequence:
- Dry Mix: In your wheelbarrow or mixer, combine all of your sand and gravel. Mix them until the color is consistent.
- Add Cement: Add the measured Portland cement to the dry aggregates. Mix again until the color is a uniform gray, with no streaks of brown sand visible.
- Add Water: Form a crater in the center of your dry mix. Slowly add about ¾ of your estimated water. Fold the dry mix into the water from the edges. Continue adding small amounts of water until you achieve the target consistency: it should hold its shape when squeezed in your gloved hand without dripping water.
Step 3: Filling and Compacting the Mold
This step eliminates weak spots. Do not simply shovel mix in and level it off.
- First Layer: Shovel concrete into the mold, filling it about one-third to halfway. Overfill it slightly.
- Compact: Use your tamper to forcefully and repeatedly press the concrete into the corners and edges of the mold. The goal is to drive out air bubbles.
- Second Layer: Add another layer of mix, overfilling the mold completely.
- Final Compaction: Tamp this layer down vigorously, ensuring it integrates with the first layer. Continue until you see moisture (“bleed water”) glistening on the surface and the tamper meets solid resistance.
Step 4: Stripping the Mold and Finishing
Patience here prevents ruined blocks.
- အဝတ်အစားချွတ်ခြင်း Carefully lift the mold straight up. Do not twist or jerk it. If you coated it well, the block (“green” block) should release cleanly.
- Finishing: Immediately use your trowel to smooth the top surface, knocking down any high spots and filling in minor imperfections. If a corner breaks, you can sometimes gently press fresh mix into the area.
- Initial Set: Leave the block undisturbed on its casting surface for at least 24 hours.
Curing and Drying: The Most Critical Phase
This is where most DIY projects fail. Curing is not drying—it is the controlled process of maintaining moisture so the cement can fully hydrate and gain strength.
Why Proper Curing is Non-Negotiable
If fresh concrete dries out too quickly, the hydration reaction stops prematurely. The result is a block that may look fine but is permanently weak, dusty, and prone to cracking. Proper curing can double or triple the final strength of your block.
Best Practices for the First 28 Days
Think of curing in two phases:
Phase 1: Initial Curing (Days 1-7 – CRITICAL)
* After the initial 24-hour set, gently cover the blocks with plastic sheeting. This traps moisture.
* Every day for the next week, lift the plastic and lightly sprinkle the blocks with water. They should feel damp to the touch, not soggy or dry.
* Keep them in a shaded, sheltered area away from wind and direct sun.
Phase 2: Strength Gain (Days 7-28)
* After a week, the blocks are hard enough to be carefully moved, if necessary.
* You can remove the plastic, but the blocks should still be stored in a protected location.
* They will continue to gain strength progressively. A block reaches only about 65% of its potential strength at 7 days. The full design strength is achieved at 28 days.
Safety, Troubleshooting, and Pro Tips
Critical Safety Precautions
Concrete work is physical and involves hazardous materials. Never skip safety.
- Cement Burns: Portland cement is highly alkaline. Always wear waterproof gloves. If cement gets on skin, wash it off immediately with vinegar (which neutralizes the alkali) or copious water.
- Silica Dust: Inhaling dust from sand and dry cement can cause serious lung damage. Always wear a mask when handling dry materials.
- Heavy Lifting: Concrete is extremely heavy. Use proper lifting technique: lift with your legs, not your back.
- Eye Protection: Stray chips of aggregate or splashes of wet mix can cause injury.
Common Problems and How to Fix Them
Problem: Blocks crumble when removing the mold.
* Likely Cause: Concrete mix is too dry, or it was under-compacted.
* Solution: Increase water slightly for better workability and tamp more vigorously.
Problem: Cracks appear during curing.
* Likely Cause 1: Rapid drying (sun/wind exposure).
* Solution: Improve your covering/misting routine.
* Likely Cause 2: Uneven or weak foundation under the curing blocks.
* Solution: Ensure blocks are cured on a perfectly level, solid surface.
Problem: Blocks stick to the mold and break.
* Likely Cause: Insufficient or uneven application of release agent.
* Solution: Be more generous and thorough with your mold coating next time.
Expert Tips for Higher Quality Blocks
- Water Quality: Use clean, potable water. Avoid water with high salt, silt, or organic content.
- Add Fibers: Consider adding a handful of polypropylene or glass fibers to your mix. This provides micro-reinforcement, reducing plastic shrinkage cracks.
- Do a Test Batch: Always make one or two test blocks first to dial in your mix consistency and demolding technique before committing to a large batch.
- Level is Everything: From your mixing surface to your curing yard, take the time to ensure everything is level. It affects the shape and stability of every block.
မကြာခဏ မေးလေ့ရှိသော မေးခွန်းများ (FAQ)
Q: What is the difference between cinder blocks and concrete blocks?
က: Historically, “cinder blocks” used coal cinders as the aggregate, making them lighter. Modern blocks are almost exclusively concrete blocks, using sand and gravel. The terms are used interchangeably today, but the material is Portland cement-based aggregate.
Q: How long does it take for a homemade cinder block to fully cure?
က: While they can be handled after 24-48 hours, blocks reach about 65% strength in 7 days and their full design strength at 28 days. Do not use them for load-bearing structures before this period.
Q: Can I make cinder blocks without a purchased mold?
က: Yes, you can build wooden molds, but they must be extremely sturdy, rigid, and sealed. Steel molds are recommended for consistency, durability, and achieving smooth sides. Homemade molds often lead to irregular shapes and are harder to demold.
Q: Is it actually cheaper to make your own cinder blocks?
က: It depends on scale. For a small project (under 50 blocks), buying is often more cost-effective when you factor in tool purchase, mold cost, and your time. For large projects, remote locations, or if you plan to make blocks regularly, DIY can offer significant savings.
Q: What strength (PSI) can I expect from homemade blocks?
က: With a proper 1:3:3 mix and excellent curing, you can achieve blocks in the range of 1500-2500 PSI, suitable for garden walls, sheds, and other non-foundation applications. Commercial blocks are typically rated between 2000-3000+ PSI.
နိဂုံး
Learning how to make cinder blocks is a rewarding exercise in practical craftsmanship. The process hinges on three pillars: a precise mix design, a meticulous molding and compaction technique, and the patient discipline of proper curing. Remember, the quality of your final product is determined by your attention to process, not just the ingredients.
A final, crucial note on expertise and authority: while this guide equips you to create strong blocks for many DIY applications, it is not a substitute for professional engineering. For critical structural projects—home foundations, tall retaining walls, or any load-bearing element—consulting a structural engineer and using professionally manufactured, code-rated materials is the only safe and responsible choice.
Ready to start? Begin with a small test batch of 4-6 blocks. See how the process feels, cure them carefully, and test their strength. Share your results or ask further questions below! And if you’re planning your first project, check out our related guide on “How to Build a Cinder Block Raised Garden Bed” to put your new skills to immediate use.
<