
How to Make a Cement Block Machine: A Step-by-Step DIY Guide
ਪਰਿਚਯ
Imagine being able to fabricate the very building blocks of your next shed, garden wall, or small homestead project. For the hands-on builder, entrepreneur, or self-sufficient homesteader, constructing a DIY cement block machine isn’t just a metalworking project—it’s a gateway to significant cost savings and profound self-reliance. This guide is designed to transform that vision into a tangible, functional piece of equipment.
As a professional with experience in both practical fabrication and material science, I’ve crafted this guide based on proven mechanical principles and common DIY engineering practices. It demystifies the process, but it comes with a crucial, non-negotiable preface: this is an intermediate to advanced project. It involves welding, metal fabrication, and working with heavy materials and wet concrete. Success and safety depend entirely on your skill level, patience, and strict adherence to safety protocols—including wearing proper Personal Protective Equipment (PPE) and using tools correctly.
By following this guide, you will gain a clear understanding of the core mechanics behind block formation, a detailed list of required tools and materials, step-by-step assembly instructions, and essential operational know-how. Whether you aim for a simple manual press or a more efficient semi-automatic system, this resource will provide the foundational knowledge to build a machine that works.
Understanding the Core Principles of a Block Machine
Before cutting a single piece of steel, it’s vital to understand ਕਿਵੇਂ a block machine works. Grasping these principles ensures your design is effective, not just assembled.
The Essential Components
Every cement block machine, from the simplest manual press to complex commercial units, relies on four key components:
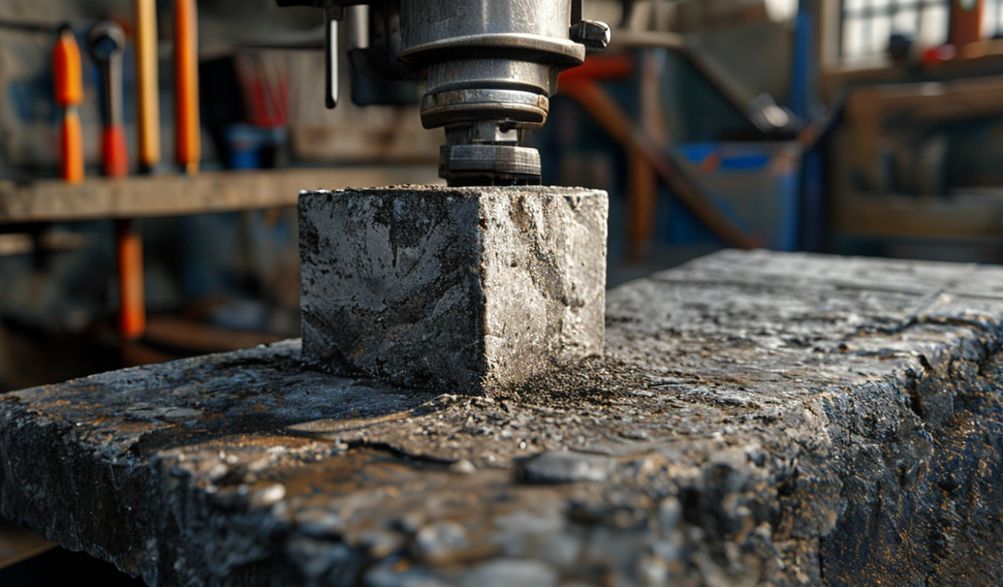
- The Mold or Mold Box: This is a sturdy, open-topped box, often with internal dividers, that defines the shape and size of your block (e.g., a standard 4x8x16 inch rectangle). It must be incredibly robust to withstand repeated compression forces.
- The Tamper/Compactor Plate: This is a plate that fits precisely inside the mold cavities. It’s attached to a lever system and is responsible for applying downward pressure to compress the concrete mix.
- The Leverage System: This is the force multiplier. Typically a pivoting lever arm, it allows you to apply significant compaction force with manageable human effort. The mechanical advantage is critical.
- The Base Plate/Platform: A solid, flat surface upon which the mold sits during the filling and compression process. It ensures stability and provides a smooth surface for releasing the formed “green” block.
The Compression Process
Cement blocks aren’t just poured; they’re formed under pressure. A stiff, low-slump concrete mix is placed into the mold. The tamper plate then applies intense pressure, squeezing out air pockets and consolidating the mixture. In enhanced designs, ਵਾਈਬ੍ਰੇਸ਼ਨ is added alongside this pressure. This vibration helps the concrete particles settle into a denser, more uniform matrix, resulting in a stronger, more professional-looking block with sharp edges.
Manual vs. Semi-Automatic Designs
Your first design decision is the level of complexity:
* ਮੈਨੂਅਲ ਮਸ਼ੀਨਾਂ: These rely solely on a hand-operated lever for compression. They are simpler to build, require no electricity, and are perfect for very low-volume production (e.g., a few dozen blocks for a personal project).
* ਸੈਮੀ-ਆਟੋਮੈਟਿਕ ਮਸ਼ੀਨਾਂ: These incorporate a powered element, most commonly a vibrator motor attached to the mold frame. The vibration happens at the pull of a switch while you operate the lever. This significantly improves block density, finish, and production speed, making it suitable for someone looking to produce blocks for small-scale commercial sale or larger personal builds.
Tools and Materials You Will Need
A successful build hinges on preparation. Gathering the right tools and quality materials upfront will save immense frustration later.
Metalworking Tools
You will need access to a well-ventilated workspace and the following tools:
- Angle Grinder with cutting and grinding discs.
- Welder: A MIG welder is preferred for its ease of use on mild steel, but an ARC (stick) welder is sufficient if you are proficient.
- Drill Press or Heavy-Duty Hand Drill with metal-cutting drill bits.
- Measuring Tools: Tape measure, metal ruler, speed square, and marker.
- Clamps: Multiple C-clamps or locking pliers to hold components in place during fabrication.
- Safety Gear (Non-Negotiable): Welding helmet, auto-darkening preferred; heavy-duty gloves; safety goggles; ear protection; and a respirator for grinding/welding fumes.
Raw Materials & Components
The following list is for a basic manual machine capable of making two standard blocks at a time. Dimensions can be adjusted.
- Steel Sheet: 1/4″ (6mm) thick, for the mold walls and base plate. You’ll need roughly a 2′ x 4′ sheet.
- Square Steel Tubing: 2″ x 2″ with 1/8″ wall thickness for the main support frame.
- Steel Rod: 1″ diameter for the tamper head plate and lever handle.
- Flat Bar/Plate: For gussets, brackets, and the tamper plate itself.
- Hardware: High-tensile bolts, nuts, washers, and sturdy hinges for the lever pivot.
- For Semi-Automatic Option: A 0.5 HP, 110V/220V concrete vibrator motor, a waterproof switch, and appropriate power cable.
Sourcing Tips
Don’t overlook local metal suppliers or “steel supermarkets.” They often sell off-cuts at a discount, which can be perfect for this project. Scrap yards can be a treasure trove for heavy-duty angle iron or tubing. Always prioritize mild steel (A36) for its ease of welding and strength. Avoid rusty, thin, or severely damaged material for the primary load-bearing parts.
Step-by-Step Assembly Instructions
This is the core fabrication process. Work methodically, measure twice, and cut once.
Step 1: Designing and Cutting the Mold
- Finalize Dimensions: Decide on your block size. A common “half-block” size is 4″ (width) x 8″ (height) x 16″ (length). Account for a slight taper (1-2 degrees) on the interior walls for easy block release.
- Fabricate the Mold Box: From the 1/4″ steel sheet, cut:
- Two end plates (4″ tall x the block width).
- Two side plates (4″ tall x the block length).
- One center divider (4″ tall x the block width) if making two blocks at once.
- A bottom plate slightly larger than the mold’s footprint.
- Weld the Mold: Clamp and carefully weld the pieces together to form an open-topped box. Ensure all interior corners are square and seams are fully welded to prevent concrete leakage. Grind the interior welds smooth.
Step 2: Building the Main Frame and Lever System
- Construct the Frame: Using the 2″x2″ square tubing, build a sturdy “H” or “A” frame. A typical height is about 5-6 feet tall to allow for a long lever arm. The base must be wide enough for stability. Weld all joints securely.
- Create the Lever Arm: Cut a long piece of tubing (6-7 feet) for the lever. At the pivot point (about 1/4 of the way from one end), attach it to the top of the main frame using a heavy-duty bolt or a solid steel rod acting as an axle. This should create a smooth pivoting motion.
Step 3: Creating the Tamper and Compression Plate
- Fabricate the Tamper Head: Cut the 1″ steel rod into pieces that match the interior dimensions of your mold cavities (e.g., for a 4″x8″ cavity, you’d need a head roughly 3.75″ x 7.75″ to allow for clearance). Weld these rods together into a solid plate. Attach a vertical rod from its center upwards to connect to the lever arm.
- Attach Tamper to Lever: Connect the vertical rod from the tamper head to the short end of the lever arm. This connection must be very strong; use a heavy-duty bolt or a welded pivot joint.
- Prepare the Base Plate: Weld the flat bottom plate you prepared earlier onto the base of your main frame. This is where the mold will sit during operation.
Step 4: Integrating a Vibration System (Semi-Automatic Option)
- Mount the Motor: Securely bolt the vibrator motor to the exterior of the mold frame. A sturdy steel bracket is essential to handle the intense shaking.
- Wire with Caution: Connect the motor to the switch and power cable following the manufacturer’s instructions. All connections must be insulated and protected from moisture and physical damage. Consider having an electrician check your work.
Step 5: Final Assembly and Calibration
- Assemble and Test: Place the mold on the base plate. Lower the tamper head into the mold using the lever. It should slide in and out with minimal side-to-side play.
- Check Alignment: The tamper must apply even, perpendicular pressure across the entire mold cavity. Adjust brackets or pivot points if necessary.
- Test the Motion: Operate the lever without concrete to ensure the action is smooth and the frame is rigid—no excessive flexing.
Operating Your Homemade Cement Block Machine
Building the machine is only half the battle; operating it correctly determines the quality of your blocks.
The Right Concrete Mix
The mix is critical. A standard, high-strength block mix is:
* 1 part Portland cement
* 3 parts sharp, coarse sand (avoid fine, “soft” sand)
* ਪਾਣੀ Add minimally. The mix should be “stiff”—it should clump in your hand without dripping water. Too much water drastically reduces final strength.
The Block-Making Process
- Prepare: Lightly coat the interior of the mold with used motor oil or a commercial release agent.
- Fill: Shovel your stiff concrete mix into the mold cavities, slightly overfilling them.
- ਸੰਕੁਚਿਤ ਕਰੋ Pull down the lever arm firmly to drive the tamper into the mold. If you have a vibrator, activate it during this compression for 5-10 seconds. Apply sustained pressure.
- Release: Release the lever, lift the tamper, and carefully slide the mold box straight up and off the newly formed “green” blocks.
- Repeat: Move the blocks to a curing area and repeat the process.
Curing for Maximum Strength
This is the most overlooked yet vital step. Green blocks are fragile.
* Keep them on a flat, stable surface.
* Cover them with plastic sheeting to retain moisture.
* Lightly spray them with water 1-2 times a day for at least 5-7 days.
* Proper, slow curing is what allows the cement to reach its full structural strength. Blocks should cure for 28 days for maximum load-bearing capacity.
Important Safety and Maintenance Considerations
Non-Negotiable Safety Practices
- PPE is Mandatory: Always wear safety glasses, gloves, and hearing protection. Use a respirator when grinding or welding.
- Lifting Mechanics: Concrete mix and blocks are heavy. Lift with your legs, not your back.
- Electrical Safety: If your machine is powered, ensure all wiring is properly insulated and grounded. Keep cords away from water and sharp edges.
- Workspace: Maintain a clean, organized, and well-ventilated area.
Troubleshooting Common Issues
- Blocks Stick in Mold: Ensure your mold has a slight taper and you are using enough release agent. The interior surfaces must be perfectly smooth.
- Blocks Crumble: The mix is too dry, compression is insufficient, or curing was improper (blocks dried out too fast).
- Blocks Have Poor Definition: Not enough vibration/pressure, or the mix was too wet, causing “slump.”
Maintaining Your Machine
- Clean Thoroughly after every use session. Hardened concrete is difficult to remove and can throw off your machine’s alignment.
- Inspect Welds regularly for hairline cracks, especially on the frame and lever pivots.
- Prevent Rust: Apply a fresh coat of paint to any exposed steel surfaces periodically. Store the machine under cover.
Frequently Asked Questions (FAQ)
Q1: Is it really cheaper to build a machine than to buy one?
A: For a basic manual machine, yes—if you already own or have access to welding equipment and can source affordable steel. The primary investment is your labor. For consistent, high-volume output, a commercial machine’s efficiency and durability often justify its cost.
Q2: What is the production capacity of a DIY machine?
A: A skilled operator with a manual machine might produce 20-30 blocks per hour. A well-tuned semi-automatic machine with vibration can potentially reach 40-60 blocks per hour. This is for small-scale use, not industrial production.
Q3: Can I make different block sizes and shapes?
A: Absolutely. The machine’s frame and lever system are universal. You simply need to fabricate different mold boxes. With advanced fabrication, you can create molds for hollow blocks, decorative blocks, or pavers.
Q4: How strong are blocks made with a homemade machine?
A: With the correct mix (1:3 cement/sand), proper high-pressure compaction, and, crucially, correct 28-day moist curing, DIY blocks can achieve compressive strengths suitable for garden walls, sheds, and single-story auxiliary structures. Always test a batch before relying on them for critical loads.
Q5: Do I need to be a welder to complete this project?
A: Basic welding competency is essential for creating a safe, durable machine that can handle the repeated stress. If you cannot weld, partnering with a skilled welder is a must. Purely bolted designs are rarely robust enough for this application.
Conclusion
Building your own cement block machine is a deeply rewarding project that blends practical engineering with hands-on construction. It empowers you to create a fundamental building material on your own terms. This guide has walked you through the core principles, the fabrication process, and the operational knowledge needed to succeed.
Remember, this endeavor rewards patience, precision, and a relentless focus on safety. While a homemade machine offers incredible value and satisfaction for personal and small-scale use, it’s important to acknowledge that commercial machines are engineered for higher consistency and volume in professional settings.
If you are embarking on this project, start simple. Master a basic manual design before adding complexity. Research local building codes if your blocks will be used in any permanent, structural application. Your safety and the safety of any structure you build are paramount.
Have you built a block machine before? Share your tips or modifications in the comments below. For those looking to deepen their knowledge, exploring advanced concrete admixtures or automated hydraulic systems could be your next fascinating challenge.
<