
Moldes de Blocos: Seu Guia Completo sobre Tipos, Usos e Fabricação
Introdução
Você está envolvido em construção, paisagismo ou projetos de faça-você-mesmo e procura uma maneira confiável e econômica de criar estruturas de concreto duráveis? A solução geralmente está não apenas no material que você escolhe, mas na ferramenta que você usa para moldá-lo: o molde para blocos. Esse herói anônimo da alvenaria é a chave para transformar concreto bruto e úmido em blocos de construção precisos e uniformes.
Mas com tantas opções disponíveis, como escolher a ideal? Selecionar a forma errada pode resultar em blocos inconsistentes, atrasos na produção e aumento de desperdício. Este guia abrangente mergulha fundo no mundo das formas para blocos, indo além das definições básicas. Utilizaremos a experiência do setor para explorar os diferentes tipos de formas, seu papel crucial na fabricação de tudo, desde paralelepípedos até muros de contenção, e os fatores-chave que determinam a qualidade e a durabilidade do produto final.
Seja você um empreiteiro profissional otimizando uma cadeia de suprimentos, um pequeno fabricante iniciando um negócio ou um entusiasta dedicado aprimorando sua casa, entender os moldes de blocos é essencial para alcançar resultados eficientes, consistentes e de alta qualidade. Vamos construir seu conhecimento desde o básico.
O que é um Molde de Bloco? Definindo a Fundação
Em sua essência, um molde de bloco é o instrumento definidor na produção de concreto pré-moldado. É a ponte entre uma mistura de matéria-prima e um componente acabado e funcional.
A Função Central: Moldar e Formar
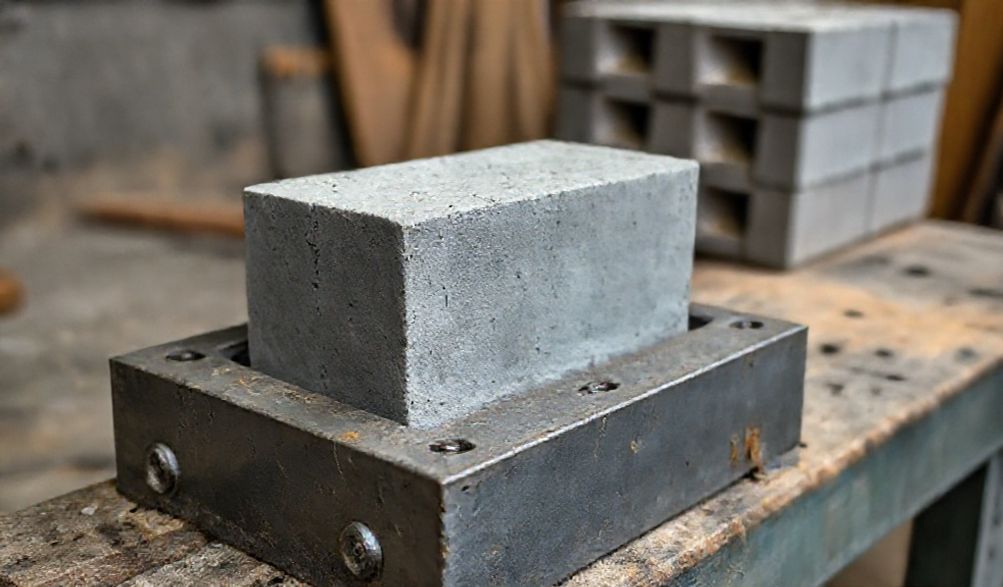
A block mould is a precision-engineered cavity or formwork designed to shape fluid or semi-fluid materials—like concrete, plaster, or compressed earth—into solid, geometric blocks upon setting and curing.
- Padronização: Its primary value lies in creating identical units. This allows for mass production, predictable structural performance, and easier installation.
- Versatilidade: While synonymous with concrete, moulds are also used for clay bricks, glass blocks, and even synthetic landscaping materials.
In essence, the mould doesn’t just create a shape; it ensures repeatability, which is the bedrock of modern construction efficiency.
Block Mould vs. Other Moulds: Key Distinctions
It’s easy to confuse terms, so let’s clarify:
* Injection Moulds: Used for plastics. Material is heated until liquid and forcibly injected under high pressure into a sealed, hardened steel mould.
* Die-Casting Moulds: Used for metals (e.g., zinc, aluminum). Molten metal is injected under high pressure.
* Formwork: This refers to the temporary or permanent molds used for in-situ concrete pours on-site, like for foundations, walls, or columns. They are typically larger, less precise for small units, and deal with much greater volumes of concrete at once.
Block moulds are specifically for producing discrete, handheld (or machine-handled) units, often in batches, with a focus on dimensional accuracy and surface finish for the individual block.
Types of Block Moulds: Choosing the Right Tool for the Job
Selecting a mould isn’t one-size-fits-all. The right choice depends on your material, volume, and block design. Here’s a breakdown of the main categories.
By Material of Construction
The mould’s material dictates its lifespan, cost, and best-use case.
-
Steel Moulds: The Industrial Workhorse
- Melhor para: High-volume, industrial block production plants.
- Prós: Extremely durable, capable of withstanding hundreds of thousands of cycles. Offers the highest precision and best surface finish for blocks. Handles high compaction forces from automated machinery.
- Contras: Highest upfront cost. Heavy. Requires regular maintenance (cleaning, rust prevention) and professional repair.
- Dica Pro: In our experience, the lifespan of a steel mould is directly tied to its maintenance schedule. A quick clean-down after each production run prevents concrete from hardening and causing damage.
-
Polypropylene (PP) / ABS Plastic Moulds: The Flexible Performer
- Melhor para: Small to medium batches, startups, and serious DIYers.
- Prós: Lightweight, cost-effective, and corrosion-resistant. Good for producing blocks with complex geometries. Often reinforced with ribs or fiberglass for added strength.
- Contras: Will wear out faster than steel, especially with abrasive concrete mixes. Can warp if stored improperly or exposed to direct sunlight.
- Dica Pro: Look for moulds with UV stabilizers if they will be stored outdoors, and always store them flat and supported.
-
Silicone/Rubber Moulds: The Detail Artist
- Melhor para: Decorative stones, intricate paving designs, and replicating natural textures like stone or wood.
- Prós: Excellent flexibility allows for easy demoulding of complex undercuts and highly detailed surfaces. Provides a superior non-stick surface.
- Contras: Not suitable for high-volume production due to slower demoulding and wear. Less dimensionally stable under pressure than rigid moulds.
By Operation and Production Scale
How will you use the mould? Your process defines the type.
- Manual/Single Moulds: Operated by hand, one batch at a time. Ideal for custom work, prototyping, small garden projects, or very low-volume production.
- Multi-Cavity Moulds: A single frame holds multiple block cavities (e.g., 4, 6, or 8). Dramatically increases output for small businesses while still allowing for manual or semi-mechanized operation.
- Automated Mould Systems: Integrated into block-making machines. These are often steel moulds mounted on a pallet circulation system. The machine handles filling, compaction, curing, and demoulding in a continuous cycle for large-scale plants.
By Block Type Produced
The end product determines the mould’s internal design.
- Paving Block / Interlocking Paver Moulds: Create blocks with interlocking edges for stable, flexible pavements without mortar.
- Hollow Block / Concrete Masonry Unit (CMU) Moulds: Form blocks with hollow cores to reduce weight, improve insulation, and allow for rebar and grout in walls.
- Solid Block Moulds: For dense, heavy blocks used in foundations and heavy-load walls.
- Retaining Wall Block Moulds: Often feature a lip or pin system for creating setback courses in gravity walls.
- Specialty & Decorative Block Moulds: Include everything from chimney blocks and vent blocks to ornate garden edging and faux stone veneers.
The Block Manufacturing Process: From Mould to Finished Product
Understanding the process highlights why mould design and care are so critical.
Step-by-Step: How a Mould is Used
- Preparation & Release Agent Application: This is a non-negotiable first step. A mould release agent (oil-based or modern synthetic) is applied to every internal surface. It forms a barrier that prevents the concrete from bonding to the mould, ensuring clean demoulding and protecting the mould surface.
- Filling & Compaction: The mould is filled with the concrete mix. For quality blocks, simply filling isn’t enough. Vibration or mechanical compaction is essential to remove air bubbles, consolidate the mix, and ensure the mould is completely filled, especially in detailed corners. This step is critical for the block’s final strength.
- Cura: The filled mould allows the block to set and gain initial strength in a controlled shape. Proper curing (maintaining moisture and temperature) begins in the mould before demoulding.
- Demoulding: Once the concrete has achieved “green strength” (solid enough to hold its shape but not fully cured), the block is ejected. A well-designed mould will have slight draft angles (tapered sides) to facilitate easy release.
Key Factors Affecting Block Quality
The mould influences the final product in several key ways:
- Mould Design Precision: Tight tolerances ensure every block is the same size. Smooth internal surfaces create a smooth block face. Seam integrity prevents “flash” or excess concrete from leaking out.
- Material Mix Design: A harsh, rocky mix will wear a plastic mould faster than a smoother sand-heavy mix. The water content also affects release; too wet a mix can seep into microscopic pores and cause sticking.
- Vibration and Compaction: Insufficient compaction leads to weak, honeycombed blocks that may break during handling. The mould must be rigid enough to withstand the forces of proper compaction without flexing.
Critical Considerations When Selecting a Block Mould
Arm yourself with the right questions before you buy.
Assessing Your Needs: Key Questions to Ask
- Production Volume: Are you making 100 blocks or 100,000? This is the biggest driver for material choice (plastic vs. steel).
- Block Type & Design: Do you need hollow cores, interlocking sides, or a special texture?
- Matéria-Prima: Standard concrete, lightweight aggregate, or compressed earth?
- Orçamento: Consider total cost of ownership. A cheaper plastic mould that wears out in 500 cycles may be more expensive per block than a steel mould lasting 50,000 cycles.
Quality and Durability Indicators
- Material Thickness: Thicker plastic (e.g., 6-8mm) lasts longer than thin (3-4mm).
- Reinforcement: Look for ribbing or fiberglass layers in plastic moulds.
- Weld/Join Quality: For steel moulds, clean, ground-down welds prevent sticking and wear.
- Manufacturer Reputation: Seek companies specializing in precast or construction equipment.
The Importance of Design & Engineering
A good mould is thoughtfully engineered:
* Draft Angles: Slight tapers (1-3 degrees) on vertical faces make demoulding effortless.
* Rounded Corners: Internal rounded corners are easier to clean and help concrete flow during compaction, reducing weak spots.
* Integrated Handles/Grips: Essential for safe and easy handling of manual moulds.
Maintenance and Care for Long-Lasting Block Moulds
Your mould is an investment. Protect it with proper care.
Routine Cleaning and Storage Best Practices
- Clean Immediately After Use: Never let concrete harden in the mould. Use water, a brush, and a plastic scraper (never metal on plastic or coated steel) to remove all residue.
- Inspect: Check for built-up concrete, especially in corners and seams.
- Dry Thoroughly: Prevent rust on steel and mildew on plastic.
- Store Properly: Store flat on a level surface, out of direct sunlight. Stacking multiple plastic moulds can cause warping over time.
Troubleshooting Common Mould Issues
- Sticking Blocks: The #1 complaint. Causes: Forgotten release agent, worn/porous mould surface, mix too wet, or insufficient draft angles in the design.
- Surface Imperfections on Blocks: Pitting or roughness can be caused by a dirty mould, old release agent buildup, or damage to the mould’s interior surface.
- Wear & Tear: For plastic moulds, minor scratches can often be smoothed with fine sandpaper. For steel, professional welding and re-machining may be needed. Severe wear means it’s time for a replacement.
Frequently Asked Questions (FAQ) About Block Moulds
Q1: What is the most durable type of block mould for a small business?
A: For a small business balancing durability and cost, reinforced polypropylene or high-density polyethylene (HDPE) moulds are often the best starting point. They offer a good lifespan for thousands of cycles. If your production focuses on one high-volume block style, investing in a custom steel mould becomes a cost-effective long-term strategy.
Q2: Can I make my own concrete block mould at home?
A: Yes, for simple solid blocks, you can construct moulds from wood, lined with melamine or metal sheets. However, for consistent quality, dimensional accuracy, and the ability to produce interlocking or hollow blocks with the necessary draft angles, purchasing professionally engineered moulds is highly recommended. Homemade moulds rarely match the efficiency or block quality.
Q3: How many blocks can I make from one plastic mould before it wears out?
A: This varies immensely. A well-made, reinforced plastic mould from a reputable supplier, used with a non-abrasive mix and proper care, can produce 5,000 to 10,000+ blocks. Lighter-duty “hobbyist” moulds may show significant wear after 500-1,000 cycles. Always check the manufacturer’s specifications.
Q4: Why are my blocks difficult to remove from the mould?
A: The most common reasons are, in order: 1) Insufficient or improper application of mould release agent, 2) Using a concrete mix that is too wet, 3) Demoulding too quickly before the block has gained enough green strength, or 4) A mould with inadequate draft angles. Systematically check each step in your process.
Q5: Where can I find reputable block mould manufacturers or suppliers?
A: Look for established companies specializing in precast concrete machinery, construction equipment, or landscaping supply machinery. Industry trade shows, B2B industrial directories, and seeking recommendations from other block manufacturers are good strategies. Always review material specs, ask for customer references, and prefer suppliers who offer design support and clear warranties.
Conclusion
Block moulds are far more than simple containers; they are the engineered heart of consistent, high-quality block production. The choice of mould—from its material and design to its maintenance—directly impacts the efficiency of your operation and the strength, accuracy, and appearance of your final product.
By understanding the types, applications, and selection criteria outlined in this guide, you are equipped to make an informed decision that aligns with your specific project goals, whether you’re building a garden path or supplying materials for a large-scale development. Remember, the foundation of any great structure lies in the quality of its individual components. Investing in and caring for the right block mould is your essential first step toward building something that truly lasts.
<