
The Ultimate Guide to Cement Block Molds: Types, Uses, and DIY Tips
Intangamarara
From towering skyscrapers to charming garden paths, the transformative power of concrete is undeniable. At the heart of this versatility, especially for smaller-scale and creative projects, lies a simple yet powerful tool: the cement block mold. This guide is your key to unlocking that potential.
With over a decade of experience in masonry, concrete fabrication, and DIY project consulting, I’ve seen how the right mold can mean the difference between a frustrating failure and a professional-grade success. This comprehensive guide is built on practical, tested knowledge and adherence to industry best practices for safety and quality.
Whether you’re a seasoned contractor looking to optimize small-batch production or a homeowner embarking on a backyard makeover, understanding cement block molds is crucial. We’ll delve into the different types available, provide a foolproof step-by-step DIY guide, and explore their myriad applications. By the end, you’ll be equipped to choose the perfect mold, use it effectively, and execute your vision with confidence. Let’s build a solid foundation of knowledge.
What is a Cement Block Mold? Understanding the Basics
Before you pour your first batch, it’s essential to understand the tool that makes it all possible.
Inshamake y'Umurongo n'Imikorere
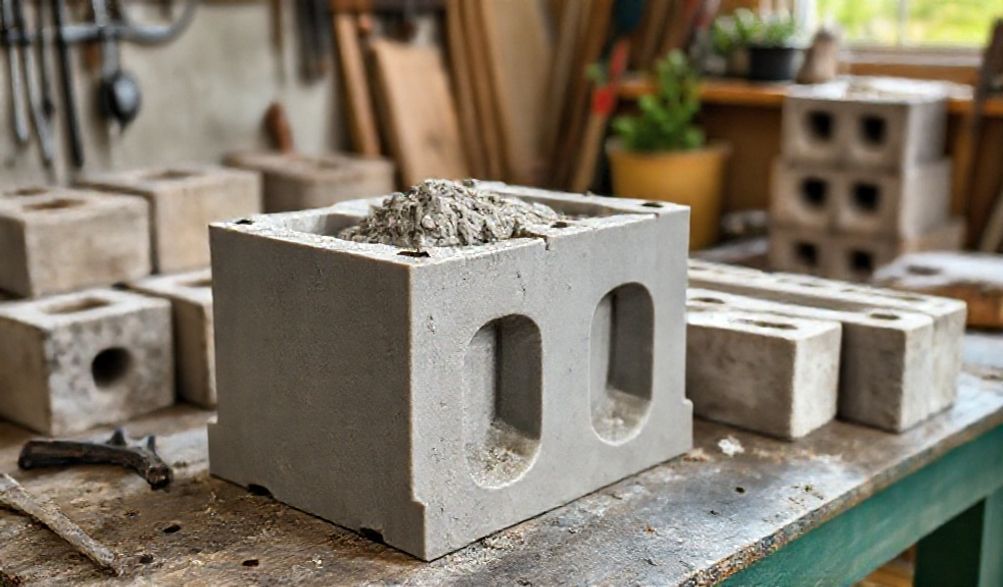
A cement block mold is a hollow container or form designed to give shape, texture, and dimension to wet concrete as it cures and hardens. Think of it as a negative space that defines the positive form of your final block. Its primary function is to hold the concrete mixture in a specific configuration until it gains enough strength to hold its own shape. The quality of the mold directly influences the accuracy, surface finish, and ease of production of your concrete blocks.
A Brief History of Block Molding
The concept is ancient, but the technology has evolved dramatically. Early builders used simple wooden forms, often for single-use, which was labor-intensive and inconsistent. The industrial revolution and the invention of Portland cement led to standardized block sizes. The 20th century introduced mass-produced steel and, later, plastic molds, enabling both large-scale manufacturing and accessible DIY projects. This evolution has been driven by a constant pursuit of efficiency, consistency, and accessibility.
Key Components of a Quality Mold
Not all molds are created equal. A superior cement block mold incorporates several key features:
- Material: Determines durability, finish, and cost (detailed in the next section).
- Design & Draft Angles: Walls should be slightly tapered (have a “draft”) to allow for easy demolding without damaging the block.
- Reinforcement: Especially in plastic molds, ribbed or thickened sections prevent warping under the pressure of wet concrete.
- Release Mechanism: May include built-in tabs, knock-out holes, or a design that facilitates flexing for easy block removal.
- Interlocking Features: For molds making retaining wall or paving blocks, precise tongues and grooves are critical for a seamless fit.
Types of Cement Block Molds: Choosing the Right One for Your Project
Selecting the correct mold is your first critical decision. The right choice depends on your project scope, budget, and desired finish.
By Material: Plastic vs. Polypropylene vs. Steel Molds
-
Plastic (ABS, HDPE): Byiza kuri: Hobbyists, DIYers, and low-volume decorative projects.
- Inziza: Lightweight, affordable, and available in countless decorative shapes (garden stones, ornamental blocks).
- Ibibi: Less durable, can warp or crack with rough use or UV exposure, may produce a less sharp edge definition.
-
Polypropylene (PP): Byiza kuri: Serious DIYers and small-scale production.
- Inziza: More rigid and durable than standard plastic, offers excellent release properties, and provides a smoother finish. Often used for standard block shapes.
- Ibibi: More expensive than basic plastic, can become brittle in extreme cold.
-
Steel (Often Powder-Coated): Byiza kuri: Professional use, high-volume production, and where dimensional precision is paramount.
- Inziza: Extremely durable, can last for thousands of cycles, produces blocks with very sharp edges and consistent dimensions. Resists warping.
- Ibibi: Heavy, expensive, and requires proper maintenance (cleaning, oiling) to prevent rust.
By Block Type and Size
Molds are specialized for their output. Common types include:
- Standard Cinder Blocks: For structural walls (though modern “cinder” blocks use concrete).
- Concrete Bricks: Smaller, solid units for paving or lightweight walls.
- Decorative Screen Blocks: Feature geometric patterns for privacy screens and aesthetic walls.
- Landscaping & Retaining Wall Blocks: Often interlocking and designed with a natural stone face.
- Large Paving Slabs and Patio Stones: For creating walkways and patios.
By Production Method: Manual vs. Automated Machine Molds
- Manual Hand-Pack Molds: The focus of this DIY guide. You fill, compact, and level the concrete by hand. Perfect for projects requiring dozens or hundreds of blocks.
- Vibration Table Molds: These are sturdy molds placed on a vibrating table. The mechanical vibration compacts the concrete thoroughly, producing denser, stronger blocks with fewer voids.
- Automated Block-Making Machines: These are industrial systems that integrate mixing, molding, vibration, and curing. They are used for large-scale commercial production of concrete blocks.
How to Use a Cement Block Mold: A Step-by-Step DIY Guide
Follow this proven process to create perfect blocks every time.
Essential Tools and Materials You’ll Need
- Cement block mold(s)
- Concrete mix (pre-mixed or ingredients: Portland cement, sand, gravel)
- Amazi
- Release agent (vegetable oil, commercial mold release, or diesel oil)
- Mixing tub or wheelbarrow
- Shovel or hoe for mixing
- Trowel and margin float
- Stiff brush or rag (for applying release agent)
- Safety gear: Heavy-duty gloves, safety glasses, dust mask, and sturdy boots.
Step 1: Preparing Your Mold and Mix
- Apply Release Agent: Thoroughly coat every interior surface of the mold with a thin layer of release agent. This is non-negotiable for easy demolding.
- Mix Concrete: Aim for a consistent, “cottage cheese” texture—moist but not soupy. If using a pre-mix, follow bag instructions. For a standard mix, a 1:2:3 ratio (cement:sand:gravel) by volume is a reliable starting point.
Step 2: Filling, Compacting, and Leveling
- Fill in Layers: Shovel concrete into the mold in layers, filling about one-third at a time.
- Compact Thoroughly: After each layer, use a tamping tool (a piece of wood works) or a vibrating motion to eliminate air pockets. This is crucial for strength.
- Overfill and Strike Off: Once the mold is overfilled, use a straight piece of wood or a metal screed to scrape excess concrete off the top, leaving a smooth, level surface.
Step 3: Curing, Demolding, and Final Curing
- Initial Cure: Let the filled mold sit on a flat, stable surface for 24-48 hours. Keep it out of direct sun and wind; you can cover it with plastic to retain moisture.
- Careful Demolding: Gently flex the mold or tap its sides. Invert it onto a soft surface (like grass or a bed of sand) and carefully lift it away.
- Final Curing: The block is now “green.” For maximum strength, it must cure slowly for up to 28 days. Keep it damp by misting with water and covering with plastic for the first week. This slow hydration process is what gives concrete its legendary strength.
Top Applications for Cement-Block-Molded Projects
The possibilities are limited only by your imagination and the molds you choose.
- Construction Fundamentals: Build non-load-bearing garden walls, shed foundations, or interior partition walls using standard blocks.
- Landscaping and Outdoor Living:
- Create custom garden edging to define flower beds.
- Craft a unique patio with interlocking patio stones.
- Build raised planter boxes for vegetables or flowers.
- Construct sturdy outdoor benches or fire pits.
- Decorative and Architectural Elements: Use decorative screen blocks to build a privacy wall that lets light and air through. Make custom-shaped pavers with inlaid designs or colored concrete for a personalized touch.
Buying Guide: What to Look for in a Quality Cement Block Mold
Investing in a good mold pays dividends in results and longevity.
- Durability and Material Thickness: Thicker walls resist flexing. For plastic/polypropylene, look for molds at least 4-5mm thick.
- Design for Easy Release: Look for generous draft angles, integrated handles or knock-out holes, and a design that doesn’t have undercuts that trap the block.
- Accuracy and Consistency: The mold must produce blocks with consistent dimensions, especially if they need to interlock. Check product reviews for comments on this.
- Brand Reputation and Supplier Reliability: Purchase from established suppliers specializing in concrete tools. Look for clear warranties, available customer service, and positive user feedback about durability.
Maintenance, Troubleshooting, and Safety Tips
Protect your investment and yourself.
- Cleaning and Storage: Clean molds with water and a brush immediately after use. Never let concrete dry on them. Store in a cool, dry place out of direct sunlight.
- Common Issues & Fixes:
- Blocks Sticking: You didn’t use enough release agent. Next time, coat thoroughly.
- Broken Blocks on Demolding: The concrete was too dry, wasn’t compacted enough, or you demolded too soon.
- Surface Blemishes: Air bubbles caused by insufficient vibration/tamping. Ensure proper compaction.
- Essential Safety Practices:
- Always wear gloves and safety glasses. Concrete is caustic and can cause skin burns and eye damage.
- Wear a dust mask (N95) when mixing dry cement to avoid inhaling silica dust.
- Lift with your legs, not your back—wet concrete and molds are heavy.
Frequently Asked Questions (FAQ) About Cement Block Molds
Q: What’s the difference between a cement block mold and a concrete block mold?
A: In common usage, they refer to the same thing. Technically, “cement” is the powdered binding agent (like Portland cement), while “concrete” is the finished composite of cement, sand, and aggregate. Since these molds are used to make concrete blocks, “concrete block mold” is more accurate, but “cement block mold” is universally understood.
Q: Can I make my own cement block mold at home?
A: Yes, for one-off or highly custom shapes. Wood is common for simple forms, and silicone can capture intricate details. However, for producing multiple, identical blocks, a manufactured mold made from polypropylene or steel will provide far better consistency, durability, and ease of use.
Q: How many blocks can I make from one mold before it wears out?
A: It varies drastically by material and care. A cheap plastic decorative mold may last 50-100 cycles. A quality polypropylene mold for standard blocks can last 300-500 pours. A professional steel mold can last for thousands of cycles.
Q: What is the best concrete mix ratio for block molds?
A: For strong, general-purpose blocks, a mix of 1 part Portland cement, 2 parts clean sand, and 3 parts gravel (by volume) is excellent. For smoother, finer-detail blocks (like decorative stones), use a “mortar mix” or a 1:3 ratio of cement to fine sand. Pre-mixed concrete bags are a convenient and consistent alternative.
Q: Do I need to use a release agent every time?
A: Absolutely, yes. Using a release agent every single time is the most important step for ensuring your block releases cleanly and your mold remains undamaged. It saves time, frustration, and money in the long run.
Conclusion
Mastering the use of a cement block mold is a gateway to remarkable efficiency, creativity, and cost savings in your building and landscaping projects. It transforms a raw, liquid material into precise, durable building units with your own hands. Remember, success hinges on choosing a quality mold suited to your task, meticulously following the mixing and curing steps, and never compromising on safety.
We hope this guide empowers you to tackle your next project with confidence. Have you used cement block molds before? Share your experiences or project photos in the comments below—we’d love to see what you create. For more trusted advice on working with concrete, from mixing techniques to advanced masonry, explore the other expert guides on our site. Now, go pour something amazing.
<