
วิธีทำบล็อกคอนกรีตซีเมนต์: คู่มือทีละขั้นตอนสำหรับผู้ที่ชอบทำเองและช่างก่อสร้าง
มองไปรอบ ๆ ย่านที่อยู่อาศัย เมือง หรือฟาร์มใด ๆ คุณจะเห็นพวกมัน บล็อกคอนกรีตซีเมนต์ หรือที่รู้จักในชื่อทางการว่าหน่วยก่อสร้างคอนกรีต (CMUs) คือฮีโร่ที่ถูกหลงลืมของโลกสิ่งปลูกสร้าง ตั้งแต่ฐานรากใต้บ้านของคุณ ไปจนถึงกำแพงกันดินในสวน และผิวหน้าอาคารสมัยใหม่ที่ตกแต่งอย่างสวยงาม ความแข็งแรง ความทนทาน และความหลากหลายในการใช้งานของพวกมันนั้นไม่มีอะไรเทียบได้ แต่ถ้าคุณสามารถสร้างบล็อกพื้นฐานเหล่านี้ด้วยตัวเองล่ะ?
ด้วยประสบการณ์กว่า 15 ปีในงานก่อสร้างและก่ออิฐ โดยได้วางและผลิตบล็อกนับพันสำหรับโครงการตั้งแต่โรงเก็บของง่ายๆ ไปจนถึงภูมิสถาปัตยกรรมที่ซับซ้อน ผมได้เรียนรู้ว่าความสำเร็จอยู่ที่รายละเอียด คู่มือนี้จัดทำขึ้นสำหรับผู้ที่รักการทำด้วยตัวเองอย่างจริงจัง ผู้สร้างโครงการขนาดเล็ก และผู้พึ่งพาตนเองที่จัดการที่อยู่อาศัย ไม่ว่าคุณจะวางแผนสร้างกำแพงสวนขนาดเล็ก โรงงานในสวนหลังบ้าน หรือเพียงต้องการเข้าใจกระบวนการเพื่อประเมินงานมืออาชีพได้ดีขึ้น คุณก็มาถูกที่แล้ว
เราสัญญาว่าจะให้คำแนะนำที่ชัดเจน ปลอดภัย และละเอียดลึกซึ้ง เราจะครอบคลุมทุกอย่างตั้งแต่การจัดหาวัสดุไปจนถึงการฝึกฝนจนเชี่ยวชาญส่วนผสมคอนกรีตบล็อกสู่การปฏิบัติจริงกระบวนการทีละขั้นตอนของการขึ้นรูปและวิทยาศาสตร์ที่ไม่สามารถต่อรองได้ของกระบวนการบำบัดรักษาในตอนท้าย คุณจะไม่เพียงแต่เข้าใจวิธีการทำบล็อกคอนกรีตซีเมนต์แต่จะทำให้พวกเขาได้อย่างไรดีมาสร้างความรู้พื้นฐานนั้นขึ้นมา ตั้งแต่พื้นฐานที่สุด
การทำความเข้าใจบล็อกคอนกรีตซีเมนต์ (CMUs)
Before you mix a single grain of sand, it’s crucial to understand what you’re making and why you might choose to make it yourself.
What Are Concrete Blocks?
A concrete block is a precast building material made from a mixture of Portland cement, fine aggregates (like sand), coarse aggregates (like gravel), and water. These DIY concrete blocks are formed into standardized shapes—most commonly the rectangular 8″x8″x16″ block—with one or more hollow cores to reduce weight and improve insulation. Their primary uses are in constructing walls, foundations, partitions, and other structural elements. They provide excellent compressive strength, fire resistance, and thermal mass.
Benefits of Making Your Own Blocks
- Cost Savings: For large projects, producing your own blocks can significantly reduce material costs, especially if you have access to local aggregates.
- การปรับแต่ง You control the mix, color (with pigments), and even the size if you build custom molds. Want a slightly different hue or a unique dimension for a special project? You’re the boss.
- Project Satisfaction & Self-Reliance: There’s an immense pride in building something from the literal ground up. Making the blocks yourself deepens your connection to the project and builds invaluable skills.
- Logistical Advantage: For remote locations where transporting heavy, finished blocks is expensive or difficult, making them on-site can be the only practical solution.
Important Safety First: Essential PPE and Precautions
Concrete work is rewarding but demands respect. Cement is caustic, dust is harmful, and the materials are heavy. Prioritizing safety is non-negotiable for a trustworthy builder. Always wear:
* Safety Goggles: Protect your eyes from cement dust and splashes.
* Respirator/Dust Mask: N95 or better to avoid inhaling fine silica dust.
* Heavy-Duty Gloves: Prevent skin irritation from cement and abrasions.
* Sturdy Boots: Steel-toe boots are ideal for protecting feet from heavy drops.
* Long Pants and Sleeves: Minimize skin exposure.
Work in a well-ventilated area, lift with your legs—not your back—and keep a clean workspace to avoid trips and falls.
Essential Materials and Tools You’ll Need
Gathering the right components is 80% of the battle. Here’s your comprehensive checklist.
Core Materials: Cement, Aggregates, and Water
- Portland Cement: This is the binding agent. Type I/II general-purpose cement is perfect for most concrete block mixtures. Buy fresh, bagged cement from a reputable supplier and store it in a dry place.
- Fine Aggregate (Sand): Use sharp, clean concrete sand—not soft masonry sand or beach sand. It should be free of clay, silt, and organic matter. The grains provide density and workability.
- Coarse Aggregate (Gravel): For strong blocks, you need crushed stone or gravel. A 3/8-inch to 1/2-inch size is ideal for block making, allowing for good compaction without being too large for the mold.
- น้ำ Clean, potable water is essential. Never use water from a pond or ditch, as impurities can weaken the final block.
The Right Tools for the Job
Your method defines your toolset.
For the Manual Method:
* Block Molds: Steel molds are durable and give sharp edges; plastic molds are lighter and cheaper. Ensure they are designed for the block size you want.
* Mixing Tub or Mortar Pan: A large, shallow tub for hand mixing.
* Shovel and Hoe: For combining dry materials and mixing in water.
* Trowel: For striking off excess mix from the top of the mold.
* งัดแงะ A heavy, flat-ended tool (often homemade from wood and metal) to compact the mix in the mold.
* Pallets & Plastic Sheeting: Wooden pallets to place fresh blocks on and plastic to cover them for curing.
* Mold Release Agent: Non-stick cooking spray, used motor oil (sparingly), or commercial form oil to prevent sticking.
Semi-Mechanized Option:
For higher output, consider a manual press (like a Cinva-Ram style) or an electric เครื่องทำบล็อกคอนกรีต. These machines use lever action or vibration to apply significant compaction force, producing denser, more consistent blocks much faster than hand tamping.
Setting Up Your Workspace
Choose a flat, level area that is shaded from direct sun and protected from wind. You’ll need:
* Easy access to a water source.
* Space for material storage, mixing, molding, and curing.
* A solid surface (like a concrete slab or tightly packed earth) for the molding operation.
* Ample space for blocks to cure undisturbed for several weeks.
The Perfect Concrete Mix Design for Blocks
The strength and durability of your block live and die by the mix. It’s a recipe that requires precision.
Standard Mix Ratios for Different Block Strengths
A common mix ratio for general-purpose, non-structural blocks is 1:3:5 (Cement:Sand:Gravel) by volume. For stronger blocks, suitable for garden walls or low structures, a 1:2:4 mix is better. Remember, these are “parts” by volume—not weight.
| Block Use Case | Cement | Sand | Gravel | Notes |
| ———————– | :—-: | :–: | :—-: | ————————————– |
| General Use | 1 | 3 | 5 | Good for planters, non-load bearing |
| Higher Strength | 1 | 2 | 4 | Better for walls, small outbuildings |
| Paver/Decorative | 1 | 2 | 3 | Denser, smoother finish possible |
How to Calculate Materials for Your Project
Let’s say you’re using the 1:3:5 mix for 100 blocks. A standard 8″ block mold requires about 0.6 cubic feet of mixed concrete.
1. Total Volume Needed: 100 blocks x 0.6 ft³ = 60 ft³ of mixed concrete.
2. Sum the Ratio Parts: 1 + 3 + 5 = 9 total parts.
3. Volume per Part: 60 ft³ / 9 = ~6.67 ft³ per part.
4. Material Breakdown:
* Cement: 1 part = 6.67 ft³ (About 13-14 bags, since 1 bag = 0.5 ft³)
* Sand: 3 parts = 20 ft³
* Gravel: 5 parts = 33.3 ft³
Always mix a small test batch first!
Mixing Process: Achieving Consistent Quality
Consistency is king. Follow this order:
1. Dry Mix: On a clean, flat surface or in your tub, thoroughly blend all the sand and gravel until the color is uniform.
2. Add Cement: Spread the cement evenly over the top of the aggregate pile and mix until the entire pile is a consistent gray color, with no streaks of brown aggregate.
3. Form a Crater: Make a large crater or well in the center of your dry mix pile.
4. Add Water Gradually: Pour about 3/4 of your estimated water into the crater. Using your shovel or hoe, slowly pull the dry mix into the water from the edges inward. Add more water as needed, but sparingly.
5. Target Consistency: The perfect mix for blocks is “stiff” or “low-slump.” It should hold its shape when squeezed in a gloved hand (like damp soil for making a snowball), not soupy or crumbly. Too much water is the #1 mistake; it drastically weakens the final block.
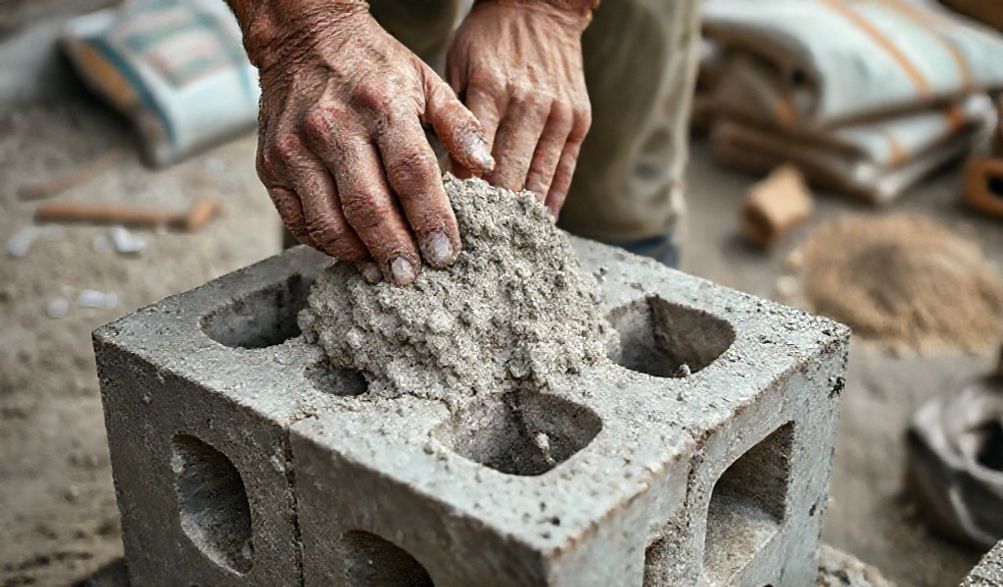
Step-by-Step Block Making Process
Now for the main event. Patience and technique here pay off in spades.
Step 1: Preparing and Oiling the Molds
Ensure your mold is clean, dry, and assembled tightly. Apply a thin, even coat of your chosen release agent to every interior surface. This step is crucial to prevent blocks sticking to the mold.
Step 2: Filling and Compacting the Mix
Place your oiled mold on a solid, flat surface (like a pallet).
1. Layer Fill: Shovel your stiff mix into the mold cavities. Don’t just dump it in. Fill them about halfway first.
2. Tamp Thoroughly: Use your tamper to apply firm, even pressure across the entire surface of the mix. The goal is to eliminate all air pockets, which are points of weakness.
3. Second Fill & Tamp: Fill the mold to overflowing and tamp again with even greater force. Proper การบดอัด is what gives a homemade block its density and strength.
4. Strike Off: Using a straight-edged trowel, scrape the excess mix off the top of the mold to create a smooth, flat surface.
Step 3: Stripping the Molds (De-molding)
This requires a gentle touch. Carefully lift the mold straight up and off the freshly formed “green” block. If the mix was right and the mold was oiled, it should release cleanly. If it resists, tap the sides of the mold gently with a rubber mallet. Never force it.
Step 4: The Critical Curing Process
Curing is not drying. It is the chemical process where cement reacts with water to gain strength. Skipping proper curing results in blocks breaking easily.
* Initial Set: Let the blocks sit undisturbed on their pallets for 24-48 hours, covered with plastic sheeting to retain moisture.
* Water Curing: After initial set, the blocks need to stay moist for at least 7 days. You can:
* Sprinkle them thoroughly 2-3 times a day.
* Pond them by building a small berm around the pallet and flooding it with a shallow layer of water.
* Keep them covered with water-saturated burlap or plastic.
* Duration: For optimal strength, cure for 28 days. A block at 7 days has only about 60-70% of its potential strength. After 28 days, it’s considered to have reached its full design strength.
Troubleshooting Common Block Making Problems
Even experts face issues. Here’s how to diagnose and fix them.
Blocks Breaking Easily (Weakness)
- Cause: Incorrect mix ratio (too little cement), insufficient compaction (air pockets), or poor/inadequate curing.
- Fix: Re-check your ratios, tamp with more deliberate force, and commit to a full, wet curing period.
Surface Cracks or Imperfections
- Cause: Too much water in the mix (causes shrinkage cracks), rapid drying in sun/wind, or de-molding too early when the block is still too soft.
- Fix: Use a stiffer mix, work in the shade, cover blocks immediately after molding, and wait longer before stripping the mold.
Blocks Sticking to the Mold
- Cause: Inadequate or uneven application of mold release agent.
- Fix: Be generous and thorough with oiling before every pour. Ensure the mold is completely clean.
Frequently Asked Questions (FAQ) About Making Concrete Blocks
Q: What is the difference between cement, concrete, and a concrete block?
ก This is a fundamental distinction. Cement (specifically Portland cement) is the fine gray powder that acts as the “glue.” Concrete is the composite material made by mixing cement, sand, gravel, and water. A concrete block is a pre-formed, hardened shape made from concrete, designed as a building unit.
Q: How long do homemade concrete blocks need to cure before use?
ก While they can be handled after 2-3 days, they should not be subjected to any load. A minimum of 7 days of proper wet curing is essential. For full structural strength, allow them to cure for 28 days before building with them.
Q: Can I use homemade blocks for load-bearing walls or foundations?
ก This is a critical point for safety and ความน่าเชื่อถือ. For non-critical projects like garden walls, planters, or decorative features, well-made homemade blocks are excellent. However, for primary load-bearing walls, foundations, or any structural element of a habitable building, we strongly advise against it. These applications require blocks that meet strict ASTM or CSA standards for compressive strength, absorption, and dimensional tolerance, which are consistently achieved in controlled factory environments. Always consult a structural engineer for load-bearing projects.
Q: How many blocks can I make in a day by hand?
ก Manage your expectations. A solo worker with a single mold, mastering the workflow, can realistically produce 30-50 blocks in a full day. The limiting factors are mixing time, compaction effort, and space for curing.
Q: Do I need to use a block-making machine?
ก It depends on scale and goals. For a small project (<100 blocks), hand molding is cost-effective. For larger projects (100+ blocks), a manual press or electric เครื่องทำบล็อกคอนกรีต saves immense time and labor, produces more consistent and denser blocks, and is a worthwhile investment if you plan future projects.
Conclusion
Making your own cement concrete blocks is a deeply satisfying fusion of craft and science. We’ve walked through the key phases: selecting quality materials, designing a precise mix, mastering the techniques of filling and compaction, and honoring the patient, critical กระบวนการบำบัดรักษา. This guide is built on a foundation of practical field experience, aiming to equip you with best practices, not just theory.
The best way to learn is by doing. Start with a small test batch—make ten blocks. Practice your mix, your tamp, and your curing routine. See how they turn out. The knowledge you gain will be solid as, well, concrete.
We’d love to hear about your projects! Share your experiences or questions in the comments below. For your next step, consider reading our guide on “How to Lay Concrete Blocks” to complete your skillset. For the most authoritative information on material specifications, we recommend visiting the Portland Cement Association website.
<