
Ultima Ductor ad Machinas Glebarum Formandarum: Provehe Successum Seminum Inceptorum
Introductio
Imaginare: primo vere es, et circumdatus es mari plastico—tenuibus seminariis alveolis, vasis fissis, ac cumulo cellularum sarcinarum ad sterquilinium destinatarum. Teneras plantas cum cura transponis, tantum ut eas marcescere et haerere spectes, vexatas illo formidato transplantationis impulsu. Sumptus augentur, vastitas peccare videtur, et exitus saepe frustrant. Si hic cyclus notus tibi sonat, non solus es. Per decennia, hic modus usitatus fuit, sed melior via est.
Ingredere machinam formandi glebas terrae: instrumentum ingeniosum, fere liberum a materia plastica, quod revolutionem affert seminum inceptorum omnibus, ab hortulanis domesticis usque ad agricolas commerciales. Per comprimendum specialem mixturam terrae in solidos, se continentis cubos, hoc simplex machinamentum penulas omnino excludit, vegetas radicum systemata et transplantationes sine impedimentis fovens. Est arcanum telum sustinens et efficax quod quaesivisti.
Hic liber plenus est tibi via ad soli frusta dominanda. Penitus perscrutabimur quomodo operentur, cur praestent, et quomodo machinam tuam eligas atque utare perite. Annorum experientia manuali in hortorum cultura et ampla investigatione in usibus hortorum commercialium nixi, hic liber designatus est ut tempus, pecuniam, molestiamque tibi servet, dum novum gradum prosperitatis in horto tuo aperit.
Quid est Machina ad Glomeratos Terrae Faciendos?
In ipsa eius essentia, fabricator glebae est instrumentum pulchrae simplicitatis. Ultra commune palam hortensem aut terebram procedit, ad unum certum propositum transformativum excogitatum.
Conceptus Primarius: Seminatio Sine Vasis
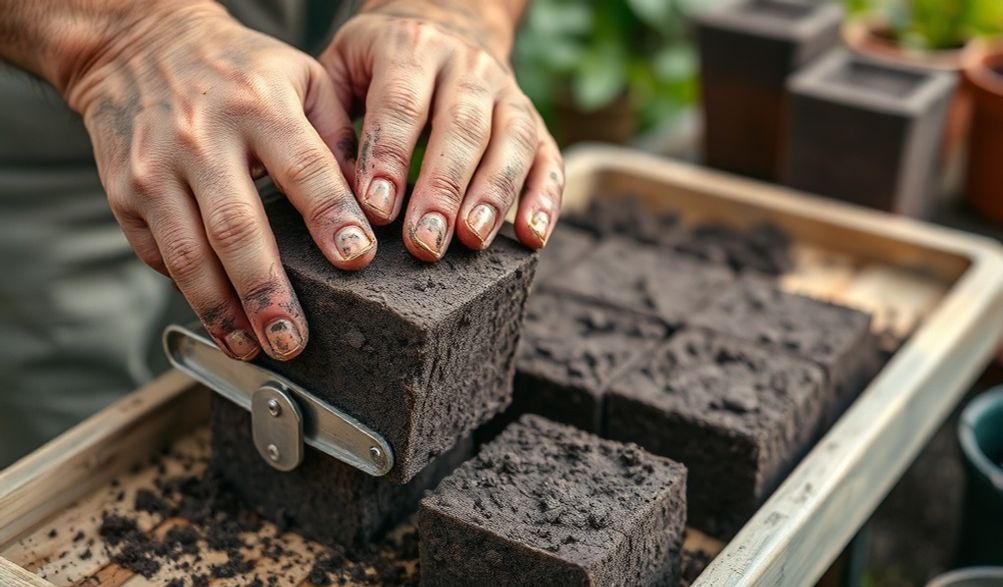
Faber laterum terrae est pressura manualis vel stativa quae mixturam humectatam et specialiter compositam in cubos liberos comprimit. Hi cubi formam suam sine ullo vase plastico, alveolo, vel cellula circumdante tenent. Simpliciter instrumentum in mixturam premis, laterem in superficiem planam eicis, et semen in praefactam impressionem (quae "dibble" vocatur) locas. Ipse later fit receptaculum, microambientem perfectum ad germinationem et primum incrementum creans. Hic processus propagationem plantularum penitus recogitat, structuram terrae et sanitatem radicum in primis ponens.
Brevis Historia: Ab Hortis Europaeis ad Praedia Moderna
Cum novum morem videri possint, obstruentes terrae altas radices in re rustica practica et magna habent. In hortis mercatoriis Europaeis—praecipue in Gallia et Batavia—primum adhibiti sunt, ubi efficientia, sanitas plantarum, et moderatio sumptuum maximi momenti sunt ad commercium sustentandum. Cultores systema requirebant quod transplantamenta meliora celerius et minore impendio efficeret.
Philosophia et instrumenta trans Oceanum Atlanticum deinceps transierunt ac studiosum sectatorem inter agricolas organicos Americanos Septentrionales, hortulanos mercatos, et domicolas oecologicae conscientiae consecuta sunt. Hodie, mutationem ad cultum parvae vastitatis, magnae efficaciae significant, quae tam perito in horto domestico quam productori professionali prodest.
Praecipua Beneficia Usus Fabricatoris Glebarum Terrae
Cur per "laborem" ire proprios formare caudices, cum plastici alvei tam prompte praesto sunt? Commoda alta sunt et physiologiam plantarum, oeconomiam, ethicamque environmentalem attingunt.
Saniores, Firmiores Plantae: Praestantia Aeris Putationis
Hoc est unum maximum beneficium. In olla plastica, radices crescunt donec parietem attingunt, deinde circum vas circumvolvuntur. Hoc efficit plantam radicibus constrictam quae post transplantationem difficile constituitur.
- Aeris Putatio:In glebae cubo, radices ad extremitates cubi expositas crescunt. Cum aërem attingunt, apex radicis naturaliter siccatur et crescere desinit (hoc est "aëris putatio"). Hoc signum dat plantae ut plures radices laterales emittat.postilla radix. Effectus est densa, fibrosa, et explosiva radicis ratiointramassa, sine ullo circumitu.
- Transplantatio Mitigata:Cum tempus est serendi, totum caementum in terram deponis. Radices statim in circumiacentem humum erumpunt sine ulla mora accommodationis. Plantae parvum aut nullum transplantationis ictum sentiunt, unde celerior incrementum et maturiores fruges proveniunt.
Sustainability and Cost-Effectiveness
The financial and environmental savings are substantial and compound over time.
- Drastically Reduce Plastic Waste: Imagine never buying another plastic seedling tray, cell pack, or pot. For a commercial grower starting tens of thousands of plants, this is a massive reduction in annual waste. For the home gardener, it aligns gardening with a sustainable lifestyle.
- Pecunia diuturna While there’s an upfront cost for a quality blocker, it’s a one-time purchase. You eliminate the recurring expense of disposable containers. The soil mix ingredients (peat, coir, compost) are often more economical in bulk than buying bagged potting soil year after year.
Efficiency and Space Optimization
Soil blocks streamline your workflow and maximize valuable growing space.
- Tight Packing: Blocks can be placed shoulder-to-shoulder on a standard tray or even a wooden board. There are no wasted gaps between round pots, allowing you to fit significantly more seedlings under a single grow light or in a germination chamber.
- Workflow Speed: With practice, making blocks becomes a rapid, rhythmic process. For large-scale seeding, multi-block machines allow a single person to produce hundreds of uniform blocks per hour.
Types of Soil Block Makers: Choosing Your Tool
Not all soil blockers are created equal. Your choice depends on your scale, budget, and physical preference.
Hand-Held Blockers: For the Home Gardener
These are the most common entry point. They are simple, affordable, and effective.
- Exempla.TheJohnny’s Selected 4″ Soil Blocker or the 2″ model are industry standards.
- Pros:
- Low cost and easy to store.
- Perfect for starting a few hundred plants per season.
- Simple mechanics with no moving parts to break.
- Incommodis:
- Requires more physical effort (pressing into the mix).
- Slower for producing very large quantities.
Stand-Mounted and Multi-Block Machines: For Market Gardeners & Farmers
When volume is key, these ergonomic, lever-operated tools are worth the investment.
- Exempla.TheEarthWay Commercial Stand-Up Blocker or the Pro-Soil Blocker.
- Pros:
- Can make 4, 5, or even 12 blocks with a single press of a lever.
- Much easier on the wrists and back for high-volume work.
- Produce incredibly consistent blocks.
- Incommodis:
- Significant upfront cost.
- Requires more storage space.
- Can be overkill for a small backyard garden.
Block Size and Shape: ¾”, 2″, 4″, and Mini Blocks
Size matters. Different blockers produce different cube dimensions for specific uses.
- ¾” or “Mini” Blocks: Ideal for quick-germinating, small plants like lettuce, brassicas (kale, cabbage), and herbs. They are transplanted very young.
- 2″ Blocks: The workhorse size. Perfect for most common vegetables: tomatoes, peppers, eggplants, cucumbers, and flowers. They provide enough root space for 3-5 weeks of growth.
- 4″ Blocks: Used for long-season crops that need a longer head start, like large tomatoes, peppers, or perennial flowers. The larger soil volume supports the plant longer if weather delays transplanting.
- The Dibble: Most blockers have a central pin that creates a small indentation for the seed. For larger seeds like beans or squash, you can simply press the seed into the flat top of the block.
The Essential Soil Mix Recipe for Perfect Blocks
This is where many beginners stumble, but it’s the foundation of success. Standard bagged potting mix will not work. It lacks the specific structure needed to hold a block together.
Why Standard Potting Mix Fails
Commercial potting mixes are often too light and fluffy, relying on peat and perlite for aeration. When compressed in a blocker, they either crumble immediately or, if over-watered, turn into a dense, soggy brick that suffocates roots. A block mix needs the “wet cement” consistency—it must cohere under pressure but still be full of air pockets.
A Proven, Reliable Soil Block Recipe
After years of testing in our trial garden, this bulk recipe provides consistent, excellent results. It’s based on the classic “Fort Vee” formula used by many professional growers.
Yield: Makes approximately 2.5 cubic feet (enough for many blocks).
Ingredients (by volume):
* 3 parts Sphagnum Peat Moss or Coconut Coir: The base. Coir is a more sustainable, pH-neutral alternative to peat.
* 2 parts High-Quality, Fine-Screened Compost: Provides fertility and microbial life. It MUST be well-finished and sieved to remove sticks and chunks.
* 1 part Perlite: For crucial aeration and drainage.
* 1/2 part Garden Lime (if using peat): Peat moss is acidic. Lime balances the pH. Omit if using coir.
* 1/2 cup Base Organic Fertilizer Blend: A mix like 1 part blood meal (for nitrogen), 1 part colloidal phosphate or bone meal (for phosphorus), and 1 part greensand or kelp meal (for potassium/micronutrients).
Mixing Instructions:
1. Dry Mix: In a large tub or on a clean tarp, thoroughly combine the peat/coir, compost, and perlite.
2. Add Amendments: Sprinkle the lime (if using) and base fertilizer evenly over the pile and mix again.
3. Add Water Slowly: This is the critical step. Add warm water gradually while mixing with your hands or a hoe. Stop and test frequently.
4. The Moisture Test: Grab a handful of mix and squeeze it firmly. It should hold together in a tight ball, with a glistening appearance, and only a drop or two of water should be extractable. It should not crumble (too dry) and should not drip freely (too wet). Achieving this “wet cement” stage takes practice.
Sourcing Quality Ingredients and Pre-Mixed Alternatives
- For Coir/Peat: Look for brands like PRO-MIXautCanna for consistent quality.
- For Compost: A high-quality, bagged compost like Coast of MaineautMalibu Compost is reliable for beginners. Avoid cheap, woody composts.
- Pre-Mixed Alternative: If mixing your own feels daunting, several companies sell pre-bagged block mix. Fort Vee Mix (from Growers Supply) is the gold standard, but it’s often sold in large, commercial quantities.
Step-by-Step Guide: Using Your Machine Like a Pro
With your mix ready, it’s time to make blocks. Follow these steps for professional results.
Preparation: Mixing, Moistening, and Setup
- Final Mix Check: Ensure your mix passes the squeeze test. Let it sit for an hour after final watering; the moisture will equalize.
- Set Up Your Station: Have a large tub of your mix, your blocker, solid-bottom trays (no holes, or line a flat with newspaper), plant labels, and seeds all within reach. Work at a comfortable waist-high table.
The Forming Technique: Dipping, Compressing, and Ejecting
- Dip: Push the blocker straight down into the mix, ensuring all chambers are fully filled. Scrape the bottom against the edge of the tub to remove excess.
- Comprime. For hand-held models, press down firmly on a solid surface (like your work table) to compact the mix. You’ll feel resistance. For stand models, pull the lever with steady pressure.
- Eice: Lift and move to your tray. Press the plunger to release the blocks. They should eject cleanly and stand proud.
Troubleshooting:
* Blocks are crumbly: Mix is too dry. Add water sparingly and re-mix.
* Blocks slump or don’t eject cleanly: Mix is too wet. Add more dry ingredients (peat/coir, compost, perlite) to absorb excess moisture.
Seeding, Watering, and Germination Care
- Seeding: Place 1-2 seeds in the dibble hole. For fine seeds, no covering is needed. For larger seeds, pinch a tiny amount of mix over the hole.
- Initial Watering: Use a fine mist sprayer to gently moisten the top of the blocks. Avoid a heavy stream that will erode them.
- Bottom Watering (Going Forward): After the initial watering, always water by pouring water into the tray, allowing the blocks to wick it up from below. This encourages deep roots and preserves block integrity.
- Germination: Cover trays with a humidity dome until seeds sprout. Remove the dome immediately after germination to prevent damping-off disease. Provide strong light as soon as the first seed leaves (cotyledons) appear.
Interrogationes Saepius Petitae (ISP)
Q: Are soil block makers worth it for a small home garden?
A: It depends on your priorities. If you value superior plant health, want to eliminate plastic waste, and hate transplant shock, then yes—even a small 2″ hand model is a fantastic, long-term investment. If you only start a dozen tomato plants each year, the convenience of a few plastic pots might outweigh the benefits for you.
Q: My blocks are falling apart. What am I doing wrong?
A: 99% of the time, this is a moisture issue. Your mix is too dry. It must hold together when squeezed firmly. Go back to the moisture test. The other culprit can be chunky, unfinished compost. Ensure your compost is fine and soil-like.
Q: Can I use my own garden compost in the mix?
A: You can, but with major caveats. It must be fully finished, cooled, screened through a ¼” mesh, and ideally pasteurized (by solarization or baking) to kill weed seeds and pathogens. For reliability in your first season, we strongly recommend using a high-quality, bagged compost.
Q: How do I transplant blocks into the garden?
A: It’s the easiest part! Simply dig a hole slightly larger than the block and place the entire block inside. Bury it so the top of the block is just below the soil surface. Water it in. There is no root disturbance—you are literally giving the plant’s root system a head start in its new home.
Q: Where can I buy a reliable soil block maker?
A: Purchase from reputable gardening and agricultural suppliers known for quality tools. We recommend Johnny’s Selected Seeds, Fedco Seeds, Growers SolutionautPeaceful Valley Farm Supply. Be cautious of unknown, cheap brands on generic online marketplaces; they often have poor casting quality and wear out quickly.
Conclusio.
Adopting a soil block making machine is more than just acquiring a new garden tool; it’s embracing a fundamentally better system for growing plants. It represents a shift towards intentional, sustainable horticulture that prioritizes root health, reduces waste, and saves money in the long run. The benefits—from the air-pruned, explosive root systems to the elimination of plastic trays—are not just theoretical; they are visibly apparent in the vigor of your transplants.
Start your journey by choosing a simple hand-held model and mixing a batch of the proven soil recipe. The learning curve is short, and the rewards are immediate. You’ll be investing not only in the success of your garden but also in a practice that respects the environment. In a world of quick fixes and disposable goods, the soil block maker stands as a testament to the power of simple, smart design for a more resilient garden.
<