
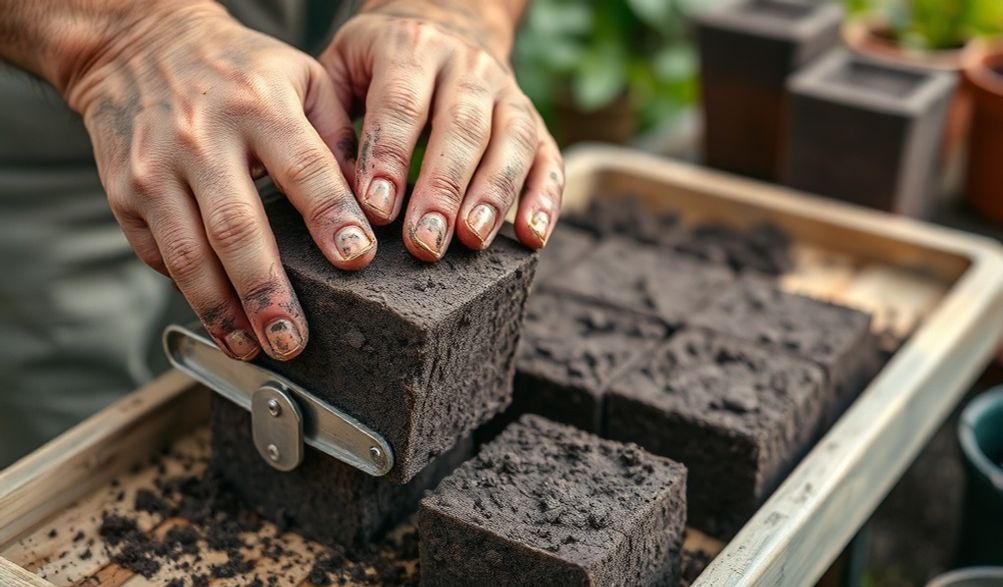
Panduan Utama Mesin Pembuat Blok Tanah: Tingkatkan Kejayaan Permulaan Benih Anda
Pengenalan
Bayangkan ini: awal musim bunga, dan anda dikelilingi lautan plastik—dulang anak benih yang nipis, pasu yang retak, dan timbunan pek sel yang menanti destinasi tapak pelupusan. Anda dengan hati-hati memindahkan anak benih, hanya untuk menyaksikannya layu dan terbantut, menderita akibat kejutan pemindahan yang ditakuti. Kos bertambah, pembaziran terasa tidak betul, dan hasilnya sering mengecewakan. Jika kitaran ini kedengaran biasa, anda tidak bersendirian. Selama beberapa dekad, ini telah menjadi piawaian, tetapi ada cara yang lebih baik.
Masuk mesin pembuat blok tanah: alat yang cerdik, hampir bebas plastik, yang merevolusikan permulaan benih untuk semua orang dari pekebun rumah hingga penanam komersial. Dengan memampatkan campuran pot khas menjadi kubus yang kuat dan mandiri, alat sederhana ini menghapuskan bekas sama sekali, mendorong sistem akar yang luar biasa kuat dan pemindahan yang lancar. Ia adalah senjata rahsia lestari dan cekap yang anda cari.
Panduan komprehensif ini adalah peta jalan anda untuk menguasai blok tanah. Kami akan menyelami secara mendalam bagaimana ia berfungsi, mengapa ia lebih unggul, dan cara memilih serta menggunakan mesin anda seperti seorang profesional. Berdasarkan pengalaman praktikal bertahun-tahun dalam perladangan pasaran dan penyelidikan mendalam mengenai amalan hortikultur komersial, panduan ini direka untuk menjimatkan masa, wang, dan kekecewaan anda sambil membuka pintu kepada tahap kejayaan baru dalam taman anda.
Apakah itu Mesin Pembuat Blok Tanah?
Pada terasnya, pembuat blok tanah adalah alat yang indah dalam kesederhanaannya. Ia melangkah lebih jauh daripada penyodok atau pencucuk kebun biasa, direka untuk satu tujuan khusus yang mengubah.
Konsep Teras: Menyemai Benih Tanpa Bekas
Pembuat blok tanah adalah alat tekan genggam atau berpendirian yang memampatkan campuran pasu lembap yang dirumus khas menjadi kiub bebas berdiri. Kiub-kiub ini mengekalkan bentuknya tanpa memerlukan sebarang pasu plastik, dulang, atau sel di sekelilingnya. Anda hanya perlu menekan alat ke dalam campuran, mengeluarkan blok ke permukaan rata, dan meletakkan biji benih di dalam lekukan yang telah terbentuk (dipanggil lubang tanam). Blok itu sendiri menjadi bekas, mencipta persekitaran mikro yang sempurna untuk percambahan dan pertumbuhan awal. Proses ini secara asasnya memikirkan semula pembiakan anak benih, meletakkan struktur tanah dan kesihatan akar di barisan hadapan.
Sejarah Ringkas: Dari Kebun Pasar Eropah ke Ladang Moden
Walaupun ia mungkin kelihatan seperti trend baharu, penghasil blok tanah mempunyai akar yang mendalam dalam pertanian berskala besar yang praktikal. Ia diperkenalkan di kebun pasar Eropah—terutamanya di Perancis dan Belanda—di mana kecekapan, kesihatan tumbuhan, dan pengurusan kos adalah penting untuk kelestarian komersial. Penanam memerlukan sistem yang menghasilkan anak pokok yang lebih baik dengan lebih pantas dan kos input yang lebih rendah.
Falsafah dan peralatan tersebut sejak itu telah menyeberangi Atlantik dan mendapat pengikut yang bersemangat dalam kalangan petani organik Amerika Utara, pekebun pasaran, dan penghuni ladang yang sedar akan ekologi. Hari ini, ia melambangkan peralihan ke arah penanaman rendah sisa dan kecekapan tinggi yang memberi manfaat kepada kedua-dua penggemar halaman belakang dan pengeluar profesional.
Faedah Utama Menggunakan Pembuat Blok Tanah
Mengapa perlu melalui "kesusahan" membuat blok sendiri sedangkan dulang plastik begitu mudah diperoleh? Kelebihannya sangat mendalam dan menyentuh fisiologi tumbuhan, ekonomi, serta etika alam sekitar.
Tumbuhan yang Lebih Sihat, Lebih Kuat: Kelebihan Pemangkasan Udara
Ini adalah manfaat paling penting. Dalam pasu plastik, akar tumbuh sehingga mencapai dinding, kemudian mula melingkar di sekitar bekas. Ini menghasilkan tumbuhan yang akarnya terikat dan sukar untuk bertapak selepas dipindahkan.
- Pemangkasan Udara:Dalam blok tanah, akar tumbuh sehingga ke tepi kubus yang terdedah. Apabila bersentuhan dengan udara, hujung akar secara semula jadi mengalami penyahhidratan dan berhenti tumbuh (ini dipanggil "pangkasan udara"). Ini memberi isyarat kepada tumbuhan untuk mengeluarkan lebih banyak akar sisi.belakangHujung itu. Hasilnya adalah sistem akar yang padat, berserabut, dan meletup.dalamblok itu, tanpa sebarang pusingan langsung.
- Mengurangkan Kejutan Pemindahan:Apabila tiba masa untuk menanam, anda letakkan keseluruhan blok ke dalam tanah. Akar akan segera merebak ke tanah sekeliling tanpa sebarang tempoh penyesuaian. Tumbuhan mengalami sedikit atau tiada kejutan pemindahan, membawa kepada pertumbuhan lebih cepat dan hasil tuaian lebih awal.
Sustainability and Cost-Effectiveness
The financial and environmental savings are substantial and compound over time.
- Drastically Reduce Plastic Waste: Imagine never buying another plastic seedling tray, cell pack, or pot. For a commercial grower starting tens of thousands of plants, this is a massive reduction in annual waste. For the home gardener, it aligns gardening with a sustainable lifestyle.
- Simpanan Jangka Panjang: While there’s an upfront cost for a quality blocker, it’s a one-time purchase. You eliminate the recurring expense of disposable containers. The soil mix ingredients (peat, coir, compost) are often more economical in bulk than buying bagged potting soil year after year.
Efficiency and Space Optimization
Soil blocks streamline your workflow and maximize valuable growing space.
- Tight Packing: Blocks can be placed shoulder-to-shoulder on a standard tray or even a wooden board. There are no wasted gaps between round pots, allowing you to fit significantly more seedlings under a single grow light or in a germination chamber.
- Workflow Speed: With practice, making blocks becomes a rapid, rhythmic process. For large-scale seeding, multi-block machines allow a single person to produce hundreds of uniform blocks per hour.
Types of Soil Block Makers: Choosing Your Tool
Not all soil blockers are created equal. Your choice depends on your scale, budget, and physical preference.
Hand-Held Blockers: For the Home Gardener
These are the most common entry point. They are simple, affordable, and effective.
- Contoh-contoh:TheJohnny’s Selected 4″ Soil Blocker or the 2″ model are industry standards.
- Kelebihan:
- Low cost and easy to store.
- Perfect for starting a few hundred plants per season.
- Simple mechanics with no moving parts to break.
- Keburukan:
- Requires more physical effort (pressing into the mix).
- Slower for producing very large quantities.
Stand-Mounted and Multi-Block Machines: For Market Gardeners & Farmers
When volume is key, these ergonomic, lever-operated tools are worth the investment.
- Contoh-contoh:TheEarthWay Commercial Stand-Up Blocker or the Pro-Soil Blocker.
- Kelebihan:
- Can make 4, 5, or even 12 blocks with a single press of a lever.
- Much easier on the wrists and back for high-volume work.
- Produce incredibly consistent blocks.
- Keburukan:
- Significant upfront cost.
- Requires more storage space.
- Can be overkill for a small backyard garden.
Block Size and Shape: ¾”, 2″, 4″, and Mini Blocks
Size matters. Different blockers produce different cube dimensions for specific uses.
- ¾” or “Mini” Blocks: Ideal for quick-germinating, small plants like lettuce, brassicas (kale, cabbage), and herbs. They are transplanted very young.
- 2″ Blocks: The workhorse size. Perfect for most common vegetables: tomatoes, peppers, eggplants, cucumbers, and flowers. They provide enough root space for 3-5 weeks of growth.
- 4″ Blocks: Used for long-season crops that need a longer head start, like large tomatoes, peppers, or perennial flowers. The larger soil volume supports the plant longer if weather delays transplanting.
- The Dibble: Most blockers have a central pin that creates a small indentation for the seed. For larger seeds like beans or squash, you can simply press the seed into the flat top of the block.
The Essential Soil Mix Recipe for Perfect Blocks
This is where many beginners stumble, but it’s the foundation of success. Standard bagged potting mix will not work. It lacks the specific structure needed to hold a block together.
Why Standard Potting Mix Fails
Commercial potting mixes are often too light and fluffy, relying on peat and perlite for aeration. When compressed in a blocker, they either crumble immediately or, if over-watered, turn into a dense, soggy brick that suffocates roots. A block mix needs the “wet cement” consistency—it must cohere under pressure but still be full of air pockets.
A Proven, Reliable Soil Block Recipe
After years of testing in our trial garden, this bulk recipe provides consistent, excellent results. It’s based on the classic “Fort Vee” formula used by many professional growers.
Yield: Makes approximately 2.5 cubic feet (enough for many blocks).
Ingredients (by volume):
* 3 parts Sphagnum Peat Moss or Coconut Coir: The base. Coir is a more sustainable, pH-neutral alternative to peat.
* 2 parts High-Quality, Fine-Screened Compost: Provides fertility and microbial life. It MUST be well-finished and sieved to remove sticks and chunks.
* 1 part Perlite: For crucial aeration and drainage.
* 1/2 part Garden Lime (if using peat): Peat moss is acidic. Lime balances the pH. Omit if using coir.
* 1/2 cup Base Organic Fertilizer Blend: A mix like 1 part blood meal (for nitrogen), 1 part colloidal phosphate or bone meal (for phosphorus), and 1 part greensand or kelp meal (for potassium/micronutrients).
Mixing Instructions:
1. Dry Mix: In a large tub or on a clean tarp, thoroughly combine the peat/coir, compost, and perlite.
2. Add Amendments: Sprinkle the lime (if using) and base fertilizer evenly over the pile and mix again.
3. Add Water Slowly: This is the critical step. Add warm water gradually while mixing with your hands or a hoe. Stop and test frequently.
4. The Moisture Test: Grab a handful of mix and squeeze it firmly. It should hold together in a tight ball, with a glistening appearance, and only a drop or two of water should be extractable. It should not crumble (too dry) and should not drip freely (too wet). Achieving this “wet cement” stage takes practice.
Sourcing Quality Ingredients and Pre-Mixed Alternatives
- For Coir/Peat: Look for brands like PRO-MIXatauCanna for consistent quality.
- For Compost: A high-quality, bagged compost like Coast of MaineatauMalibu Compost is reliable for beginners. Avoid cheap, woody composts.
- Pre-Mixed Alternative: If mixing your own feels daunting, several companies sell pre-bagged block mix. Fort Vee Mix (from Growers Supply) is the gold standard, but it’s often sold in large, commercial quantities.
Step-by-Step Guide: Using Your Machine Like a Pro
With your mix ready, it’s time to make blocks. Follow these steps for professional results.
Preparation: Mixing, Moistening, and Setup
- Final Mix Check: Ensure your mix passes the squeeze test. Let it sit for an hour after final watering; the moisture will equalize.
- Set Up Your Station: Have a large tub of your mix, your blocker, solid-bottom trays (no holes, or line a flat with newspaper), plant labels, and seeds all within reach. Work at a comfortable waist-high table.
The Forming Technique: Dipping, Compressing, and Ejecting
- Dip: Push the blocker straight down into the mix, ensuring all chambers are fully filled. Scrape the bottom against the edge of the tub to remove excess.
- Mampatkan: For hand-held models, press down firmly on a solid surface (like your work table) to compact the mix. You’ll feel resistance. For stand models, pull the lever with steady pressure.
- Keluarkan: Lift and move to your tray. Press the plunger to release the blocks. They should eject cleanly and stand proud.
Troubleshooting:
* Blocks are crumbly: Mix is too dry. Add water sparingly and re-mix.
* Blocks slump or don’t eject cleanly: Mix is too wet. Add more dry ingredients (peat/coir, compost, perlite) to absorb excess moisture.
Seeding, Watering, and Germination Care
- Seeding: Place 1-2 seeds in the dibble hole. For fine seeds, no covering is needed. For larger seeds, pinch a tiny amount of mix over the hole.
- Initial Watering: Use a fine mist sprayer to gently moisten the top of the blocks. Avoid a heavy stream that will erode them.
- Bottom Watering (Going Forward): After the initial watering, always water by pouring water into the tray, allowing the blocks to wick it up from below. This encourages deep roots and preserves block integrity.
- Germination: Cover trays with a humidity dome until seeds sprout. Remove the dome immediately after germination to prevent damping-off disease. Provide strong light as soon as the first seed leaves (cotyledons) appear.
Soalan Lazim (FAQ)
Q: Are soil block makers worth it for a small home garden?
A: It depends on your priorities. If you value superior plant health, want to eliminate plastic waste, and hate transplant shock, then yes—even a small 2″ hand model is a fantastic, long-term investment. If you only start a dozen tomato plants each year, the convenience of a few plastic pots might outweigh the benefits for you.
Q: My blocks are falling apart. What am I doing wrong?
A: 99% of the time, this is a moisture issue. Your mix is too dry. It must hold together when squeezed firmly. Go back to the moisture test. The other culprit can be chunky, unfinished compost. Ensure your compost is fine and soil-like.
Q: Can I use my own garden compost in the mix?
A: You can, but with major caveats. It must be fully finished, cooled, screened through a ¼” mesh, and ideally pasteurized (by solarization or baking) to kill weed seeds and pathogens. For reliability in your first season, we strongly recommend using a high-quality, bagged compost.
Q: How do I transplant blocks into the garden?
A: It’s the easiest part! Simply dig a hole slightly larger than the block and place the entire block inside. Bury it so the top of the block is just below the soil surface. Water it in. There is no root disturbance—you are literally giving the plant’s root system a head start in its new home.
Q: Where can I buy a reliable soil block maker?
A: Purchase from reputable gardening and agricultural suppliers known for quality tools. We recommend Johnny’s Selected Seeds, Fedco Seeds, Growers SolutionatauPeaceful Valley Farm Supply. Be cautious of unknown, cheap brands on generic online marketplaces; they often have poor casting quality and wear out quickly.
Kesimpulan
Adopting a soil block making machine is more than just acquiring a new garden tool; it’s embracing a fundamentally better system for growing plants. It represents a shift towards intentional, sustainable horticulture that prioritizes root health, reduces waste, and saves money in the long run. The benefits—from the air-pruned, explosive root systems to the elimination of plastic trays—are not just theoretical; they are visibly apparent in the vigor of your transplants.
Start your journey by choosing a simple hand-held model and mixing a batch of the proven soil recipe. The learning curve is short, and the rewards are immediate. You’ll be investing not only in the success of your garden but also in a practice that respects the environment. In a world of quick fixes and disposable goods, the soil block maker stands as a testament to the power of simple, smart design for a more resilient garden.
<