
La Guía Definitiva de las Máquinas para Hacer Bloques de Suelo: Potencia tu Éxito en la Siembra de Semillas
Introducción
Imagina esto: es principios de primavera y estás rodeado por un mar de plástico: bandejas de plántulas endebles, macetas agrietadas y un montón de celdas destinadas al vertedero. Trasplantas tus plántulas con cuidado, solo para ver cómo se marchitan y estancan, víctimas del temido shock del trasplante. Los costos se acumulan, el desperdicio parece incorrecto y los resultados a menudo son decepcionantes. Si este ciclo te resulta familiar, no estás solo. Durante décadas, esto ha sido lo habitual, pero existe una alternativa mejor.
Entra la máquina de hacer bloques de tierra: una ingeniosa herramienta casi libre de plástico que está revolucionando la siembra de semillas para todos, desde jardineros domésticos hasta cultivadores comerciales. Al comprimir una mezcla especial para macetas en cubos resistentes y autónomos, este sencillo dispositivo elimina por completo los contenedores, fomentando sistemas de raíces increíblemente robustos y trasplantes sin complicaciones. Es el arma secreta sostenible y eficiente que estabas buscando.
Esta guía integral es tu hoja de ruta para dominar los bloques de tierra. Profundizaremos en cómo funcionan, por qué son superiores y cómo elegir y usar tu máquina como un profesional. Basándonos en años de experiencia práctica en horticultura de mercado y una extensa investigación sobre las prácticas de horticultura comercial, esta guía está diseñada para ahorrarte tiempo, dinero y frustraciones, al tiempo que desbloquea un nuevo nivel de éxito en tu jardín.
¿Qué es una Máquina para Hacer Bloques de Suelo?
En esencia, un moldeador de bloques de tierra es una herramienta de hermosa simplicidad. Es un paso más allá de una pala de jardín común o un plantador, diseñado para un propósito específico y transformador.
El Concepto Central: Iniciar Semillas Sin Recipientes
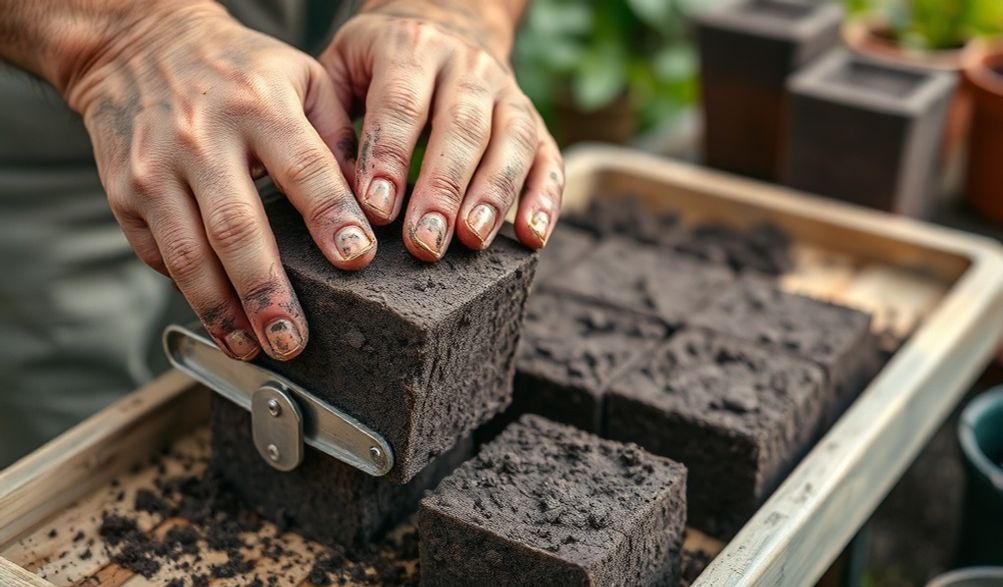
Un fabricante de bloques de tierra es una prensa manual o montada en soporte que comprime una mezcla de sustrato húmeda y especialmente formulada en cubos independientes. Estos cubos mantienen su forma sin necesidad de macetas de plástico, bandejas o alvéolos circundantes. Simplemente presionas la herramienta en la mezcla, expulsas el bloque sobre una superficie plana y colocas la semilla en la hendidura preformada (llamada cavidad de siembra). El bloque en sí se convierte en el contenedor, creando un microambiente perfecto para la germinación y el crecimiento temprano. Este proceso replantea fundamentalmente la propagación de plántulas, colocando la estructura del suelo y la salud de las raíces en primer plano.
Una Breve Historia: De las Huertas Europeas a las Granjas Modernas
Aunque pueden parecer una tendencia nueva, los bloques de suelo tienen raíces profundas en la agricultura práctica a gran escala. Fueron pioneros en los huertos de mercado europeos, especialmente en Francia y los Países Bajos, donde la eficiencia, la salud de las plantas y la gestión de costos son primordiales para la viabilidad comercial. Los cultivadores necesitaban un sistema que produjera plántulas superiores más rápido y con menor costo de insumos.
La filosofía y las herramientas desde entonces han cruzado el Atlántico y han ganado un apasionado seguimiento entre los agricultores orgánicos, los horticultores de mercado y los propietarios de granjas ecológicas de Norteamérica. Hoy en día, simbolizan un cambio hacia un cultivo de bajo desperdicio y alta eficiencia que beneficia tanto al entusiasta del jardín trasero como al productor profesional.
Principales Beneficios del Uso de un Moldeador de Bloques de Tierra
¿Por qué pasar por la "molestia" de hacer tus propios bloques cuando las bandejas de plástico están tan fácilmente disponibles? Las ventajas son profundas y abarcan la fisiología vegetal, la economía y la ética ambiental.
Plantas más Sanas y Fuertes: La Ventaja de la Poda por Aire
Este es el beneficio más significativo. En una maceta de plástico, las raíces crecen hasta que chocan contra la pared y luego comienzan a rodear el contenedor. Esto crea una planta con raíces enredadas que lucha por establecerse después del trasplante.
- Poda por Aire:En un bloque de suelo, las raíces crecen hasta los bordes expuestos del cubo. Al entrar en contacto con el aire, la punta de la raíz se deshidrata naturalmente y deja de crecer (esto se conoce como "poda aérea"). Esto le indica a la planta que emita más raíces laterales.detrásEsa punta. El resultado es un sistema de raíces denso, fibroso y explosivo.dentroEl bloque, sin ningún tipo de círculo.
- Reducción del Estrés por Trasplante:Cuando llega el momento de trasplantar, colocas el bloque entero en la tierra. Las raíces se expanden inmediatamente en el suelo circundante sin ningún período de adaptación. Las plantas experimentan poco o ningún estrés por trasplante, lo que resulta en un crecimiento más rápido y cosechas más tempranas.
Sustainability and Cost-Effectiveness
The financial and environmental savings are substantial and compound over time.
- Drastically Reduce Plastic Waste: Imagine never buying another plastic seedling tray, cell pack, or pot. For a commercial grower starting tens of thousands of plants, this is a massive reduction in annual waste. For the home gardener, it aligns gardening with a sustainable lifestyle.
- Ahorros a Largo Plazo: While there’s an upfront cost for a quality blocker, it’s a one-time purchase. You eliminate the recurring expense of disposable containers. The soil mix ingredients (peat, coir, compost) are often more economical in bulk than buying bagged potting soil year after year.
Efficiency and Space Optimization
Soil blocks streamline your workflow and maximize valuable growing space.
- Tight Packing: Blocks can be placed shoulder-to-shoulder on a standard tray or even a wooden board. There are no wasted gaps between round pots, allowing you to fit significantly more seedlings under a single grow light or in a germination chamber.
- Workflow Speed: With practice, making blocks becomes a rapid, rhythmic process. For large-scale seeding, multi-block machines allow a single person to produce hundreds of uniform blocks per hour.
Types of Soil Block Makers: Choosing Your Tool
Not all soil blockers are created equal. Your choice depends on your scale, budget, and physical preference.
Hand-Held Blockers: For the Home Gardener
These are the most common entry point. They are simple, affordable, and effective.
- Ejemplos:ElJohnny’s Selected 4″ Soil Blocker or the 2″ model are industry standards.
- Pros:
- Low cost and easy to store.
- Perfect for starting a few hundred plants per season.
- Simple mechanics with no moving parts to break.
- Contras:
- Requires more physical effort (pressing into the mix).
- Slower for producing very large quantities.
Stand-Mounted and Multi-Block Machines: For Market Gardeners & Farmers
When volume is key, these ergonomic, lever-operated tools are worth the investment.
- Ejemplos:ElEarthWay Commercial Stand-Up Blocker or the Pro-Soil Blocker.
- Pros:
- Can make 4, 5, or even 12 blocks with a single press of a lever.
- Much easier on the wrists and back for high-volume work.
- Produce incredibly consistent blocks.
- Contras:
- Significant upfront cost.
- Requires more storage space.
- Can be overkill for a small backyard garden.
Block Size and Shape: ¾”, 2″, 4″, and Mini Blocks
Size matters. Different blockers produce different cube dimensions for specific uses.
- ¾” or “Mini” Blocks: Ideal for quick-germinating, small plants like lettuce, brassicas (kale, cabbage), and herbs. They are transplanted very young.
- 2″ Blocks: The workhorse size. Perfect for most common vegetables: tomatoes, peppers, eggplants, cucumbers, and flowers. They provide enough root space for 3-5 weeks of growth.
- 4″ Blocks: Used for long-season crops that need a longer head start, like large tomatoes, peppers, or perennial flowers. The larger soil volume supports the plant longer if weather delays transplanting.
- The Dibble: Most blockers have a central pin that creates a small indentation for the seed. For larger seeds like beans or squash, you can simply press the seed into the flat top of the block.
The Essential Soil Mix Recipe for Perfect Blocks
This is where many beginners stumble, but it’s the foundation of success. Standard bagged potting mix will not work. It lacks the specific structure needed to hold a block together.
Why Standard Potting Mix Fails
Commercial potting mixes are often too light and fluffy, relying on peat and perlite for aeration. When compressed in a blocker, they either crumble immediately or, if over-watered, turn into a dense, soggy brick that suffocates roots. A block mix needs the “wet cement” consistency—it must cohere under pressure but still be full of air pockets.
A Proven, Reliable Soil Block Recipe
After years of testing in our trial garden, this bulk recipe provides consistent, excellent results. It’s based on the classic “Fort Vee” formula used by many professional growers.
Yield: Makes approximately 2.5 cubic feet (enough for many blocks).
Ingredients (by volume):
* 3 parts Sphagnum Peat Moss or Coconut Coir: The base. Coir is a more sustainable, pH-neutral alternative to peat.
* 2 parts High-Quality, Fine-Screened Compost: Provides fertility and microbial life. It MUST be well-finished and sieved to remove sticks and chunks.
* 1 part Perlite: For crucial aeration and drainage.
* 1/2 part Garden Lime (if using peat): Peat moss is acidic. Lime balances the pH. Omit if using coir.
* 1/2 cup Base Organic Fertilizer Blend: A mix like 1 part blood meal (for nitrogen), 1 part colloidal phosphate or bone meal (for phosphorus), and 1 part greensand or kelp meal (for potassium/micronutrients).
Mixing Instructions:
1. Dry Mix: In a large tub or on a clean tarp, thoroughly combine the peat/coir, compost, and perlite.
2. Add Amendments: Sprinkle the lime (if using) and base fertilizer evenly over the pile and mix again.
3. Add Water Slowly: This is the critical step. Add warm water gradually while mixing with your hands or a hoe. Stop and test frequently.
4. The Moisture Test: Grab a handful of mix and squeeze it firmly. It should hold together in a tight ball, with a glistening appearance, and only a drop or two of water should be extractable. It should not crumble (too dry) and should not drip freely (too wet). Achieving this “wet cement” stage takes practice.
Sourcing Quality Ingredients and Pre-Mixed Alternatives
- For Coir/Peat: Look for brands like PRO-MIXoCanna for consistent quality.
- For Compost: A high-quality, bagged compost like Coast of MaineoMalibu Compost is reliable for beginners. Avoid cheap, woody composts.
- Pre-Mixed Alternative: If mixing your own feels daunting, several companies sell pre-bagged block mix. Fort Vee Mix (from Growers Supply) is the gold standard, but it’s often sold in large, commercial quantities.
Step-by-Step Guide: Using Your Machine Like a Pro
With your mix ready, it’s time to make blocks. Follow these steps for professional results.
Preparation: Mixing, Moistening, and Setup
- Final Mix Check: Ensure your mix passes the squeeze test. Let it sit for an hour after final watering; the moisture will equalize.
- Set Up Your Station: Have a large tub of your mix, your blocker, solid-bottom trays (no holes, or line a flat with newspaper), plant labels, and seeds all within reach. Work at a comfortable waist-high table.
The Forming Technique: Dipping, Compressing, and Ejecting
- Dip: Push the blocker straight down into the mix, ensuring all chambers are fully filled. Scrape the bottom against the edge of the tub to remove excess.
- Comprimir: For hand-held models, press down firmly on a solid surface (like your work table) to compact the mix. You’ll feel resistance. For stand models, pull the lever with steady pressure.
- Expulsar: Lift and move to your tray. Press the plunger to release the blocks. They should eject cleanly and stand proud.
Troubleshooting:
* Blocks are crumbly: Mix is too dry. Add water sparingly and re-mix.
* Blocks slump or don’t eject cleanly: Mix is too wet. Add more dry ingredients (peat/coir, compost, perlite) to absorb excess moisture.
Seeding, Watering, and Germination Care
- Seeding: Place 1-2 seeds in the dibble hole. For fine seeds, no covering is needed. For larger seeds, pinch a tiny amount of mix over the hole.
- Initial Watering: Use a fine mist sprayer to gently moisten the top of the blocks. Avoid a heavy stream that will erode them.
- Bottom Watering (Going Forward): After the initial watering, always water by pouring water into the tray, allowing the blocks to wick it up from below. This encourages deep roots and preserves block integrity.
- Germination: Cover trays with a humidity dome until seeds sprout. Remove the dome immediately after germination to prevent damping-off disease. Provide strong light as soon as the first seed leaves (cotyledons) appear.
Frequently Asked Questions (FAQ)
Q: Are soil block makers worth it for a small home garden?
A: It depends on your priorities. If you value superior plant health, want to eliminate plastic waste, and hate transplant shock, then yes—even a small 2″ hand model is a fantastic, long-term investment. If you only start a dozen tomato plants each year, the convenience of a few plastic pots might outweigh the benefits for you.
Q: My blocks are falling apart. What am I doing wrong?
A: 99% of the time, this is a moisture issue. Your mix is too dry. It must hold together when squeezed firmly. Go back to the moisture test. The other culprit can be chunky, unfinished compost. Ensure your compost is fine and soil-like.
Q: Can I use my own garden compost in the mix?
A: You can, but with major caveats. It must be fully finished, cooled, screened through a ¼” mesh, and ideally pasteurized (by solarization or baking) to kill weed seeds and pathogens. For reliability in your first season, we strongly recommend using a high-quality, bagged compost.
Q: How do I transplant blocks into the garden?
A: It’s the easiest part! Simply dig a hole slightly larger than the block and place the entire block inside. Bury it so the top of the block is just below the soil surface. Water it in. There is no root disturbance—you are literally giving the plant’s root system a head start in its new home.
Q: Where can I buy a reliable soil block maker?
A: Purchase from reputable gardening and agricultural suppliers known for quality tools. We recommend Johnny’s Selected Seeds, Fedco Seeds, Growers SolutionoPeaceful Valley Farm Supply. Be cautious of unknown, cheap brands on generic online marketplaces; they often have poor casting quality and wear out quickly.
Conclusión
Adopting a soil block making machine is more than just acquiring a new garden tool; it’s embracing a fundamentally better system for growing plants. It represents a shift towards intentional, sustainable horticulture that prioritizes root health, reduces waste, and saves money in the long run. The benefits—from the air-pruned, explosive root systems to the elimination of plastic trays—are not just theoretical; they are visibly apparent in the vigor of your transplants.
Start your journey by choosing a simple hand-held model and mixing a batch of the proven soil recipe. The learning curve is short, and the rewards are immediate. You’ll be investing not only in the success of your garden but also in a practice that respects the environment. In a world of quick fixes and disposable goods, the soil block maker stands as a testament to the power of simple, smart design for a more resilient garden.
<