
Toprak Blok Ýasama Maşynlarynyň Iň Soňky Gollanmasy: Tohum Başlangyç Üstünligiňizi Artdyryň
Giriş
Tasawur et: erken ýaz, we sen plastik deňziniň golaýynda—ýuwaş pikire taýýarlaýjy tabakalar, çatlak güýzeler we zyýanly ýere taýyn edilen öýjük paketleriniň bir topary. Sen ösümlikleriňi gowşaklyk bilen köçürýärsiň, diňe olaryň solup we togtap, elhenç köçüriş şokundan ejir çekýändigini görmek üçin. Bahalary köpelýär, zyýan ýalňyş duýulýar we netijeler köplenç umydy üzýär. Bu aýlaw tanşyk gelse, ýekeňe dälsiň. Onlarça ýyllardan bäri bu standart boldy, ýöne has gowy bir ýol bar.
Toprak blok tayýar makinasy: bu döredijilikli, deňagramly plastmassa serişdesiz gural, öý baýçylygyndan başlap, hojalyk öndürijilerine çenli ähli tohum ekmek işini öwrüp ýöredýär. Ýörite toprak garyndysyny berk, özbaşdak küplere siňdirýän bu ýönekeý enjam, konteýnerleri doly aýyryp, gaty güýçli kök ulgamyny we düýpli ösüşi üpjün edýär. Bu sözleýän sürdürüjilikli, netijeli gizlin ýaragyňyzdyr.
Bu gollanma toprak bloklaryna yokary derejede ylmy başarmak üçin ýol görkezijidir. Olaryň nädip işleýändigine, näme üçin üstün bolandygyna we maşynyňyzy professional ýaly saýlap we ulanyp bilmek üçin gerekli maglumatlara çuňlaryna çözüp berer. Bazarlyk bagçylygyndaky köp ýyllaryň tejribesine we söwda bagçylyk amallaryna giňişleýin gözden geçirmelere daýanyp, bu gollanma bagtyňyzy täze derejä ýetirmek bilen bir hatarda, wagtyňyzy, puluňyzy we düşüňjeleriňizi tygşytlamak üçin düzüldi.
Toprak Blok Ýasama Maşyny Näme?
Onuň esasynda, toprak blok düzüji gowy ýönekeýlikde bir guraldyr. Bu, adaty bag beli ýa-da çüýşe bilen deňeşdirilende, bir aýratyn, öwrüji maksat üçin düzülen bir ädimdir.
Esasy Düşünje: Konteýnersiz Tohumdan Ösüş
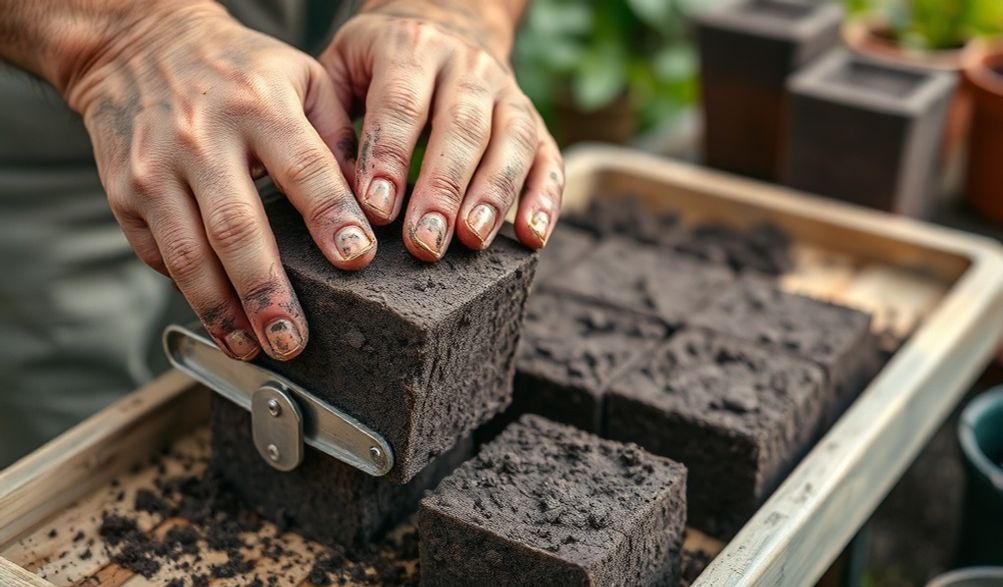
Toprak blok düzüji, nemli, aýratyn düzülen topgaryş goşundysyny özbaşdak küplere siňdirýän golýada ýa-da stendine ornaşdyrylan press. Bu küpler, hiç hili plastik güýz, taba ýa-da öýjük gerekmeýär, öz görnüşini saklaýar. Guralyňyzy goşundyňyza basyp, bloky düzlük üstüne çykaryp, we urugyňyzy öňünden düzülen çukurjaga (dibble diýilýär) goýuň. Blok özi konteýner bolup, önüş we erken ösüş üçin ideal mikroýagdaý döredýär. Bu proses, aslynda, şitillik köpeltmegini täzeden oýlap, topragyň gurluşy we kökleriň saglygyny öňe sürýär.
Gysgaça Taryh: Ýewropa Bağçalar Marketlerinden Häzirki Zamanyň Öý Jaýlaryna Çenli
Olar täze moda ýaly görünse-de, toprak bloklary praktiki, uly ölçegli oba hojalygynda çuňňur düýpli. Olar Ýewropanyň bazarlyk baglarynda—esasanam Fransiwede we Niderlandlarda—ýolbaşçylyk etdi, bu ýerde ticary amatlylyk üçin netijelilik, ösümlikleriň saglygy we çykdajylary dolandyrmak iň möhüm bolupdyr. Ösdürijiler has gowy göçürmeleri has çalt we az girdeji çykdajysy bilen öndürýän ulgama zerurdy.
Felsefa we gurallar şu wagtda Atlantik okeanyndan geçdi we Demirgazyk Amerikanyň organiki daýhanlary, bazarlyk bağçylary we ekologiýa ýöriteleşdiriji maşgalalarynyň arasynda gyzgyn goldawy gazandy. Bu gün olar, hem hojalyk bağy hobbisi, hem-de hünärmen öndürijiler üçin peýdaly bolýan az çöplük, ýokary netijelilikli ösüşe geçişi nyşan edýär.
Toprak Blok Düzeldijiniň Ulanylmagyndan Alýan Esasy Peýdalar
Өзүңіздің блокларыңызды жасауға "қиыншылық" көрсету не үшін, пластик подностар оңай қол жетімді болса да? Артықшылықтары терең және өсімдік физиологиясы, экономикасы және экологиялық этикасына қатысты.
Saglykly, Güýçli Ösümlikler: Howa-Kesip Gaýtadan Ösdürmegiň Üstünligi
Bu iň uly peýda. Plastik güýzede kökler diwara degýänçä ösýär, soňra konteýneriň töwereginde aýlanýar. Bu kökleri çykyp giden ösümi ýagdaýyny döredýär we güýze geçirilenden soň ornaşmakda kynçylyk çekýär.
- Air-Pruning: In a soil block, the roots grow to the exposed edges of the cube. Upon contact with the air, the root tip naturally dehydrates and stops growing (this is “air-pruning”). This signals the plant to send out more lateral roots behind that tip. The result is a dense, fibrous, and explosive root system within the block, with no circling whatsoever.
- Reduced Transplant Shock: When it’s time to plant out, you place the entire block into the ground. The roots immediately explode into the surrounding soil without any adjustment period. Plants experience little to no transplant shock, leading to faster growth and earlier harvests.
Sustainability and Cost-Effectiveness
The financial and environmental savings are substantial and compound over time.
- Drastically Reduce Plastic Waste: Imagine never buying another plastic seedling tray, cell pack, or pot. For a commercial grower starting tens of thousands of plants, this is a massive reduction in annual waste. For the home gardener, it aligns gardening with a sustainable lifestyle.
- Uzak Möwletli Tygşytlamalar: While there’s an upfront cost for a quality blocker, it’s a one-time purchase. You eliminate the recurring expense of disposable containers. The soil mix ingredients (peat, coir, compost) are often more economical in bulk than buying bagged potting soil year after year.
Efficiency and Space Optimization
Soil blocks streamline your workflow and maximize valuable growing space.
- Tight Packing: Blocks can be placed shoulder-to-shoulder on a standard tray or even a wooden board. There are no wasted gaps between round pots, allowing you to fit significantly more seedlings under a single grow light or in a germination chamber.
- Workflow Speed: With practice, making blocks becomes a rapid, rhythmic process. For large-scale seeding, multi-block machines allow a single person to produce hundreds of uniform blocks per hour.
Types of Soil Block Makers: Choosing Your Tool
Not all soil blockers are created equal. Your choice depends on your scale, budget, and physical preference.
Hand-Held Blockers: For the Home Gardener
These are the most common entry point. They are simple, affordable, and effective.
- Mysallar:TheJohnny’s Selected 4″ Soil Blocker or the 2″ model are industry standards.
- Artalary:
- Low cost and easy to store.
- Perfect for starting a few hundred plants per season.
- Simple mechanics with no moving parts to break.
- Kemçilikler:
- Requires more physical effort (pressing into the mix).
- Slower for producing very large quantities.
Stand-Mounted and Multi-Block Machines: For Market Gardeners & Farmers
When volume is key, these ergonomic, lever-operated tools are worth the investment.
- Mysallar:TheEarthWay Commercial Stand-Up Blocker or the Pro-Soil Blocker.
- Artalary:
- Can make 4, 5, or even 12 blocks with a single press of a lever.
- Much easier on the wrists and back for high-volume work.
- Produce incredibly consistent blocks.
- Kemçilikler:
- Significant upfront cost.
- Requires more storage space.
- Can be overkill for a small backyard garden.
Block Size and Shape: ¾”, 2″, 4″, and Mini Blocks
Size matters. Different blockers produce different cube dimensions for specific uses.
- ¾” or “Mini” Blocks: Ideal for quick-germinating, small plants like lettuce, brassicas (kale, cabbage), and herbs. They are transplanted very young.
- 2″ Blocks: The workhorse size. Perfect for most common vegetables: tomatoes, peppers, eggplants, cucumbers, and flowers. They provide enough root space for 3-5 weeks of growth.
- 4″ Blocks: Used for long-season crops that need a longer head start, like large tomatoes, peppers, or perennial flowers. The larger soil volume supports the plant longer if weather delays transplanting.
- The Dibble: Most blockers have a central pin that creates a small indentation for the seed. For larger seeds like beans or squash, you can simply press the seed into the flat top of the block.
The Essential Soil Mix Recipe for Perfect Blocks
This is where many beginners stumble, but it’s the foundation of success. Standard bagged potting mix will not work. It lacks the specific structure needed to hold a block together.
Why Standard Potting Mix Fails
Commercial potting mixes are often too light and fluffy, relying on peat and perlite for aeration. When compressed in a blocker, they either crumble immediately or, if over-watered, turn into a dense, soggy brick that suffocates roots. A block mix needs the “wet cement” consistency—it must cohere under pressure but still be full of air pockets.
A Proven, Reliable Soil Block Recipe
After years of testing in our trial garden, this bulk recipe provides consistent, excellent results. It’s based on the classic “Fort Vee” formula used by many professional growers.
Yield: Makes approximately 2.5 cubic feet (enough for many blocks).
Ingredients (by volume):
* 3 parts Sphagnum Peat Moss or Coconut Coir: The base. Coir is a more sustainable, pH-neutral alternative to peat.
* 2 parts High-Quality, Fine-Screened Compost: Provides fertility and microbial life. It MUST be well-finished and sieved to remove sticks and chunks.
* 1 part Perlite: For crucial aeration and drainage.
* 1/2 part Garden Lime (if using peat): Peat moss is acidic. Lime balances the pH. Omit if using coir.
* 1/2 cup Base Organic Fertilizer Blend: A mix like 1 part blood meal (for nitrogen), 1 part colloidal phosphate or bone meal (for phosphorus), and 1 part greensand or kelp meal (for potassium/micronutrients).
Mixing Instructions:
1. Dry Mix: In a large tub or on a clean tarp, thoroughly combine the peat/coir, compost, and perlite.
2. Add Amendments: Sprinkle the lime (if using) and base fertilizer evenly over the pile and mix again.
3. Add Water Slowly: This is the critical step. Add warm water gradually while mixing with your hands or a hoe. Stop and test frequently.
4. The Moisture Test: Grab a handful of mix and squeeze it firmly. It should hold together in a tight ball, with a glistening appearance, and only a drop or two of water should be extractable. It should not crumble (too dry) and should not drip freely (too wet). Achieving this “wet cement” stage takes practice.
Sourcing Quality Ingredients and Pre-Mixed Alternatives
- For Coir/Peat: Look for brands like PRO-MIXжеCanna for consistent quality.
- For Compost: A high-quality, bagged compost like Coast of MaineжеMalibu Compost is reliable for beginners. Avoid cheap, woody composts.
- Pre-Mixed Alternative: If mixing your own feels daunting, several companies sell pre-bagged block mix. Fort Vee Mix (from Growers Supply) is the gold standard, but it’s often sold in large, commercial quantities.
Step-by-Step Guide: Using Your Machine Like a Pro
With your mix ready, it’s time to make blocks. Follow these steps for professional results.
Preparation: Mixing, Moistening, and Setup
- Final Mix Check: Ensure your mix passes the squeeze test. Let it sit for an hour after final watering; the moisture will equalize.
- Set Up Your Station: Have a large tub of your mix, your blocker, solid-bottom trays (no holes, or line a flat with newspaper), plant labels, and seeds all within reach. Work at a comfortable waist-high table.
The Forming Technique: Dipping, Compressing, and Ejecting
- Dip: Push the blocker straight down into the mix, ensuring all chambers are fully filled. Scrape the bottom against the edge of the tub to remove excess.
- Compress: For hand-held models, press down firmly on a solid surface (like your work table) to compact the mix. You’ll feel resistance. For stand models, pull the lever with steady pressure.
- Eject: Lift and move to your tray. Press the plunger to release the blocks. They should eject cleanly and stand proud.
Troubleshooting:
* Blocks are crumbly: Mix is too dry. Add water sparingly and re-mix.
* Blocks slump or don’t eject cleanly: Mix is too wet. Add more dry ingredients (peat/coir, compost, perlite) to absorb excess moisture.
Seeding, Watering, and Germination Care
- Seeding: Place 1-2 seeds in the dibble hole. For fine seeds, no covering is needed. For larger seeds, pinch a tiny amount of mix over the hole.
- Initial Watering: Use a fine mist sprayer to gently moisten the top of the blocks. Avoid a heavy stream that will erode them.
- Bottom Watering (Going Forward): After the initial watering, always water by pouring water into the tray, allowing the blocks to wick it up from below. This encourages deep roots and preserves block integrity.
- Germination: Cover trays with a humidity dome until seeds sprout. Remove the dome immediately after germination to prevent damping-off disease. Provide strong light as soon as the first seed leaves (cotyledons) appear.
Frequently Asked Questions (FAQ)
Q: Are soil block makers worth it for a small home garden?
A: It depends on your priorities. If you value superior plant health, want to eliminate plastic waste, and hate transplant shock, then yes—even a small 2″ hand model is a fantastic, long-term investment. If you only start a dozen tomato plants each year, the convenience of a few plastic pots might outweigh the benefits for you.
Q: My blocks are falling apart. What am I doing wrong?
A: 99% of the time, this is a moisture issue. Your mix is too dry. It must hold together when squeezed firmly. Go back to the moisture test. The other culprit can be chunky, unfinished compost. Ensure your compost is fine and soil-like.
Q: Can I use my own garden compost in the mix?
A: You can, but with major caveats. It must be fully finished, cooled, screened through a ¼” mesh, and ideally pasteurized (by solarization or baking) to kill weed seeds and pathogens. For reliability in your first season, we strongly recommend using a high-quality, bagged compost.
Q: How do I transplant blocks into the garden?
A: It’s the easiest part! Simply dig a hole slightly larger than the block and place the entire block inside. Bury it so the top of the block is just below the soil surface. Water it in. There is no root disturbance—you are literally giving the plant’s root system a head start in its new home.
Q: Where can I buy a reliable soil block maker?
A: Purchase from reputable gardening and agricultural suppliers known for quality tools. We recommend Johnny’s Selected Seeds, Fedco Seeds, Growers SolutionжеPeaceful Valley Farm Supply. Be cautious of unknown, cheap brands on generic online marketplaces; they often have poor casting quality and wear out quickly.
Netije
Adopting a soil block making machine is more than just acquiring a new garden tool; it’s embracing a fundamentally better system for growing plants. It represents a shift towards intentional, sustainable horticulture that prioritizes root health, reduces waste, and saves money in the long run. The benefits—from the air-pruned, explosive root systems to the elimination of plastic trays—are not just theoretical; they are visibly apparent in the vigor of your transplants.
Start your journey by choosing a simple hand-held model and mixing a batch of the proven soil recipe. The learning curve is short, and the rewards are immediate. You’ll be investing not only in the success of your garden but also in a practice that respects the environment. In a world of quick fixes and disposable goods, the soil block maker stands as a testament to the power of simple, smart design for a more resilient garden.
<