
الدليل الشامل لآلات صناعة كتل التربة: عزّز نجاحك في بدء البذور
مقدمة
تخيل هذا المشهد: في أوائل الربيع، وأنت محاط ببحر من البلاستيك - صواني الشتلات الهشة، والأواني المتشققة، وكومة من عبوات الشتلات المصيرها مكب النفايات. تنقل شتلاتك بعناية، فقط لمشاهدتها تذبل وتتوقف عن النمو، تعاني من صدمة الزرع المخيفة. التكاليف تتراكم، وهدر البلاستيك يشعرك بالخطأ، والنتائج غالباً ما تكون مخيبة للآمال. إذا كانت هذه الدورة مألوفة لديك، فأنت لست وحدك. لقد كان هذا هو المعيار لعقود، لكن هناك طريقة أفضل.
أدخل آلة صنع كتل التربة: أداة مبتكرة خالية تقريبًا من البلاستيك، تُحدث ثورة في بدء البذور للجميع من البستانيين المنزليين إلى المزارعين التجاريين. من خلال ضغط خليط تربة خاص إلى مكعبات متماسكة وقائمة بذاتها، تلغي هذه الأداة البسيطة الحاويات تمامًا، مما يعزز أنظمة جذر قوية بشكل لا يصدق وزراعة انتقالية سلسة. إنها السلاح السري المستدام والفعال الذي تبحث عنه.
هذا الدليل الشامل هو خارطة طريقك لإتقان صناعة كتل التربة. سنتعمق في كيفية عملها، ولماذا هي متفوقة، وكيفية اختيار واستخدام آلتك بمهارة المحترفين. مستندين إلى سنوات من الخبرة العملية في زراعة الأسواق وأبحاث موسعة في ممارسات البستنة التجارية، صُمم هذا الدليل ليوفر عليك الوقت والمال والإحباط بينما يفتح لك آفاقاً جديدة من النجاح في حديقتك.
ما هي آلة صنع كتل التربة؟
في جوهره، صانع كتل التربة هو أداة تتمتع ببساطة جميلة. إنه خطوة تتجاوز مجرد مجرفة الحديقة العادية أو أداة الزرع، مُصمم لغرض واحد محدد وتحويلي.
المفهوم الأساسي: بدء البذور بدون حاويات
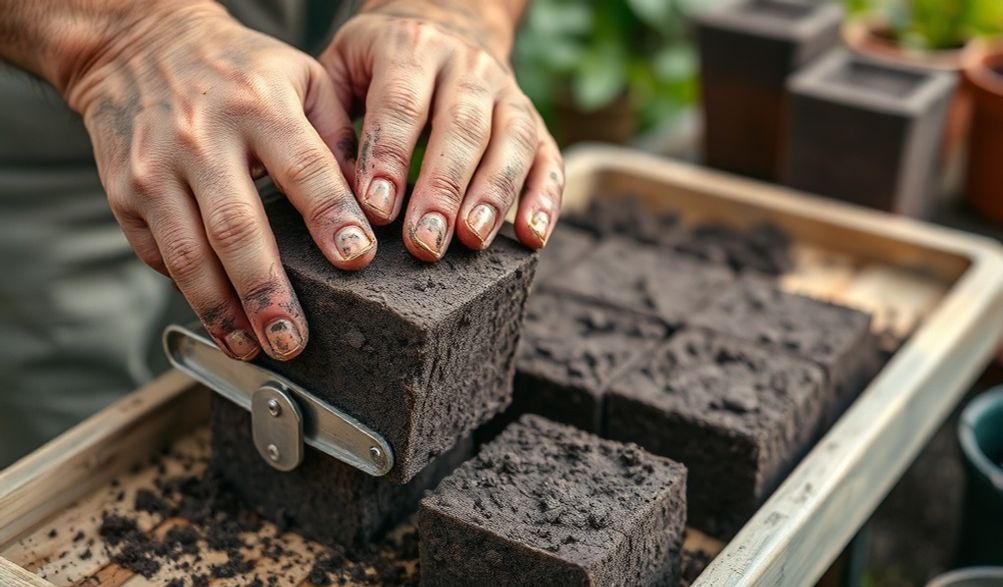
صانع كتل التربة هو مكبس يدوي أو مثبت على حامل يضغط خليط تأصيص رطب مُعد خصيصاً إلى مكعبات قائمة بذاتها. تحتفظ هذه المكعبات بشكلها دون الحاجة إلى أي وعاء بلاستيكي محيط أو صينية أو خلية. ببساطة تضغط الأداة في الخليط، تطرح الكتلة على سطح مستو، وتضع بذرك في التجويف المُشكل مسبقاً (يسمى ثقب الزراعة). تصبح الكتلة نفسها هي الوعاء، مما يخلق بيئة دقيقة مثالية للإنبات والنمو المبكر. تعيد هذه العملية التفكير جذرياً في إكثار الشتلات، حيث تضع بنية التربة وصحة الجذور في المقدمة.
نبذة تاريخية: من حدائق السوق الأوروبية إلى المزارع المعاصرة
رغم أنها قد تبدو كاتجاه جديد، فإن صواني التربة (الكتل الترابية) لها جذور عميقة في الزراعة العملية واسعة النطاق. فقد تم تطويرها لأول مرة في الحدائق السوقية الأوروبية، وتحديداً في فرنسا وهولندا، حيث تكون الكفاءة وصحة النباتات وإدارة التكاليف ذات أهمية قصوى للجدوى التجارية. حيث احتاج المزارعون إلى نظام ينتج شتلات فائقة الجودة بشكل أسرع وبكلفة مدخلات أقل.
منذ ذلك الحين، عبرت الفلسفة والأدوات المحيط الأطلسي واكتسبت أتباعًا متحمسين بين المزارعين العضويين في أمريكا الشمالية، وبستانيي الأسواق، وأصحاب المنازل الواعيين بيئيًا. اليوم، تمثل هذه الفلسفة تحولًا نحو الزراعة منخفضة الهدر وعالية الكفاءة، مما يفيد كلًا من الهواة في الحدائق المنزلية والمنتجين المحترفين.
المزايا الرئيسية لاستخدام صانع كتل التربة
لماذا تتكبد "مشقة" صنع كتل الزراعة الخاصة بك بينما صواني البلاستيك متاحة بسهولة؟ المزايا عميقة وتتعلق بفسيولوجيا النبات، والاقتصاد، وأخلاقيات البيئة.
نباتات أكثر صحة وقوة: ميزة التقليم الهوائي
هذه هي الفائدة الأكثر أهمية على الإطلاق. في الأصيص البلاستيكي، تنمو الجذور حتى تصطدم بالجدار، ثم تبدأ في الدوران حول الحاوية. وهذا يؤدي إلى نبات متشابك الجذور يصعب عليه التأقلم بعد عملية الزرع.
- التقليم الهوائي:في كتلة التربة، تنمو الجذور حتى تصل إلى الحواف المكشوفة للمكعب. عند ملامسة الهواء، تجف قمة الجذر بشكل طبيعي وتتوقف عن النمو (وهذا ما يُسمى بـ "التقليم الهوائي"). مما يشير للنبات بإرسال المزيد من الجذور الجانبية.خلفتنتج عن ذلك جذور كثيفة وليفية وقوية.داخلالكتلة، دون أي دوران على الإطلاق.
- تقليل صدمة الزرع:عندما يحين وقت الزرع، تضع الكتلة بأكملها في الأرض. تنفجر الجذور على الفور في التربة المحيطة دون أي فترة تأقلم. تمر النباتات بصدمة زرع قليلة أو معدومة، مما يؤدي إلى نمو أسرع وحصاد مبكر.
Sustainability and Cost-Effectiveness
The financial and environmental savings are substantial and compound over time.
- Drastically Reduce Plastic Waste: Imagine never buying another plastic seedling tray, cell pack, or pot. For a commercial grower starting tens of thousands of plants, this is a massive reduction in annual waste. For the home gardener, it aligns gardening with a sustainable lifestyle.
- الادخار طويل الأجل: While there’s an upfront cost for a quality blocker, it’s a one-time purchase. You eliminate the recurring expense of disposable containers. The soil mix ingredients (peat, coir, compost) are often more economical in bulk than buying bagged potting soil year after year.
Efficiency and Space Optimization
Soil blocks streamline your workflow and maximize valuable growing space.
- Tight Packing: Blocks can be placed shoulder-to-shoulder on a standard tray or even a wooden board. There are no wasted gaps between round pots, allowing you to fit significantly more seedlings under a single grow light or in a germination chamber.
- Workflow Speed: With practice, making blocks becomes a rapid, rhythmic process. For large-scale seeding, multi-block machines allow a single person to produce hundreds of uniform blocks per hour.
Types of Soil Block Makers: Choosing Your Tool
Not all soil blockers are created equal. Your choice depends on your scale, budget, and physical preference.
Hand-Held Blockers: For the Home Gardener
These are the most common entry point. They are simple, affordable, and effective.
- أمثلة:الJohnny’s Selected 4″ Soil Blocker or the 2″ model are industry standards.
- مزايا:
- Low cost and easy to store.
- Perfect for starting a few hundred plants per season.
- Simple mechanics with no moving parts to break.
- سلبيات:
- Requires more physical effort (pressing into the mix).
- Slower for producing very large quantities.
Stand-Mounted and Multi-Block Machines: For Market Gardeners & Farmers
When volume is key, these ergonomic, lever-operated tools are worth the investment.
- أمثلة:الEarthWay Commercial Stand-Up Blocker or the Pro-Soil Blocker.
- مزايا:
- Can make 4, 5, or even 12 blocks with a single press of a lever.
- Much easier on the wrists and back for high-volume work.
- Produce incredibly consistent blocks.
- سلبيات:
- Significant upfront cost.
- Requires more storage space.
- Can be overkill for a small backyard garden.
Block Size and Shape: ¾”, 2″, 4″, and Mini Blocks
Size matters. Different blockers produce different cube dimensions for specific uses.
- ¾” or “Mini” Blocks: Ideal for quick-germinating, small plants like lettuce, brassicas (kale, cabbage), and herbs. They are transplanted very young.
- 2″ Blocks: The workhorse size. Perfect for most common vegetables: tomatoes, peppers, eggplants, cucumbers, and flowers. They provide enough root space for 3-5 weeks of growth.
- 4″ Blocks: Used for long-season crops that need a longer head start, like large tomatoes, peppers, or perennial flowers. The larger soil volume supports the plant longer if weather delays transplanting.
- The Dibble: Most blockers have a central pin that creates a small indentation for the seed. For larger seeds like beans or squash, you can simply press the seed into the flat top of the block.
The Essential Soil Mix Recipe for Perfect Blocks
This is where many beginners stumble, but it’s the foundation of success. Standard bagged potting mix will not work. It lacks the specific structure needed to hold a block together.
Why Standard Potting Mix Fails
Commercial potting mixes are often too light and fluffy, relying on peat and perlite for aeration. When compressed in a blocker, they either crumble immediately or, if over-watered, turn into a dense, soggy brick that suffocates roots. A block mix needs the “wet cement” consistency—it must cohere under pressure but still be full of air pockets.
A Proven, Reliable Soil Block Recipe
After years of testing in our trial garden, this bulk recipe provides consistent, excellent results. It’s based on the classic “Fort Vee” formula used by many professional growers.
Yield: Makes approximately 2.5 cubic feet (enough for many blocks).
Ingredients (by volume):
* 3 parts Sphagnum Peat Moss or Coconut Coir: The base. Coir is a more sustainable, pH-neutral alternative to peat.
* 2 parts High-Quality, Fine-Screened Compost: Provides fertility and microbial life. It MUST be well-finished and sieved to remove sticks and chunks.
* 1 part Perlite: For crucial aeration and drainage.
* 1/2 part Garden Lime (if using peat): Peat moss is acidic. Lime balances the pH. Omit if using coir.
* 1/2 cup Base Organic Fertilizer Blend: A mix like 1 part blood meal (for nitrogen), 1 part colloidal phosphate or bone meal (for phosphorus), and 1 part greensand or kelp meal (for potassium/micronutrients).
Mixing Instructions:
1. Dry Mix: In a large tub or on a clean tarp, thoroughly combine the peat/coir, compost, and perlite.
2. Add Amendments: Sprinkle the lime (if using) and base fertilizer evenly over the pile and mix again.
3. Add Water Slowly: This is the critical step. Add warm water gradually while mixing with your hands or a hoe. Stop and test frequently.
4. The Moisture Test: Grab a handful of mix and squeeze it firmly. It should hold together in a tight ball, with a glistening appearance, and only a drop or two of water should be extractable. It should not crumble (too dry) and should not drip freely (too wet). Achieving this “wet cement” stage takes practice.
Sourcing Quality Ingredients and Pre-Mixed Alternatives
- For Coir/Peat: Look for brands like PRO-MIXأوCanna for consistent quality.
- For Compost: A high-quality, bagged compost like Coast of MaineأوMalibu Compost is reliable for beginners. Avoid cheap, woody composts.
- Pre-Mixed Alternative: If mixing your own feels daunting, several companies sell pre-bagged block mix. Fort Vee Mix (from Growers Supply) is the gold standard, but it’s often sold in large, commercial quantities.
Step-by-Step Guide: Using Your Machine Like a Pro
With your mix ready, it’s time to make blocks. Follow these steps for professional results.
Preparation: Mixing, Moistening, and Setup
- Final Mix Check: Ensure your mix passes the squeeze test. Let it sit for an hour after final watering; the moisture will equalize.
- Set Up Your Station: Have a large tub of your mix, your blocker, solid-bottom trays (no holes, or line a flat with newspaper), plant labels, and seeds all within reach. Work at a comfortable waist-high table.
The Forming Technique: Dipping, Compressing, and Ejecting
- Dip: Push the blocker straight down into the mix, ensuring all chambers are fully filled. Scrape the bottom against the edge of the tub to remove excess.
- ضغط: For hand-held models, press down firmly on a solid surface (like your work table) to compact the mix. You’ll feel resistance. For stand models, pull the lever with steady pressure.
- طرد: Lift and move to your tray. Press the plunger to release the blocks. They should eject cleanly and stand proud.
Troubleshooting:
* Blocks are crumbly: Mix is too dry. Add water sparingly and re-mix.
* Blocks slump or don’t eject cleanly: Mix is too wet. Add more dry ingredients (peat/coir, compost, perlite) to absorb excess moisture.
Seeding, Watering, and Germination Care
- Seeding: Place 1-2 seeds in the dibble hole. For fine seeds, no covering is needed. For larger seeds, pinch a tiny amount of mix over the hole.
- Initial Watering: Use a fine mist sprayer to gently moisten the top of the blocks. Avoid a heavy stream that will erode them.
- Bottom Watering (Going Forward): After the initial watering, always water by pouring water into the tray, allowing the blocks to wick it up from below. This encourages deep roots and preserves block integrity.
- Germination: Cover trays with a humidity dome until seeds sprout. Remove the dome immediately after germination to prevent damping-off disease. Provide strong light as soon as the first seed leaves (cotyledons) appear.
الأسئلة الشائعة (FAQ)
Q: Are soil block makers worth it for a small home garden?
أ: It depends on your priorities. If you value superior plant health, want to eliminate plastic waste, and hate transplant shock, then yes—even a small 2″ hand model is a fantastic, long-term investment. If you only start a dozen tomato plants each year, the convenience of a few plastic pots might outweigh the benefits for you.
Q: My blocks are falling apart. What am I doing wrong?
أ: 99% of the time, this is a moisture issue. Your mix is too dry. It must hold together when squeezed firmly. Go back to the moisture test. The other culprit can be chunky, unfinished compost. Ensure your compost is fine and soil-like.
Q: Can I use my own garden compost in the mix?
أ: You can, but with major caveats. It must be fully finished, cooled, screened through a ¼” mesh, and ideally pasteurized (by solarization or baking) to kill weed seeds and pathogens. For reliability in your first season, we strongly recommend using a high-quality, bagged compost.
Q: How do I transplant blocks into the garden?
أ: It’s the easiest part! Simply dig a hole slightly larger than the block and place the entire block inside. Bury it so the top of the block is just below the soil surface. Water it in. There is no root disturbance—you are literally giving the plant’s root system a head start in its new home.
Q: Where can I buy a reliable soil block maker?
أ: Purchase from reputable gardening and agricultural suppliers known for quality tools. We recommend Johnny’s Selected Seeds, Fedco Seeds, Growers SolutionأوPeaceful Valley Farm Supply. Be cautious of unknown, cheap brands on generic online marketplaces; they often have poor casting quality and wear out quickly.
خاتمة
Adopting a soil block making machine is more than just acquiring a new garden tool; it’s embracing a fundamentally better system for growing plants. It represents a shift towards intentional, sustainable horticulture that prioritizes root health, reduces waste, and saves money in the long run. The benefits—from the air-pruned, explosive root systems to the elimination of plastic trays—are not just theoretical; they are visibly apparent in the vigor of your transplants.
Start your journey by choosing a simple hand-held model and mixing a batch of the proven soil recipe. The learning curve is short, and the rewards are immediate. You’ll be investing not only in the success of your garden but also in a practice that respects the environment. In a world of quick fixes and disposable goods, the soil block maker stands as a testament to the power of simple, smart design for a more resilient garden.
<