
토양 블록 제작 기계 완벽 가이드: 씨앗 발아 성공률 높이기
소개
상상해 보세요: 초봄인데, 여러분은 플라스틱의 바다에 둘러싸여 있습니다. 얇은 모종 트레이, 금 간 화분, 그리고 매립지로 향할 운명의 셀 팩 더미가 있습니다. 정성껏 모종을 옮겨 심지만, 이식 충격으로 시들고 성장이 멈추는 것을 지켜볼 뿐입니다. 비용은 계속 쌓이고, 낭비되는 느낌에 마음이 불편하며, 결과는 종종 실망스럽습니다. 이 순환이 익숙하게 느껴진다면, 여러분만 그런 것이 아닙니다. 수십 년 동안 이것이 표준이었지만, 더 나은 방법이 있습니다.
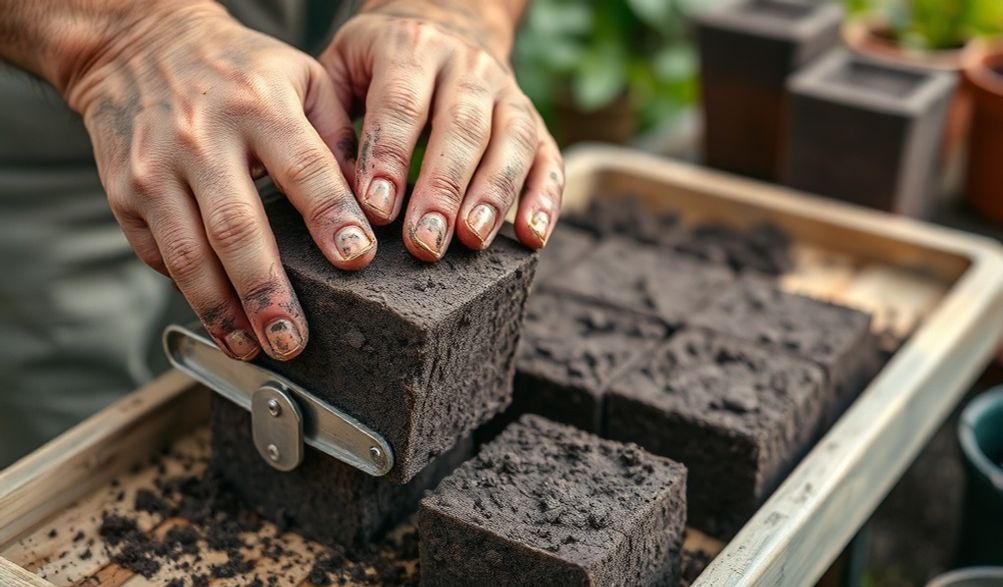
토양 블록 제작기: 가정 정원사부터 상업 재배자까지 모두를 위한 파종 방식을 혁신하고 있는 독창적이고 거의 플라스틱을 사용하지 않는 도구입니다. 특수 포팅 믹스를 단단하고 독립된 큐브로 압축함으로써, 이 간단한 장치는 용기를 완전히 없애고 놀라울 정도로 튼튼한 뿌리 시스템과 원활한 이식을 가능하게 합니다. 이는 당신이 찾아왔던 지속 가능하고 효율적인 비밀 무기입니다.
이 포괄적인 가이드는 당신이 흙 블록 기술을 완벽히 익히도록 안내하는 로드맵입니다. 우리는 흙 블록이 어떻게 작동하는지, 왜 더 우수한지, 그리고 전문가처럼 기계를 선택하고 사용하는 방법에 대해 깊이 파고들 것입니다. 시장 원예에서의 수년간의 실전 경험과 상업적 원예 관행에 대한 광범위한 연구를 바탕으로, 이 가이드는 당신의 정원에서 새로운 수준의 성공을 열어주면서 시간, 비용, 좌절감을 절약하도록 설계되었습니다.
토양 블록 제작 기계란 무엇인가요?
흙 블록 메이커의 핵심은 아름답고 단순한 도구라는 점입니다. 이는 일반 정원용 손삽이나 심는 막대를 넘어, 하나의 특정한 변혁적 목적을 위해 설계된 도구입니다.
핵심 개념: 용기 없이 씨앗 발아시키기
토양 블록 메이커는 손으로 들거나 스탠드에 고정하여 사용하는 프레스로, 특수하게 배합된 축축한 포팅 믹스를 독립적으로 서는 큐브로 압축합니다. 이 큐브들은 주변의 플라스틱 화분, 트레이 또는 셀 없이도 형태를 유지합니다. 간단히 도구를 믹스에 눌러 넣고, 블록을 평평한 표면에 배출한 후, 미리 만들어진 오목한 부분(디블이라고 함)에 씨앗을 놓으면 됩니다. 블록 자체가 용기가 되어 발아와 초기 생장을 위한 완벽한 미세 환경을 조성합니다. 이 과정은 토양 구조와 뿌리 건강을 최우선에 두어 묘목 번식 방식을 근본적으로 재고하게 합니다.
간략한 역사: 유럽의 시장 정원에서 현대의 홈스테드까지
흙 블로커는 새로운 트렌드처럼 보일 수 있지만, 실용적이고 대규모 농업에 그 뿌리를 두고 있습니다. 특히 프랑스와 네덜란드의 유럽 시장 농원에서 선구적으로 도입되었는데, 이곳에서는 상업적 생존 가능성을 위해 효율성, 식물 건강, 비용 관리가 최우선 과제였습니다. 재배자들은 더 우수한 모종을 더 빠르고 적은 투입 비용으로 생산할 수 있는 시스템이 필요했습니다.
이 철학과 도구는 이후 대서양을 건너 북미의 유기농 농부들, 시장 정원사들, 생태 의식이 높은 홈스테더들 사이에서 열렬한 지지를 얻었습니다. 오늘날 이는 뒷마당 애호가부터 전문 생산자에 이르기까지 모두에게 이익이 되는 저폐기물, 고효율 재배 방식으로의 전환을 상징합니다.
토양 블록 메이커 사용의 주요 이점
플라스틱 트레이가 그렇게 쉽게 구할 수 있는데 왜 "귀찮게" 직접 블록을 만드는 걸까요? 그 이점은 식물 생리학, 경제성, 그리고 환경 윤리에까지 미치는 깊은 의미를 지닙니다.
더 건강하고 튼튼한 식물: 공기 가지치기의 장점
이것이 가장 중요한 장점입니다. 플라스틱 화분에서는 뿌리가 벽에 닿을 때까지 자라다가, 그 후에는 용기 주위를 돌기 시작합니다. 이로 인해 뿌리 포트에 갇힌 식물이 이식 후 정착하는 데 어려움을 겪게 됩니다.
- 에어 프루닝:토양 블록 안에서 뿌리는 블록의 노출된 가장자리까지 자랍니다. 공기와 접촉하면 뿌리 끝이 자연스럽게 탈수되어 성장을 멈추는데, 이를 "에어 프루닝(air-pruning)"이라고 합니다. 이는 식물에게 더 많은 측근을 내보내라는 신호를 보내는 역할을 합니다.뒤에그 팁의 결과는 조밀하고 섬유질이 많으며 폭발적인 뿌리 시스템입니다.내부블록은 전혀 돌지 않습니다.
- 이식 충격 감소심을 때는 통째로 블록을 땅에 심습니다. 뿌리는 적응 기간 없이 바로 주변 토양으로 폭발적으로 뻗어나갑니다. 이식 충격이 거의 없거나 전혀 없어 식물이 더 빨리 자라고 수확 시기도 앞당겨집니다.
Sustainability and Cost-Effectiveness
The financial and environmental savings are substantial and compound over time.
- Drastically Reduce Plastic Waste: Imagine never buying another plastic seedling tray, cell pack, or pot. For a commercial grower starting tens of thousands of plants, this is a massive reduction in annual waste. For the home gardener, it aligns gardening with a sustainable lifestyle.
- 장기 저축 While there’s an upfront cost for a quality blocker, it’s a one-time purchase. You eliminate the recurring expense of disposable containers. The soil mix ingredients (peat, coir, compost) are often more economical in bulk than buying bagged potting soil year after year.
Efficiency and Space Optimization
Soil blocks streamline your workflow and maximize valuable growing space.
- Tight Packing: Blocks can be placed shoulder-to-shoulder on a standard tray or even a wooden board. There are no wasted gaps between round pots, allowing you to fit significantly more seedlings under a single grow light or in a germination chamber.
- Workflow Speed: With practice, making blocks becomes a rapid, rhythmic process. For large-scale seeding, multi-block machines allow a single person to produce hundreds of uniform blocks per hour.
Types of Soil Block Makers: Choosing Your Tool
Not all soil blockers are created equal. Your choice depends on your scale, budget, and physical preference.
Hand-Held Blockers: For the Home Gardener
These are the most common entry point. They are simple, affordable, and effective.
- 예시:그Johnny’s Selected 4″ Soil Blocker or the 2″ model are industry standards.
- 장점:
- Low cost and easy to store.
- Perfect for starting a few hundred plants per season.
- Simple mechanics with no moving parts to break.
- 단점:
- Requires more physical effort (pressing into the mix).
- Slower for producing very large quantities.
Stand-Mounted and Multi-Block Machines: For Market Gardeners & Farmers
When volume is key, these ergonomic, lever-operated tools are worth the investment.
- 예시:그EarthWay Commercial Stand-Up Blocker or the Pro-Soil Blocker.
- 장점:
- Can make 4, 5, or even 12 blocks with a single press of a lever.
- Much easier on the wrists and back for high-volume work.
- Produce incredibly consistent blocks.
- 단점:
- Significant upfront cost.
- Requires more storage space.
- Can be overkill for a small backyard garden.
Block Size and Shape: ¾”, 2″, 4″, and Mini Blocks
Size matters. Different blockers produce different cube dimensions for specific uses.
- ¾” or “Mini” Blocks: Ideal for quick-germinating, small plants like lettuce, brassicas (kale, cabbage), and herbs. They are transplanted very young.
- 2″ Blocks: The workhorse size. Perfect for most common vegetables: tomatoes, peppers, eggplants, cucumbers, and flowers. They provide enough root space for 3-5 weeks of growth.
- 4″ Blocks: Used for long-season crops that need a longer head start, like large tomatoes, peppers, or perennial flowers. The larger soil volume supports the plant longer if weather delays transplanting.
- The Dibble: Most blockers have a central pin that creates a small indentation for the seed. For larger seeds like beans or squash, you can simply press the seed into the flat top of the block.
The Essential Soil Mix Recipe for Perfect Blocks
This is where many beginners stumble, but it’s the foundation of success. Standard bagged potting mix will not work. It lacks the specific structure needed to hold a block together.
Why Standard Potting Mix Fails
Commercial potting mixes are often too light and fluffy, relying on peat and perlite for aeration. When compressed in a blocker, they either crumble immediately or, if over-watered, turn into a dense, soggy brick that suffocates roots. A block mix needs the “wet cement” consistency—it must cohere under pressure but still be full of air pockets.
A Proven, Reliable Soil Block Recipe
After years of testing in our trial garden, this bulk recipe provides consistent, excellent results. It’s based on the classic “Fort Vee” formula used by many professional growers.
Yield: Makes approximately 2.5 cubic feet (enough for many blocks).
Ingredients (by volume):
* 3 parts Sphagnum Peat Moss or Coconut Coir: The base. Coir is a more sustainable, pH-neutral alternative to peat.
* 2 parts High-Quality, Fine-Screened Compost: Provides fertility and microbial life. It MUST be well-finished and sieved to remove sticks and chunks.
* 1 part Perlite: For crucial aeration and drainage.
* 1/2 part Garden Lime (if using peat): Peat moss is acidic. Lime balances the pH. Omit if using coir.
* 1/2 cup Base Organic Fertilizer Blend: A mix like 1 part blood meal (for nitrogen), 1 part colloidal phosphate or bone meal (for phosphorus), and 1 part greensand or kelp meal (for potassium/micronutrients).
Mixing Instructions:
1. Dry Mix: In a large tub or on a clean tarp, thoroughly combine the peat/coir, compost, and perlite.
2. Add Amendments: Sprinkle the lime (if using) and base fertilizer evenly over the pile and mix again.
3. Add Water Slowly: This is the critical step. Add warm water gradually while mixing with your hands or a hoe. Stop and test frequently.
4. The Moisture Test: Grab a handful of mix and squeeze it firmly. It should hold together in a tight ball, with a glistening appearance, and only a drop or two of water should be extractable. It should not crumble (too dry) and should not drip freely (too wet). Achieving this “wet cement” stage takes practice.
Sourcing Quality Ingredients and Pre-Mixed Alternatives
- For Coir/Peat: Look for brands like PRO-MIX또는Canna for consistent quality.
- For Compost: A high-quality, bagged compost like Coast of Maine또는Malibu Compost is reliable for beginners. Avoid cheap, woody composts.
- Pre-Mixed Alternative: If mixing your own feels daunting, several companies sell pre-bagged block mix. Fort Vee Mix (from Growers Supply) is the gold standard, but it’s often sold in large, commercial quantities.
Step-by-Step Guide: Using Your Machine Like a Pro
With your mix ready, it’s time to make blocks. Follow these steps for professional results.
Preparation: Mixing, Moistening, and Setup
- Final Mix Check: Ensure your mix passes the squeeze test. Let it sit for an hour after final watering; the moisture will equalize.
- Set Up Your Station: Have a large tub of your mix, your blocker, solid-bottom trays (no holes, or line a flat with newspaper), plant labels, and seeds all within reach. Work at a comfortable waist-high table.
The Forming Technique: Dipping, Compressing, and Ejecting
- Dip: Push the blocker straight down into the mix, ensuring all chambers are fully filled. Scrape the bottom against the edge of the tub to remove excess.
- 압축: For hand-held models, press down firmly on a solid surface (like your work table) to compact the mix. You’ll feel resistance. For stand models, pull the lever with steady pressure.
- 이젝트: Lift and move to your tray. Press the plunger to release the blocks. They should eject cleanly and stand proud.
Troubleshooting:
* Blocks are crumbly: Mix is too dry. Add water sparingly and re-mix.
* Blocks slump or don’t eject cleanly: Mix is too wet. Add more dry ingredients (peat/coir, compost, perlite) to absorb excess moisture.
Seeding, Watering, and Germination Care
- Seeding: Place 1-2 seeds in the dibble hole. For fine seeds, no covering is needed. For larger seeds, pinch a tiny amount of mix over the hole.
- Initial Watering: Use a fine mist sprayer to gently moisten the top of the blocks. Avoid a heavy stream that will erode them.
- Bottom Watering (Going Forward): After the initial watering, always water by pouring water into the tray, allowing the blocks to wick it up from below. This encourages deep roots and preserves block integrity.
- Germination: Cover trays with a humidity dome until seeds sprout. Remove the dome immediately after germination to prevent damping-off disease. Provide strong light as soon as the first seed leaves (cotyledons) appear.
자주 묻는 질문 (FAQ)
Q: Are soil block makers worth it for a small home garden?
A: It depends on your priorities. If you value superior plant health, want to eliminate plastic waste, and hate transplant shock, then yes—even a small 2″ hand model is a fantastic, long-term investment. If you only start a dozen tomato plants each year, the convenience of a few plastic pots might outweigh the benefits for you.
Q: My blocks are falling apart. What am I doing wrong?
A: 99% of the time, this is a moisture issue. Your mix is too dry. It must hold together when squeezed firmly. Go back to the moisture test. The other culprit can be chunky, unfinished compost. Ensure your compost is fine and soil-like.
Q: Can I use my own garden compost in the mix?
A: You can, but with major caveats. It must be fully finished, cooled, screened through a ¼” mesh, and ideally pasteurized (by solarization or baking) to kill weed seeds and pathogens. For reliability in your first season, we strongly recommend using a high-quality, bagged compost.
Q: How do I transplant blocks into the garden?
A: It’s the easiest part! Simply dig a hole slightly larger than the block and place the entire block inside. Bury it so the top of the block is just below the soil surface. Water it in. There is no root disturbance—you are literally giving the plant’s root system a head start in its new home.
Q: Where can I buy a reliable soil block maker?
A: Purchase from reputable gardening and agricultural suppliers known for quality tools. We recommend Johnny’s Selected Seeds, Fedco Seeds, Growers Solution또는Peaceful Valley Farm Supply. Be cautious of unknown, cheap brands on generic online marketplaces; they often have poor casting quality and wear out quickly.
결론
Adopting a soil block making machine is more than just acquiring a new garden tool; it’s embracing a fundamentally better system for growing plants. It represents a shift towards intentional, sustainable horticulture that prioritizes root health, reduces waste, and saves money in the long run. The benefits—from the air-pruned, explosive root systems to the elimination of plastic trays—are not just theoretical; they are visibly apparent in the vigor of your transplants.
Start your journey by choosing a simple hand-held model and mixing a batch of the proven soil recipe. The learning curve is short, and the rewards are immediate. You’ll be investing not only in the success of your garden but also in a practice that respects the environment. In a world of quick fixes and disposable goods, the soil block maker stands as a testament to the power of simple, smart design for a more resilient garden.
<